Affiliate Disclosure: This post may include affiliate links. If you click and make a purchase, I may earn a small commission at no extra cost to you.
The most common reasons why your SSD is slow include SSD wear over time, lack of TRIM support, insufficient free space, connection or interface issues, firmware problems, thermal throttling, and malware.
Identifying the issue can be really helpful in fixing the problem quickly. However, it isn’t as easy as saying. We can start by checking the available free space, adjusting power management settings, ensuring the correct port, verifying SSD temperatures, and so on. We can also scan the system for malware.
The typical sign of degraded SSD performance is slow system booting. You can also check the read/write speeds to confirm. However, I will give the best method to check your SSD’s performance through a benchmarking tool.
This detailed guide will cover all these aspects to improve your SSD performance most effectively. So, let’s get started.
How do we confirm that the SSD performance is down?
Slow booting time is the first sign, as I said. Longer application loading times, slow file transfers, and ‘Not Responding’ errors in Windows are some other common signs of degraded SSD performance. But you can also use a benchmarking tool to confirm if the problem is real.
- Open the software, keep all the settings as it is, and hit All
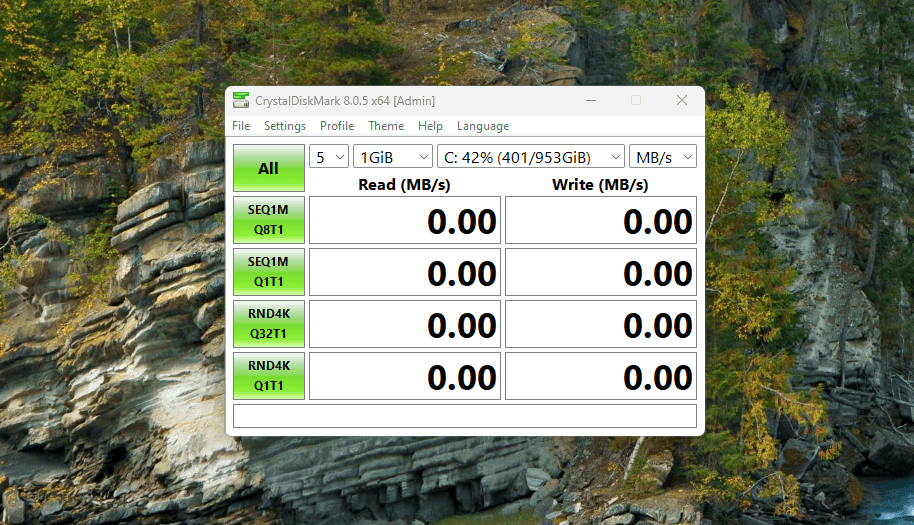
- The benchmark will run for a while and present you with the results.
- You can now compare the results with the advertised speed on the official website or any other reliable online review. For random performance, get the results in IOPS and compare them. If you don’t find the advertised speed, search for the specs on TechPowerUp.
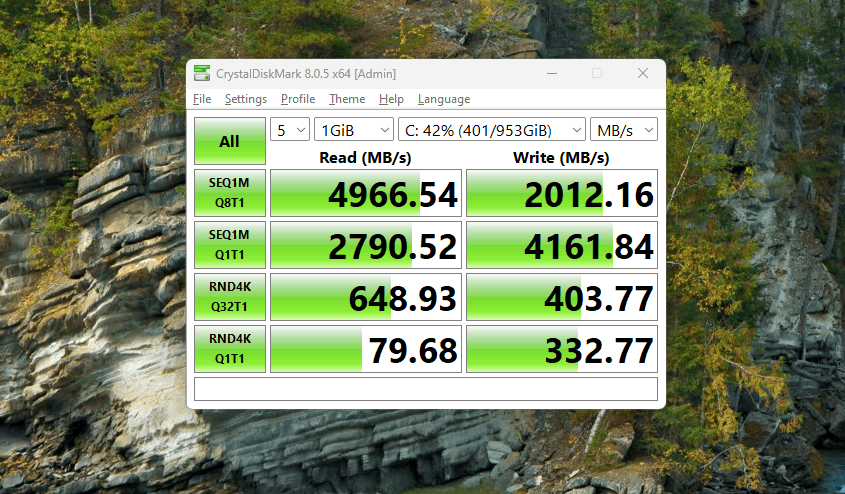
- If the benchmarks are way off, there are surely some things to fix. Remember that these benchmark results will also depend on your system specifications. However, it is easy to find anomalies.
10 Ways to Fix a Slow SSD and Increase Read/Write Performance
Before starting, ensure you understand what your system can deliver. In most cases, people expect too much from their SSD, especially when they upgrade to a new one. SSDs are not a magical potion to empower your weak components with special energy. It is simply faster storage that eliminates storage bottlenecks and ensures the CPU doesn’t have to wait for the data it requires to function.
Additionally, I assume you have at least 25% of your SSD space available (SSDs tend to become slower after around 75% of storage is filled). Secondly, before installing the SSD and OS inside it, you must have selected the AHCI mode in your motherboard BIOS. The third requirement is the right formatting. You should format your drive in GPT.
1. Update SSD Firmware
SSD Firmware acts as a mediator between the SSD components, such as NAND Flash, Controller, DRAM, and the operating system. The firmware is a software component that has its own ROM chip on the SSD. It handles various essential tasks, including data read/write management, wear leveling, power management, and garbage collection, among others. Manufacturers continually release new firmware updates to enhance their drives and incorporate improved algorithms. Your SSD may have an outdated firmware that is causing all the performance issues.
It is easy to upgrade your drive’s firmware using the dedicated software for your drive. I would recommend not using any third-party tools unless your manufacturer doesn’t provide its software. Here is a table with links to all this software.
| Brand | Firmware Update Tool | Download Link |
|---|---|---|
| Samsung | Samsung Magician | Samsung Magician |
| Crucial | Crucial Storage Executive | Crucial Storage Executive |
| Western Digital | Western Digital Dashboard | Western Digital Dashboard |
| SanDisk | SanDisk SSD Dashboard | Sandisk SSD Plus |
| Intel | Intel Memory and Storage Tool (MAS) | Intel MAS |
| Kingston | Kingston SSD Manager | Kingston SSD Manager |
| Seagate | Seagate SeaTools | Seagate SeaTools |
| Toshiba/Kioxia | Kioxia SSD Utility | Kioxia SSD Utility |
| ADATA | ADATA SSD Toolbox | ADATA SSD Toolbox |
| Corsair | Corsair SSD Toolbox | Corsair SSD Toolbox |
| Plextor | Plextool | Plextool Download |
2. Enable TRIM
SSDs do not immediately erase data when it is deleted. It keeps it there due to the limitations of how SSDs are designed to function. However, TRIM is an algorithm that operates in the background in conjunction with garbage collection. Garbage collection is the algorithm that cleans the invalid space in SSDs. TRIM just makes it efficient by locating these invalid data locations on the NAND Flash. Without TRIM, the SSD can accumulate a large number of invalid blocks, which can occupy unnecessary space and cause your SSD to slow down.
Not all SSDs come with the TRIM feature, but if your drive does, you should keep it enabled. Here is the process of doing so.
Enabling trim in Windows
Check if TRIM is enabled:
- Open Command Prompt as an administrator.
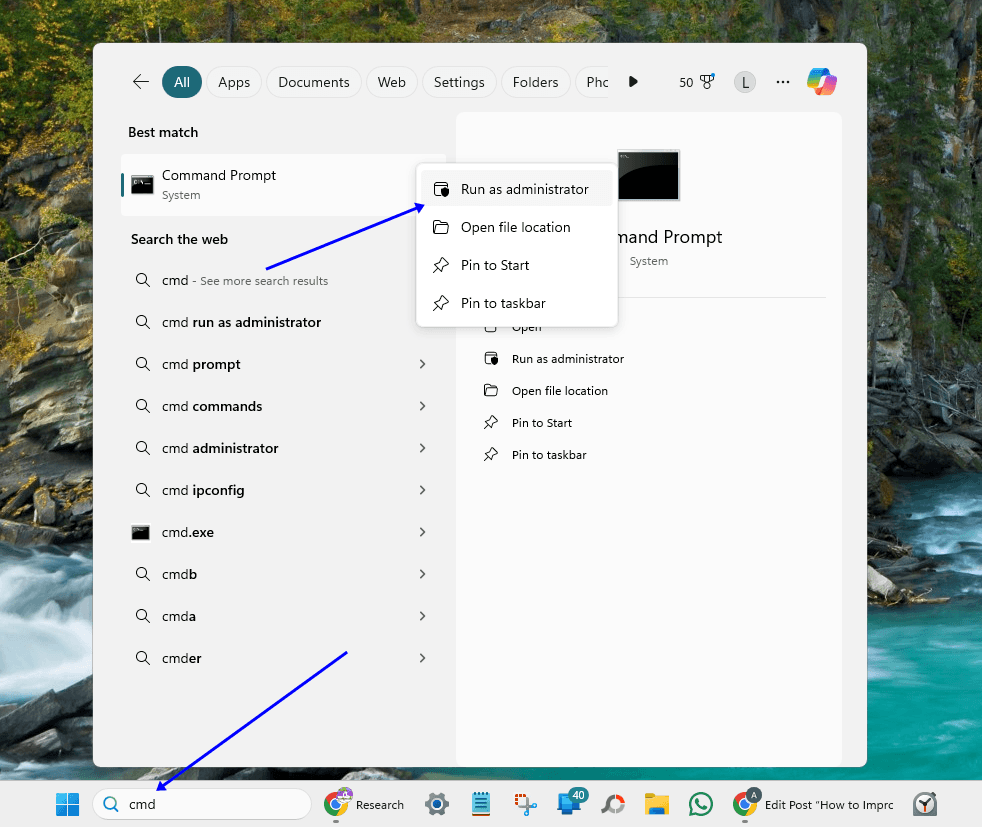
- Type fsutil behavior query DisableDeleteNotify and press Enter.
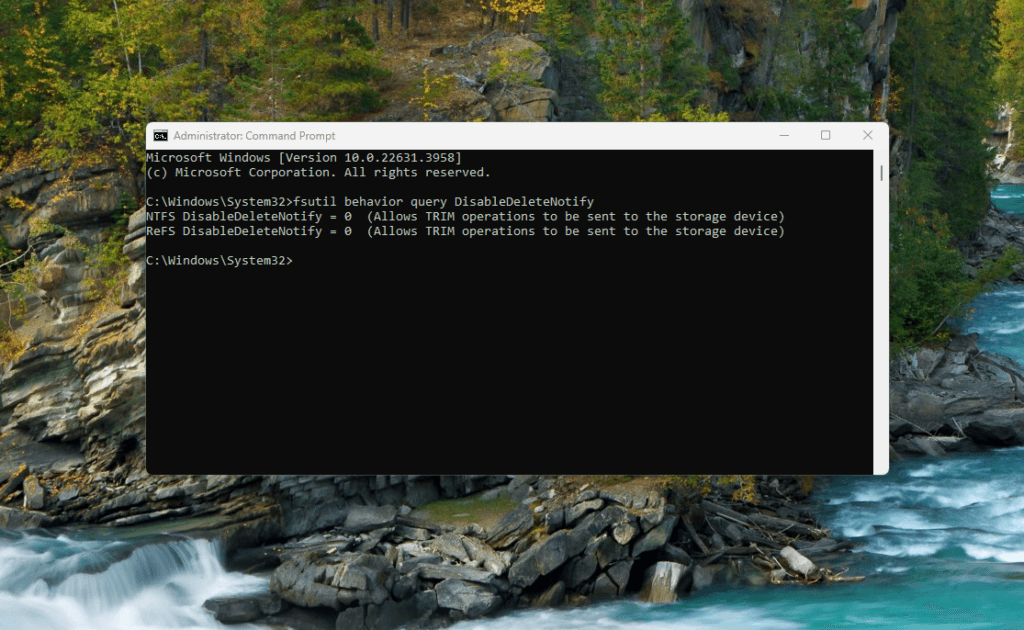
- If the result is DisableDeleteNotify = 0 , TRIM is enabled. If it is 1, TRIM is disabled.
Enable TRIM:
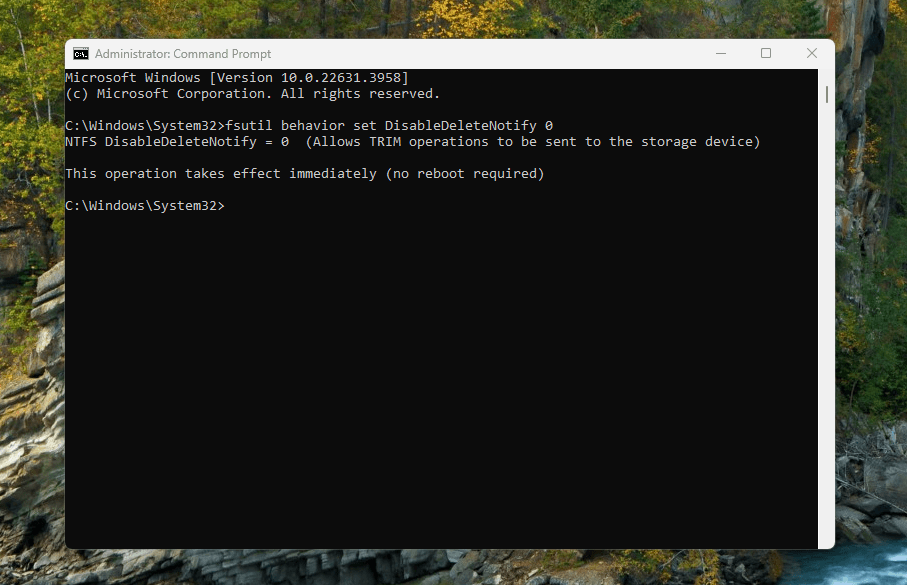
- If TRIM is disabled, you can enable it by typing fsutil behavior set DisableDeleteNotify 0 in the Command Prompt and pressing Enter.
Enabling TRIM in macOS
- Check if TRIM is enabled:
- macOS usually enables TRIM for Apple SSDs by default. For third-party SSDs, you may need to enable it manually.
- Enable TRIM:
- Open Terminal.
- Type sudo trimforce enable and press Enter.
- Follow the on-screen prompts and restart your Mac.

Enabling TRIM in Linux
In Linux, you can enable TRIM by using periodic TRIM (recommended). Using periodic TRIM enables the TRIM command to run automatically once a week via the fstream command through the system interface. To check if TRIM is enabled in Linux, Open a terminal and run the following command:
sudo fstrim -v /

If the command is executed successfully, showing you how much space was trimmed, TRIM is working. If you do, you’ll see a warning message like the one I get in my system. To enable TRIM, open the terminal and run the following code.
sudo systemctl enable fstrim.timer
sudo systemctl start fstrim.timer

3. Disable Disk Defragmenter and Enable Drive Optimizer
Disk Defragmenter is a Windows process for hard drives to make the data stored in distant locations on the hard disk closer. This is extremely helpful in moving discs because the space between two data locations matters a lot. But, because neither SSDs have moving parts nor do they work with spinning disks, there is no need to enable disk defragmentation on Windows.
In the case of SSDs, defragmentation causes frequent and unnecessary data movements in different blocks. This results in more wear of NAND Flash over time. Also, because SSDs work with electric current and have higher random performance, there is no performance benefit of keeping the data together.
Notably, modern operating systems recognize that SSDs don’t require defragmentation and automatically disable this feature. Instead, the TRIM command is turned on. Additionally, there is a beneficial feature for SSDs called Drive Optimization, which you should enable. Primarily, this optimization involves the frequent use of the TRIM command. It increases both the performance and lifespan of your SSD.
Disable Scheduled SSD Defragmentation and enable Optimization in Windows:
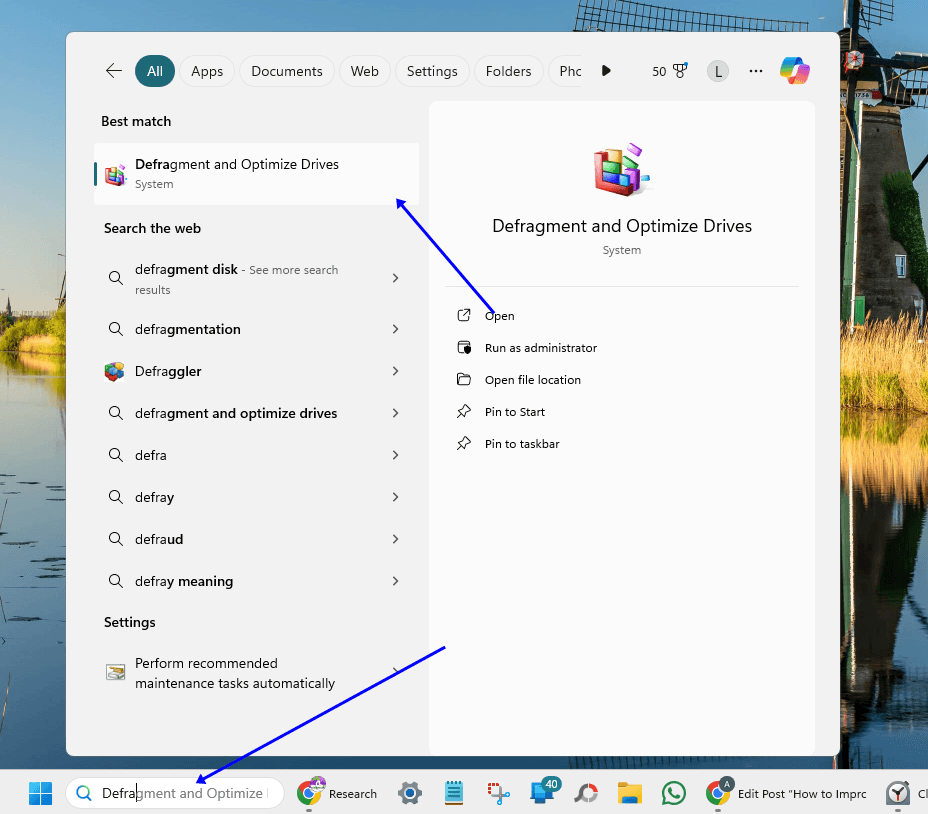
- Open the Start Menu and type “Defragment and Optimize Drives”.
- Select the “Defragment and Optimize Drives” tool.
- In the window that opens, select your SSD from the list of drives.
- Click “Change settings” to adjust the schedule.
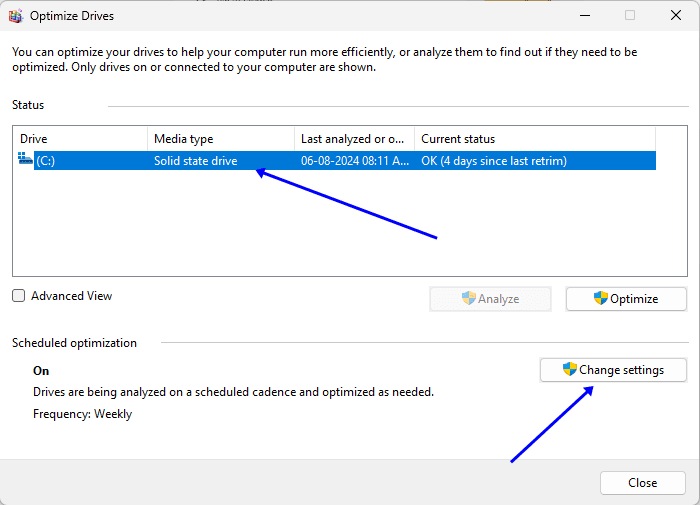
- Make sure the Optimization schedule is turned on and set at an appropriate frequency. Weekly optimization is recommended, but you can change it as per your usage.
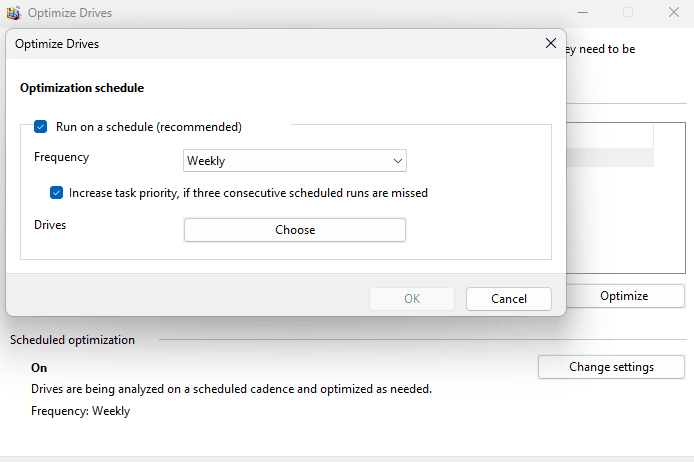
- Click “OK” to save changes.
Windows 8 and later versions automatically detect SSDs and perform only the TRIM operation instead of defragmentation. However, to be certain, you can manually disable the defragmentation and turn on optimization for your SSD, as described above.
4. Disable Windows Search/Indexing Services
Windows generally keeps an index of all the stored files on the computer to improve searching. This feature can be really helpful if you work with multiple small files in your everyday use. However, if you are a normal user who doesn’t generally use the search feature of Windows, you can turn this feature off.
Disabling this feature will reduce the overall writes to your drive and also reduce the background load on the drive. Additionally, since SSDs already have faster file access times, this feature makes virtually no contribution. The method to disable it is as follows.
- Open File Explorer.
- Right-click on the SSD drive (usually C:), and select Properties.
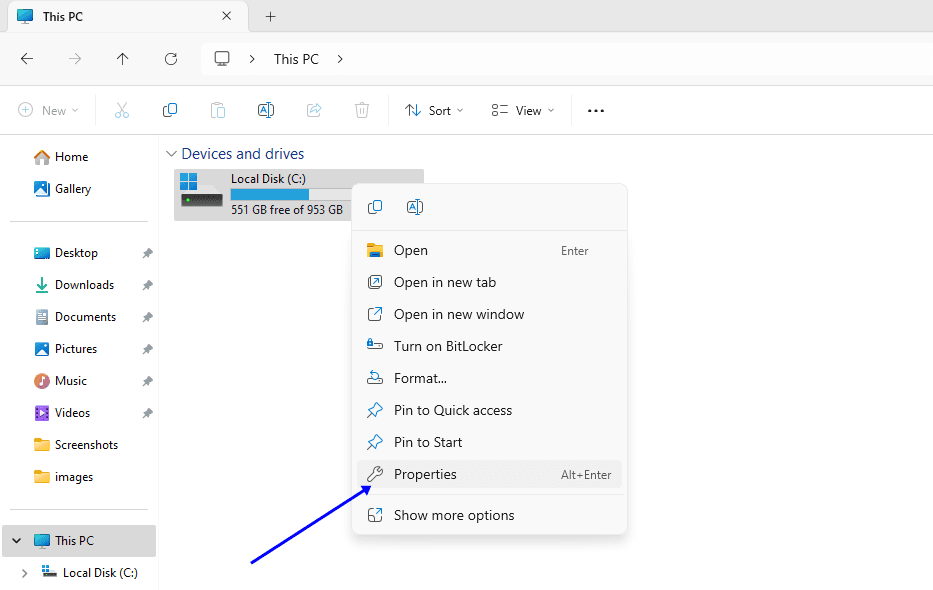
- In the General tab, uncheck the box labeled “Allow files on this drive to have contents indexed in addition to file properties”.

- Click OK. You may be prompted to apply the changes to all files and subfolders; choose your preferred option.
Keep in mind that some applications that rely on Windows Search might not function as efficiently, and features like searching for file contents within Windows may be slower.
5. Enable Write Caching
SSD write speed is generally slower than the read speed. This is because the writing process inside the NAND Flash memory is much more complex than just reading. To temporarily boost write speed by decreasing overhead is called write caching. Generally, a small amount of DRAM is utilized for caching purposes. In some drives, a faster variant of NAND Flash may be in place.
The size of the write cache is significant here. If the write file/files are huge, it can fill up the total write cache memory, and then you will get the actual write speed offered by the NAND Flash memory.
Enabling SSD Write Caching in Windows
- In the Windows search bar, search and go to Device Manager.
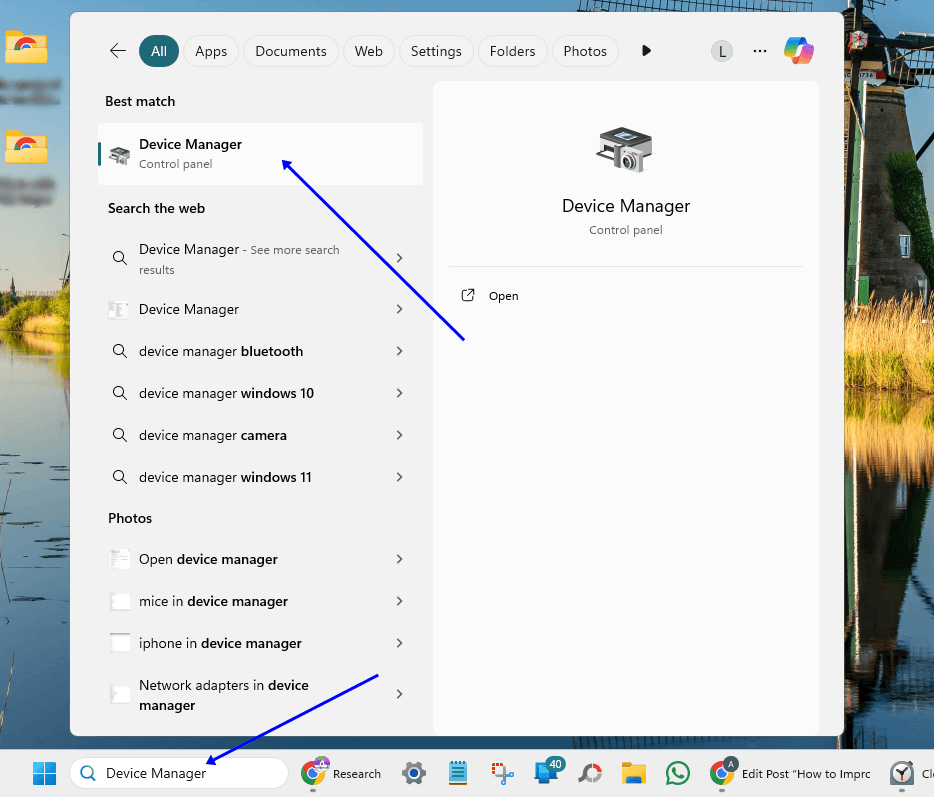
- Expand Disk drives, right-click on your SSD, and select Properties.
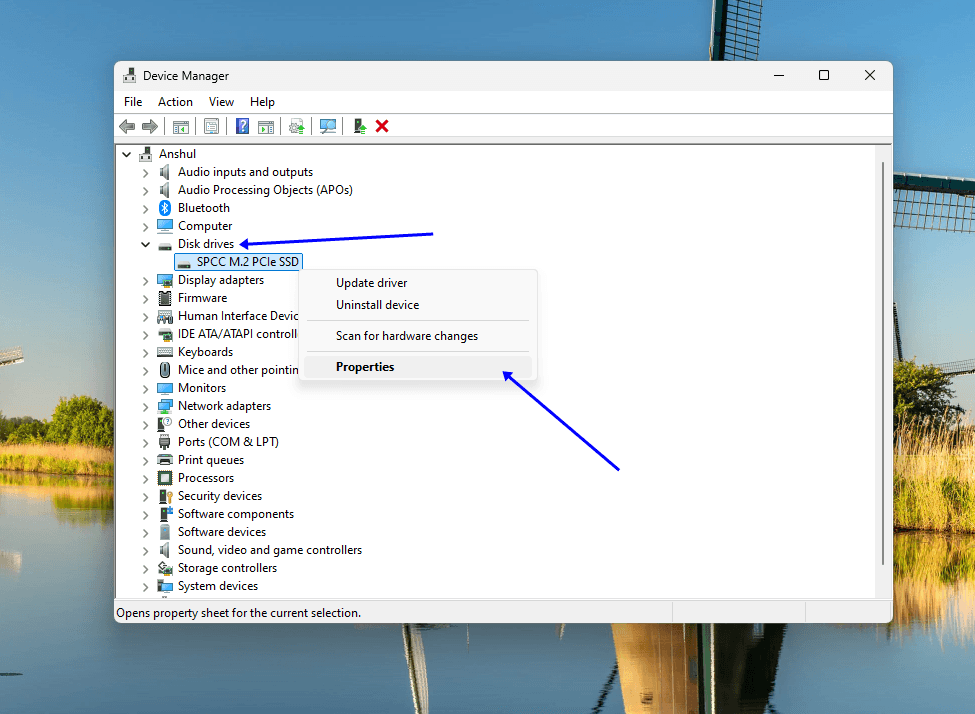
- Go to the Policies tab.
- Check the box next to “Enable write caching on the device”.
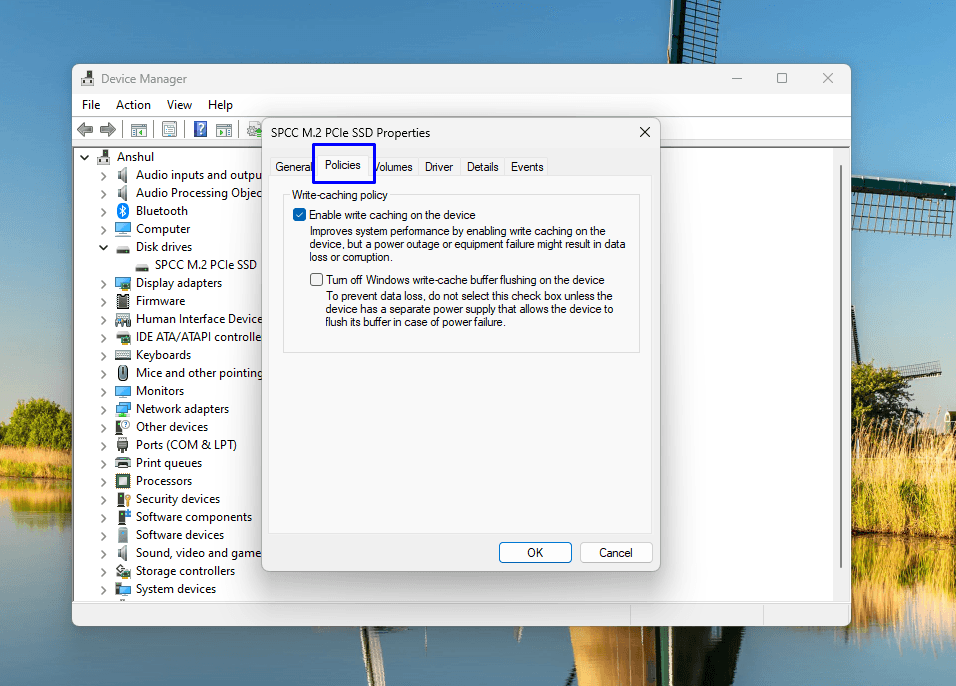
Do not turn off write cache buffer flushing if your system doesn’t have a UPS. If it turns off while the drive is working, you can end up losing all its data.
- Click OK to apply the settings.
In macOS, the write cache is always enabled by default.
In Linux, write caching can be controlled using the hdparm utility: “sudo hdparm -W1 /dev/sdX“. Replace /dev/sdX with your SSD’s device identifier.
6. Make the best use of Power Settings
Power settings in Windows help us change settings that can impact the performance massively. These settings are particularly important when working with laptops to conserve battery life. However, on desktops, you should make the best use of the abundant power coming to your system. Below are some settings to perform.
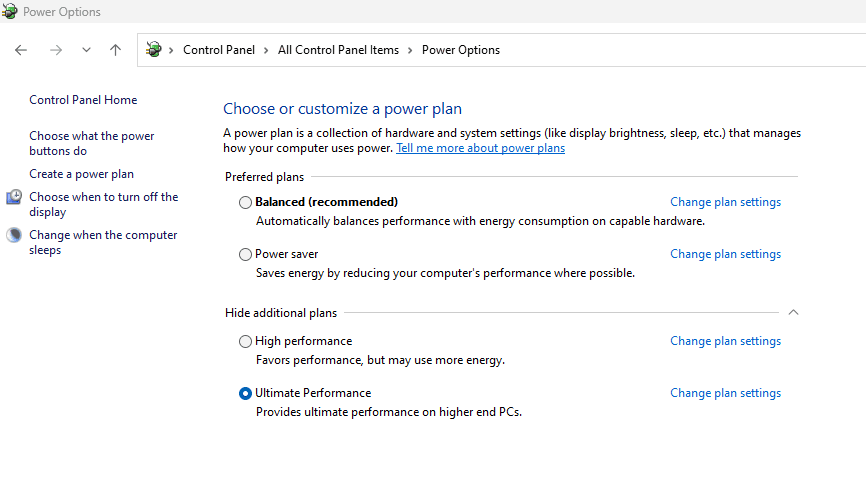
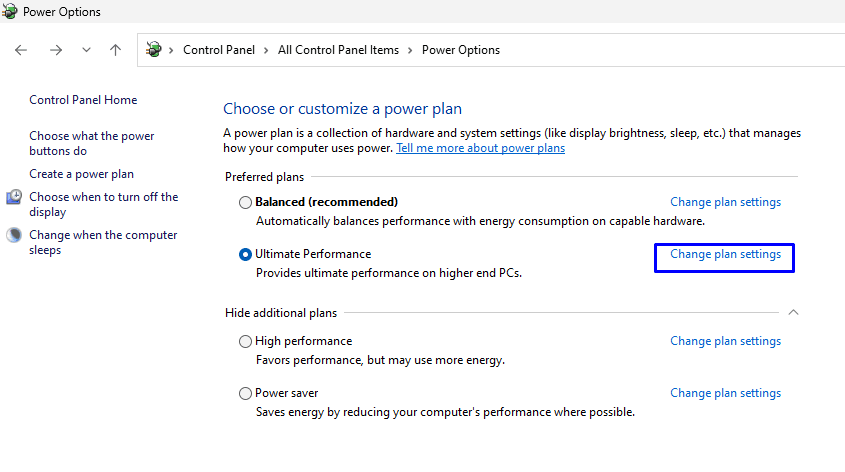
Change Power Plan to High Performance
- Go to the Windows search bar and search for Control Panel.
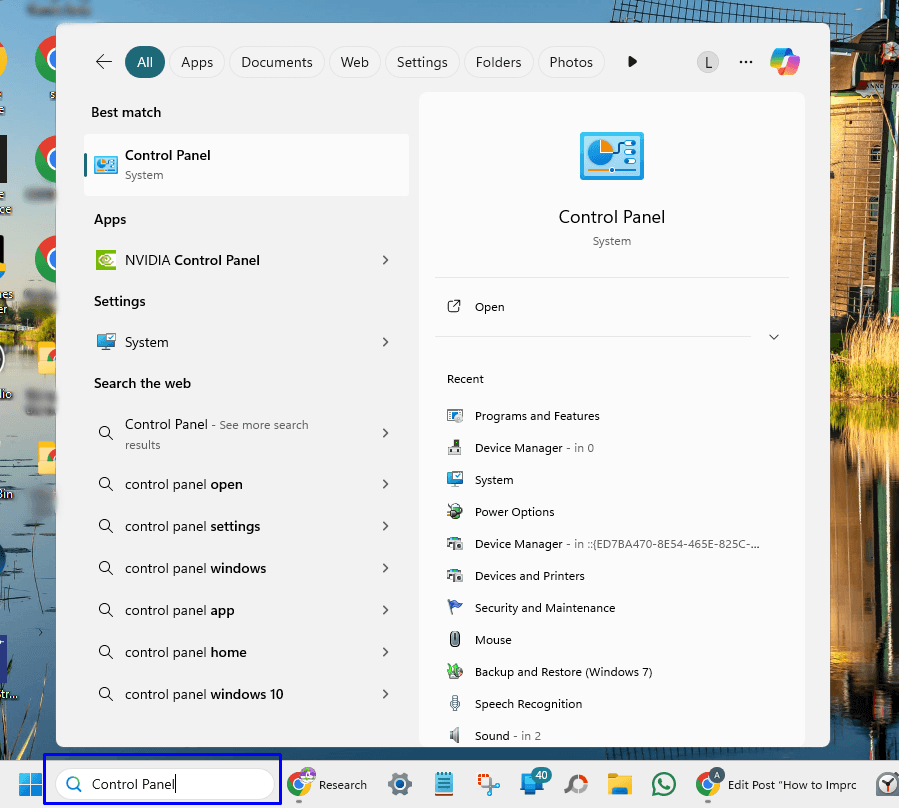
- Inside the Control Panel, click Power Options

- Select the High-Performance option. On the high-end computer, you can also get to see the Ultimate Performance option.
Disable low-power states for PCIe lanes
Power saving enabled on the PCIe lanes can result in slower SSDs. Here is how you can turn this setting off.
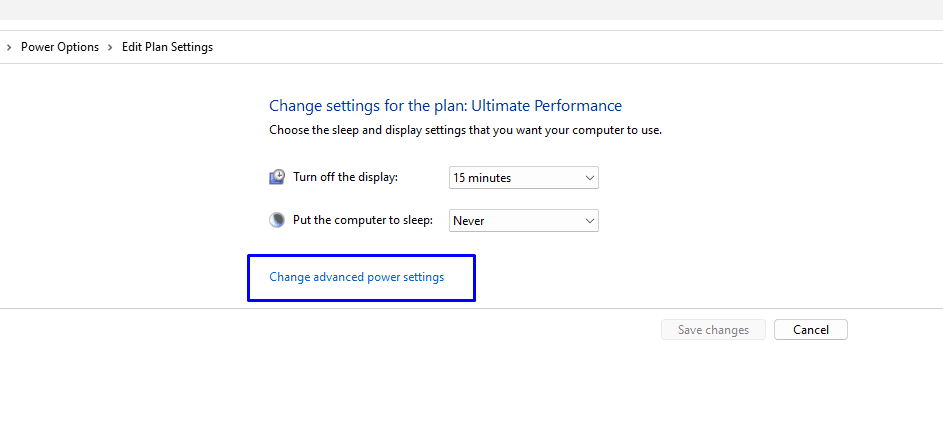
- In the place where you change your power plan, click plan settings in the same menu for your selected power plan.
2. On the next page, click Change Advanced Plan settings
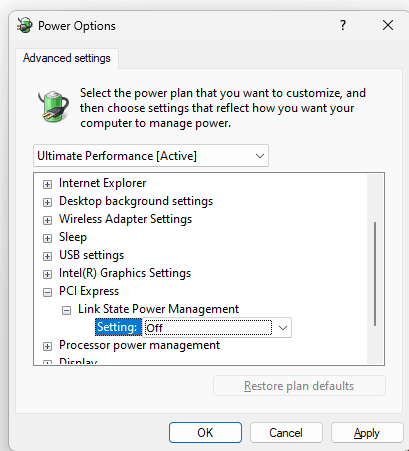
3. Now, find the PCIe Express and inside the option Link State Power Management. Make sure the settings are off.
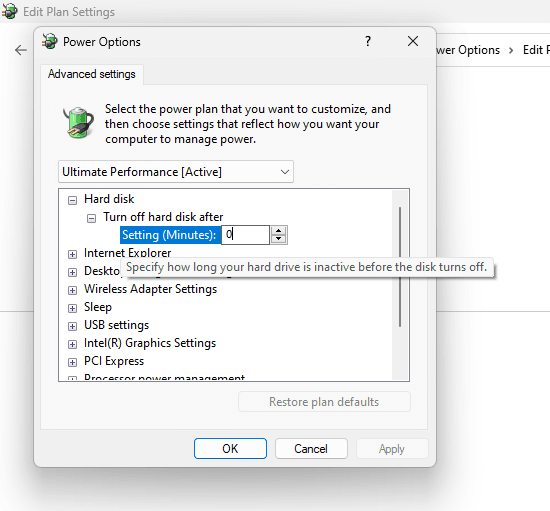
Change Hard Drive Power Settings
In the same advanced settings menu, find the Hard Disk. Make sure you select 0 seconds after which the hard disk will turn itself off.
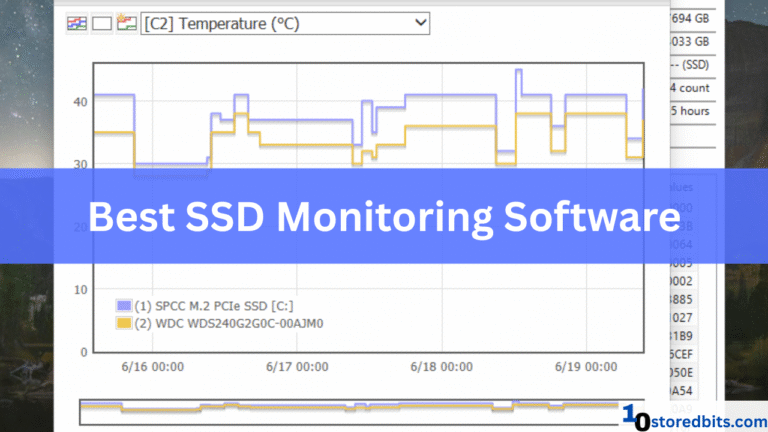
7. Managing Heat
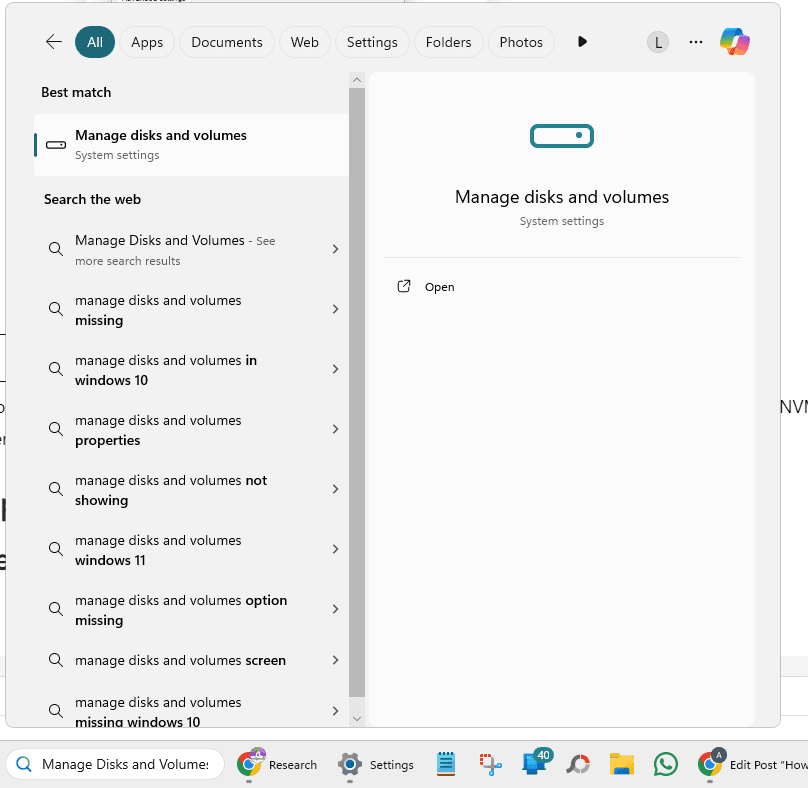
This issue is often undermined in desktop computers, where the read/write load is higher. Below 50°C is considered good for NVMe drives. But if it is going above 80°C, it is dangerous. Windows 11 allows you to check the drive temperature without using any software. You can just search for Manage Disks and Volumes in the Windows search bar. Inside the menu, you can check your drive’s health and temperature.

If your drive is showing a temperature above 50°C continuously, it is a warning sign that you need some kind of care. During read/write operations, it is normal to see high temperatures. But, constant heat is a sign of malfunction or lack of passive cooling. On modern motherboards, we find heatsinks that effectively manage high heat levels. For other computers and operating systems, you can use CrystalDiskInfo, which I have discussed in the upcoming step.
8. Monitor Wear and Upgrade if required
Wear is inevitable in SSDs. If you are using an SSD, it will degrade. So, if your drive is very old, it is important to check its health. We are going to use the CrystalDiskInfo software for the same.

If the drive is showing good condition, it clearly means the NAND Flash is in good health. However, if the status is bad, there should be an error in the attributes below. Generally, in the case of SSD wear, you will see error messages with data units read/written or host read/write commands. In that case, bad performance is obvious. You should think about changing or upgrading your drive. Use this remaining TBW calculator tool instead to make things easier for you.
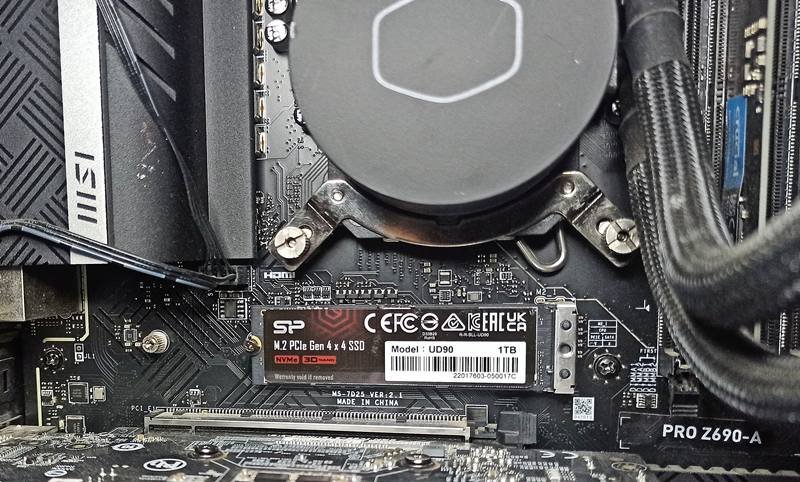
9. Make sure to use the NVMe connection nearest to the CPU
Ideally, the nearest M.2 NVMe port is the most suitable port for your primary OS drive. If you have an M.2 NVMe drive, do not install it in the optional ports given at the bottom or the middle of your motherboard. They generally have higher latency, and some ports may just be M.2 SATA ports.
10. Move temporary and less-important files to another drive
If you think you can clear some space from your drive, you should definitely do it to increase your drive’s performance. It is always good to keep your drive below 50% storage capacity for optimal performance.
You can change the file storage location as follows in Windows.
- Go to Settings > System > Storage > Change where new content is saved. You can move downloads, documents, and temp files to another drive.
- For temp files specifically, you can change the location by modifying the TEMP and TMP environment variables in System Properties > Advanced > Environment Variables.
Conclusion
I hope you will now notice a significant improvement in your SSD performance. Some other things you can do to improve your SSD performance include upgrading your operating system, running malware scans, upgrading to a faster SSD, performing a clean OS install (formatting the drive), using RAID, and more.

![Are Gen 5.0 SSDs backward compatible with Gen 3.0 Motherboards? [Bottleneck Explained]](https://storedbits.com/wp-content/uploads/2024/09/1-768x432.png)