Affiliate Disclosure: This post may include affiliate links. If you click and make a purchase, I may earn a small commission at no extra cost to you.
On the hardware level, storage upgrades have become pretty easy. However, most people find cloning to be complex and stressful because their important data is involved in the whole process. If something goes wrong, your precious data could be at risk. So, this isn’t just a list of the best software, but also how to use it safely to move your data from one drive to another. You can migrate the OS after a drive upgrade or perform any other critical data move. This article will provide you with the best possible solution.
There are specific criteria for choosing the best cloning software, and they are straightforward to identify. For me, it is always ease of use, hot cloning, OS Cloning, and bad sector support. However, some people may prioritize pricing, encryption, or operational speed. I have evaluated all the programs and given their pros and cons.
To be honest, Macrium Reflect is my favorite, but I have tried most of the popular disk cloners, and this is the list that I can suggest to anyone. So, here it is for you.
1. Macrium Reflect
- Applicable OS: Windows
- Price:
- 30-day free trial
- 12-Month Plan (1 PC): Approximately $49.99/year, including email support, new features, and updates.
- 4-Pack Special (4 PCs): Often available as a discounted bundle (4 licenses for the price of 2).
- The newest Version: Macrium Reflect X
- Trustpilot rating: 4.3/5

I have been a regular user of Macrium Reflect (now Macrium Reflect X) for the last 8 years. I have done so many SSD upgrades and OS migrations using this program. It is easy to use, quick, and offers a backup option. It comes with a 30-day trial period, which is enough for most users because most people use drive cloners once and then forget about them. All the important features are available in the trial version, and with the professional version, you get complete access to all these features for $49.99/year for one computer.
Macrium Reflect is built for fast bare-metal recovery, disk cloning, and continuous protection of PCs and servers. So, it isn’t just a cloner but a full-fledged data protection software. It offers Resumable Imaging, checkpoint image creation, and write-failure retry.
Reflect X performs sector-intelligent cloning, meaning it copies only used file system blocks rather than raw sectors, drastically reducing clone time compared to forensic or sector-by-sector methods. This can be really helpful when migrating from SATA SSDs or hard drives to modern NVMe drives. With this method, Reflect X automatically handles partition alignment and ensure optimize performance and longevity of your SSD.
Reflect X is its continued use and refinement of Rapid Delta Clone (RDC) technology. This is helpful when re-cloning a disk that already contains a related file system. Reflect X analyzes block-level differences and copies only changed data, allowing subsequent clone operations to complete in minutes rather than hours.
Read Full Macrium Reflect X Review
Key features of Macrium Reflect include removable media imaging and cloning, OS image creation, restoration, bootable media creation, direct disk cloning, backup scheduling, and ransomware protection. You can check all the features and download Macrium Reflect X right here.
| Pros ✅ | Cons ❌ |
|---|---|
| Uses block-level imaging with intelligent sector mapping which minimizes unnecessary read/writes. | Doesn’t perform real-time deduplication |
| Fully file-system aware (NTFS, FAT, exFAT) and handles metadata accurately. | Limited optimization for APFS or EXT4 |
| Multithreaded read pipeline efficiently saturates SATA/NVMe bandwidth. | No adaptive throttling |
| Uses CRC32 and optional MD5 verification per block | Verification adds significant overhead on slower SSDs or USB interfaces. |
| Supports WinPE-based rescue media and UEFI boot repair. | Windows-only. |
For some people, Macrium Reflect can be complex to use, and I believe this is because Macrium Reflect X offers many other features beyond cloning. The cloning process is explained below.
2. EaseUS Disk Copy
- Applicable OS: Windows 11/10/8/7
- Price:
- $19.90 for a one-month subscription
- $39.90 for one-year plan
- $59.90 for lifetime upgrade
- The newest Version: EaseUS Disk Copy 7.0.0
- Trustpilot rating: 4.9/5
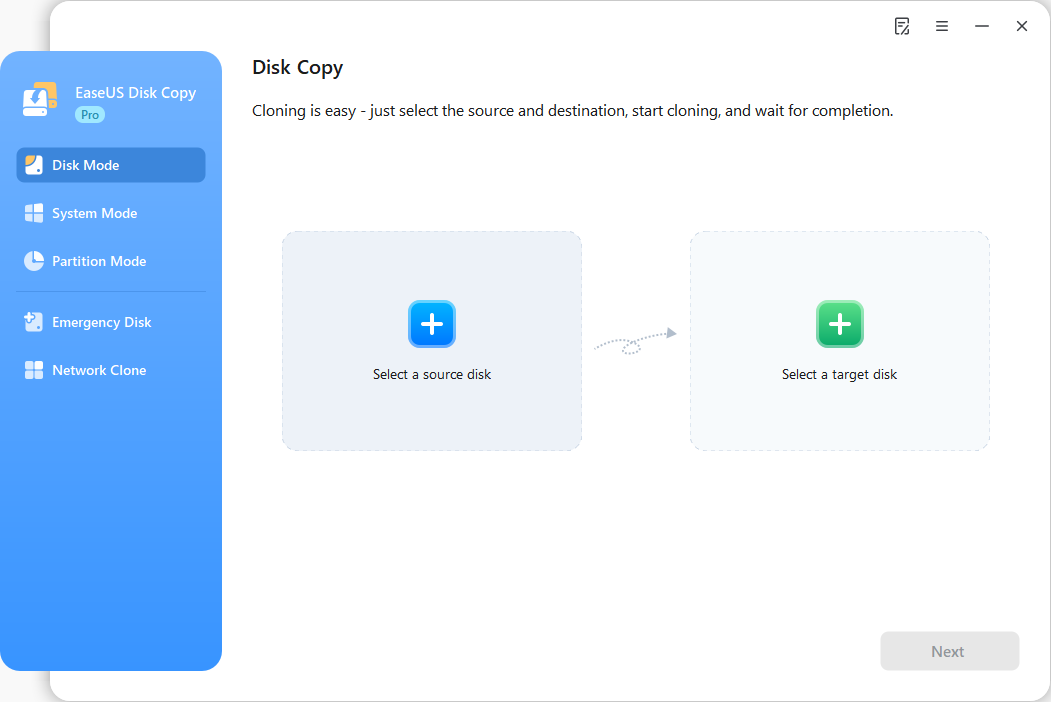
EaseUS Disk Copy is a professional and dedicated disk cloning tool. It is designed for disk-to-disk cloning, system migration, and partition cloning. The software allows users to clone an HDD to an SSD, upgrade from a smaller disk to a larger one, or create a fully bootable copy of an existing drive.
It uses sector-by-sector cloning technology, which ensures that all data, including hidden partitions and special file systems, can be copied accurately. This makes it especially suitable for OS migration and disaster recovery scenarios.
Additionally, it supports creating a WinPE bootable disk, enabling users to perform cloning even when the system cannot boot normally. The tool is compatible with both MBR and GPT partition styles and supports common storage interfaces such as SATA and NVMe.
Pricing begins at $19.90 for a one-month subscription to the basic edition. Users who want long-term updates and support can choose the one-year plan at $39.90. A lifetime license is also available, offering perpetual use and free upgrades for a one-time fee of $59.90. All license types support use on a single computer, with higher-tier business editions available for multi-device deployments.
| Pros ✅ | Cons ❌ |
|---|---|
| User-friendly interface – Clear step-by-step wizard makes it easy for beginners. | Focused functionality – Primarily designed for cloning. |
| High cloning success rate – Supports sector-by-sector cloning and can skip bad sectors. | Paid software – no trial version. |
| Bootable media support – Allows cloning outside the running operating system. | Windows-only. |
| Wide compatibility – Works with HDDs, SSDs, and NVMe drives, as well as MBR and GPT disks. | |
| Advanced cloning features – Clone disk to image and clone a single disk to multiple drives. |
3. DiskGenius
- Applicable OS: Windows XP to Windows 11/10/Server, etc.
- Price:
- One-Month $69.90(1PC)
- One-Year $99.90(1PC)
- Lifetime Family license for 5 PCs $129.90
- The newest Version: DiskGenius Free & DiskGenius Professional
- Trustpilot rating: 3.7/5

DiskGenius is an all-round tool for storage drives, and I have discussed its bad-block feature in this article. But, it has a dedicated OS migration tool, which is great if you don’t want to spend money on paid tools like EaseUS ToDo Backup and AOMIE Backupper. The tool might look outdated, but it does the job perfectly. The trial version is enough for cloning any drive.
Its approach and limitations clearly position it as a basic migration and duplication tool rather than a full-scale system cloning solution. The free edition allows users to clone entire disks or individual partitions using an intelligent sector-based copy, meaning it copies only used sectors instead of performing a raw sector-by-sector duplication by default.
I found DiskGenius to be slower than Macrium Reflect X, but not by huge margins. You do not get backup options and limited automation features. However, it offers sector-by-sector cloning and SSD alignment, although this feature can slow down the process even more.
In the free version, system disk cloning is restricted because you can clone a Windows system disk only under specific conditions, and many advanced features required for guaranteed boot success are either limited or unavailable.
You can choose hot migration and also customize or delete the existing partitions and create a new one.
| Pros ✅ | Cons ❌ |
|---|---|
| Sector-by-sector and file-level cloning options | Free version lacks multi-threaded copy path |
| Deep understanding of NTFS, FAT32, exFAT, EXT2/3/4 | No APFS or BitLocker-aware optimization |
| Direct disk I/O bypasses Windows caching for accurate sector reads. | No I/O queue optimization |
| Can retry bad sectors and verify copied regions byte-for-byte. | Verification isn’t checksummed |
| Preserves GPT, MBR, and partition alignment | No TRIM awareness |
4. Clonezilla
- Applicable OS: Windows, Linux, macOS (Intel-based), FreeBSD, NetBSD, OpenBSD, Minix, and VMware ESX.
- Price: Free
- The newest Version: Stable – Debian based like 3.3.1-35; Alternative – Ubuntu based like 20260301-questing
- SourceForge rating: 4.6/5

Clonezilla is the best free and open-source program that I occasionally use for mass deployment via multicast, which allows me to clone multiple systems simultaneously. However, I would say this software is not for beginners. It is an entirely text-based program that runs through the command-line interface without a GUI. While it is powerful, it demands a level of technical knowledge. There are many guides on YouTube, but I will provide you with one here as well.
Once you master Clonezilla, you will save a lot of time by cloning multiple disks at once. Also, it supports various file systems, encryption, and unattended operations through scripts. Clonezilla is widely used in enterprises as well for deploying software and virtual machines. Clonezilla is commonly used in Linux operating systems because some people find it a good alternative to DD and GParted. However, we will just explore its capabilities for simple disk cloning.
You’ll need the Clonezilla ISO file (downloaded from the official website) and a USB flash drive. You can boot Clonezilla just like any other live USB. You get into the boot menu and choose the Clonezilla flash drive.
| Pros ✅ | Cons ❌ |
|---|---|
| Uses block-level differential imaging | Falls back to raw sector copy if it can’t detect filesystem |
| Supports NTFS, EXT, XFS, Btrfs | No APFS or BitLocker native support |
| Offers SHA1 or CRC checks after clone | Verification is manual and not integrated in every mode |
| Maintains GPT, EFI, and alignment properly; works well for mixed SSD/HDD systems. | No TRIM command issued on target SSD |
| Runs on any hardware via Linux boot | Falls back to raw sector copy if it can’t detect the filesystem |
Here is a detailed guide to using Clonezilla to clone and restore the operating system as an image file.
5. Rescuezilla
- Applicable OS: Windows, macOS, and Linux
- Price: Free
- The newest Version: Rescuezilla 2.6.1
- Trustpilot rating: 3.7/5
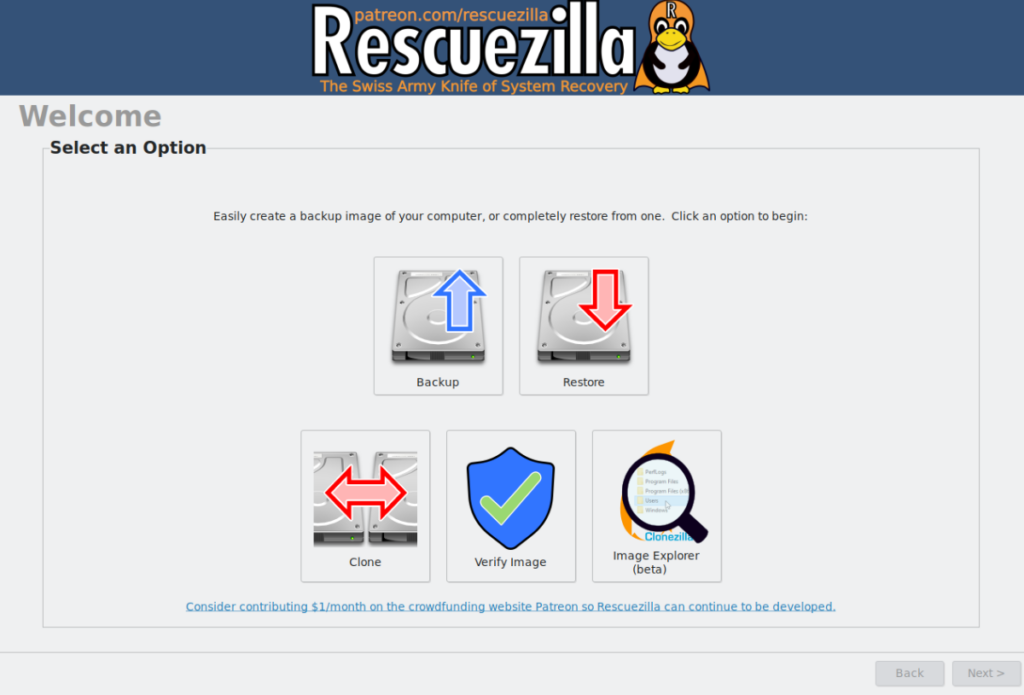
Rescuezilla is a free, open-source disk imaging and cloning solution. It is designed for full disk backup, system restoration, and drive cloning across Windows, macOS, and Linux systems. As a GUI version of Clonezilla, Rescuezilla simplifies complex disk imaging tasks with a user-friendly interface while maintaining powerful backup and recovery capabilities.
It allows users to create complete disk images that can be restored to the same or different hardware. It supports bare-metal recovery through a bootable live USB environment, meaning it runs independently of the installed operating system. Rescuezilla can access local drives, external storage, and network shares, making it suitable for home users and IT technicians who need a reliable, no-cost disaster recovery solution.
| Pros ✅ | Cons ❌ |
|---|---|
| Completely free and open-source – No subscription fees or paid upgrades required. | No official support – Relies mainly on community documentation and forums. |
| Bootable live environment – Runs independently from the operating system. | Interface simplicity – While user-friendly compared to Clonezilla, it is less polished than commercial alternatives. |
| Cross-platform compatibility – Works with Windows, macOS, and Linux systems. | |
| Network backup support – Can save and restore images from network locations. | |
| Included Tools – Comes with tools like GParted and TestDisk for partition manipulation and recovery. |
6. Acronis True Image
- Applicable OS: Windows 11/10,macOS Tahoe 26/Sequoia 15/Sonoma 14/Ventura 13/Monterey 12
- Price: From $49.99 per year
- The newest Version:
- Acronis True Image for Windows: Build 42386 (September 30, 2025)
- Acronis True Image for macOS: Build 42389 (September 30, 2025)
- Trustpilot rating: 4.5/5
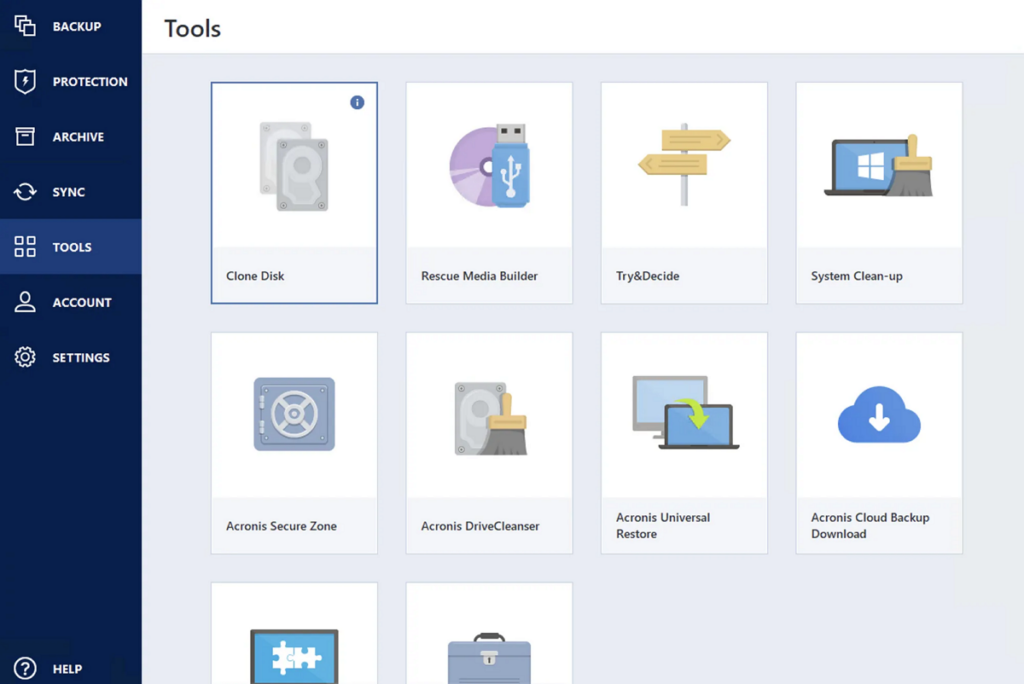
Acronis True Image is a comprehensive backup and disk imaging solution. It is designed for full-system backup, disk cloning, and data protection across Windows PCs and Macs. In addition to disk-to-disk cloning and OS migration, the software provides full image backups, incremental and differential backups, and cloud storage integration.
It allows users to create exact disk images that can be restored to the same or different hardware. It also supports bootable rescue media creation, enabling recovery even if the operating system fails to start. Beyond basic cloning, Acronis True Image includes advanced cybersecurity features such as ransomware protection and real-time threat monitoring, making it suitable for users who need both backup and security in one solution.
Pricing begins at $49.99 per year for the entry-level subscription plan. Users who require cloud backup functionality must upgrade to the Advanced tier. The Premium plan expands the offering further by providing up to 5TB of cloud storage along with electronic signature capabilities. All subscription tiers support licensing for up to five computers under a single plan.
| Pros ✅ | Cons ❌ |
|---|---|
| Comprehensive backup features – Supports full image, incremental, and differential backups. | Higher price point – Subscription-based model may be expensive for some users. |
| Disk cloning and system migration – Easily migrate OS to SSD or new hardware. | Resource usage – Background services and security features may consume more system resources. |
| Cloud backup support – Offers integrated cloud storage options. | Feature complexity – The wide range of functions may feel overwhelming for beginners. |
| Cybersecurity protection – Includes anti-ransomware and real-time threat defense. | |
| Bootable rescue media – Enables system recovery when Windows or macOS cannot boot. |
7. AOMEI Cloner
- Applicable OS: Windows 11/10/8/7/Server
- Price:
- $39.95/year
- $59.95/lifetime
- The newest Version: Version 5.1.0 (Feb 12, 2026)
- Trustpilot rating: 4.6/5

I am updating this article and adding AOMEI Cloner to 4th place for its speed and ease of use. Additionally, it comes with SSD Alignment and Sector-by-Sector clone features. Using the program is really easy, and it includes Disk clone, Partition clone, and Full System clone. You can also create a Windows PE bootable disk.
It supports disk-to-disk cloning, meaning you can replicate the contents of one physical drive onto another, including files, partitions, and boot information. I found it great because it helps when migrating from an older HDD to a faster SSD or a larger capacity disk
One major strength is intelligent used-sector cloning. So, instead of copying every physical sector, it copies only the sectors that contain actual data while optionally skipping known bad sectors. Compared with comprehensive cloning/imaging suites like Macrium Reflect X or Clonezilla, AOMEI Cloner’s interface is generally more user-friendly and straightforward, focusing solely on cloning rather than broader backup strategies.
There aren’t many features in it, but it does the job it is made for. The yearly professional plan costs $39.95, while the professional lifetime plan costs $59.95.
| Pros ✅ | Cons ❌ |
|---|---|
| Performs intelligent sector-level cloning | EXT and APFS are handled only via raw mode |
| Fully aware of NTFS, FAT, exFAT; preserves GPT/UEFI structures cleanly | Windows-only core; Linux and macOS clones fall back to raw sector copy mode |
| Optional post-clone checksum verify; consistent sector mapping avoids silent corruption | |
| Windows GUI and WinPE boot media |
8. EaseUS Todo Backup
- Applicable OS: Windows 11/10/8/8.1/7/Server
- Price:
- Free
- Home – $39.95/Yealy, $59.95/Perpetual, $79.95/Lifetime Upgrades
- The newest Version: EaseUS Todo Backup 2026
- Trustpilot rating: 4.9/5
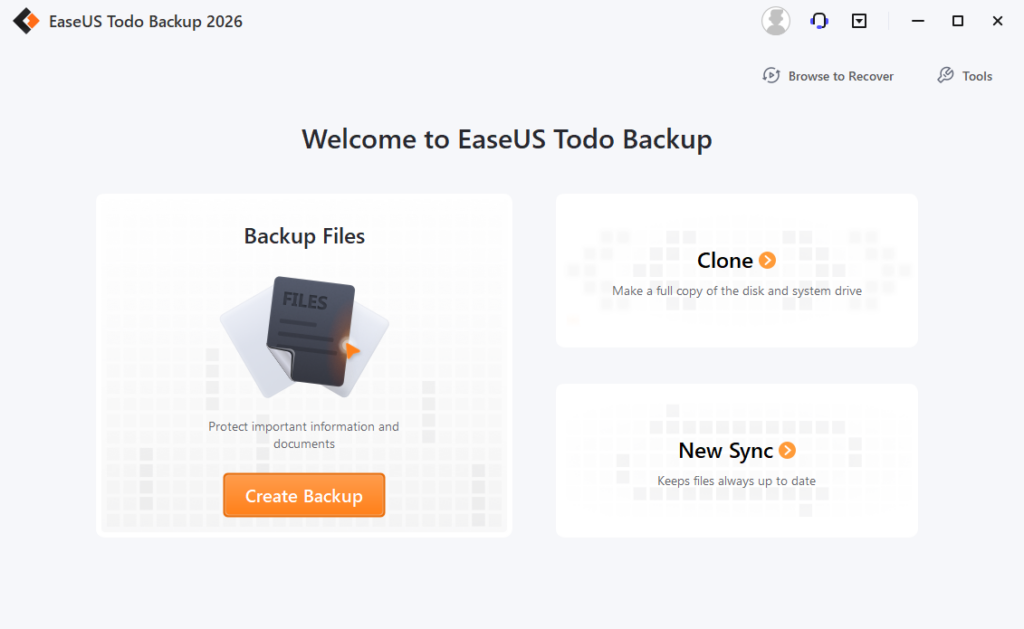
This is perhaps the easiest software that I have ever used for cloning any drive. Although the cloning feature is paid, it is worth giving a chance if you can afford it. Within just a few clicks, you can clone one drive to another. You can choose to clone the entire disk, the operating system, or just the specific partitions. When I am writing this article, the EaseUS Todo Backup Home version is available for $39.95 for one computer for a year with 1TB of cloud storage. The lifetime variant is available for $79.95.
Disk cloning isn’t as complicated as people might think, and paying these amounts isn’t necessary. However, some people want the easiest way out, and this program is made for those people. So, if you can purchase, go for it and easily clone your drive without any hassles.
| Pros ✅ | Cons ❌ |
|---|---|
| Performs intelligent sector-level cloning | Compression and encryption layers add CPU latency |
| Fully aware of NTFS, FAT, exFAT; preserves GPT/UEFI structures cleanly | EXT and APFS handled only via raw mode |
| Optional post-clone checksum verify; consistent sector mapping avoids silent corruption. | No continuous CRC per block |
| Maintains 4 KB alignment and issues TRIM to the target after clone | Doesn’t preserve host-protected areas or NVMe metadata namespaces. |
| Windows GUI and WinPE boot media | Windows-only core; Linux and macOS clones revert to raw sector copy mode. |
9. Hasleo Disk Clone
- Applicable OS: Windows 11/10/8/7/Vista
- Price:
- X86/X64 – Free
- Professional – $39.95/1 PC/Server
- Enterprise – $199.95/200 PCs/Servers
- The newest Version: v5.6
- Trustpilot rating: 4.1/5
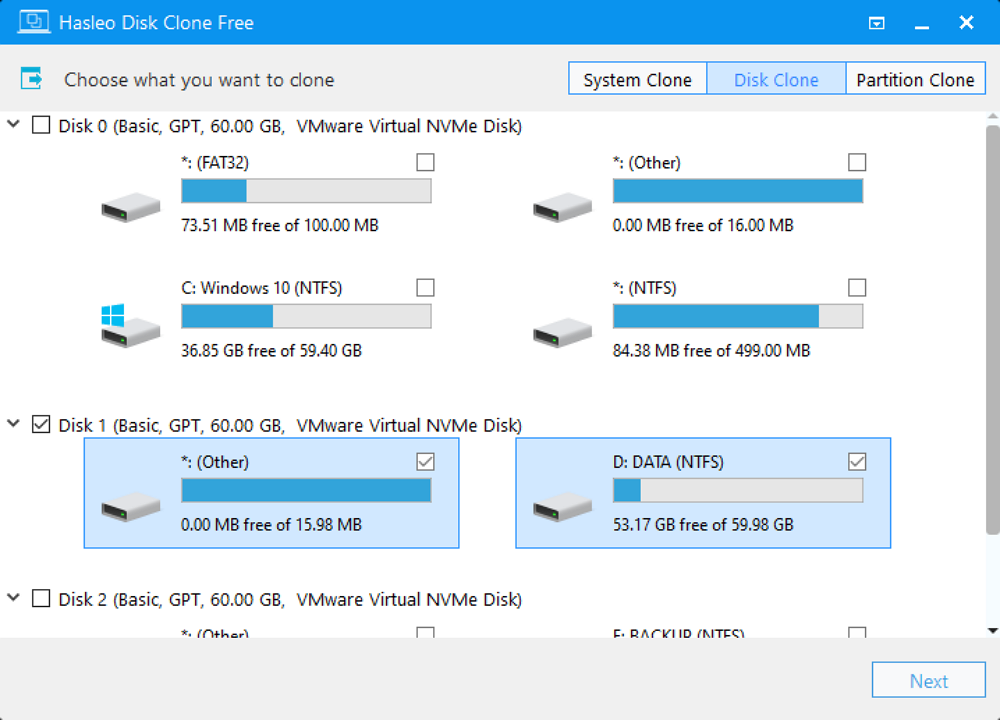
Hasleo Disk Clone is a Windows-focused disk and partition cloning utility that helps users migrate operating systems, duplicate disks, and transfer data without reinstalling software. It’s positioned as a free, all-in-one cloning solution with optional paid editions that unlock advanced capabilities and broader device/enterprise support.
It enables users to move an existing Windows installation, including system files, drivers, applications, and settings, to a new SSD or HDD without reinstalling the OS. In addition to full disk cloning, it supports partition-level cloning, partition resizing or repositioning on the target disk, and MBR-to-GPT (or GPT-to-MBR) conversion during the cloning process without data loss.
The software also incorporates intelligent sector copying and Delta Clone technology, which transfers only changed data blocks to accelerate operations. Users can create WinPE bootable media to perform offline cloning or recovery when Windows cannot start.
Hasleo Disk Clone natively runs on Windows Vista/Server 2008 or newer (including Windows 11/10/8/7) and supports both x86/x64 and ARM64 architectures, delivering efficient performance and compatibility across a wide range of PC hardware.
Pricing starts with a free edition that covers basic cloning needs. Paid editions unlock advanced features and commercial usage rights, with pricing typically structured as a one-time license rather than a recurring subscription.
| Pros ✅ | Cons ❌ |
|---|---|
| Free core functionality — Basic system and disk cloning are available at no cost. | Advanced features require payment — Delta Clone, ARM64 support, and emergency media creation are not available in the free edition. |
| Comprehensive cloning support — Handles system, disk, and partition cloning in one tool. | Windows-only compatibility — Does not support macOS or Linux systems. |
| Flexible partition handling — Resize/move partitions and convert partition styles without data loss. | Home edition lacks business licensing — Free license is limited to personal use only. |
| Fast performance — Optimized algorithms reduce cloning time. | |
| WinPE boot media support (Pro/Enterprise) — Enables offline recovery and cloning. |
Hasleo Disk Clone free edition offers reliable core cloning tools, while the paid Professional and Enterprise editions expand advanced cloning performance and usage rights. It’s suitable for both casual and power users seeking straightforward disk duplication solutions.
10. Manufacturer-Specific Tools
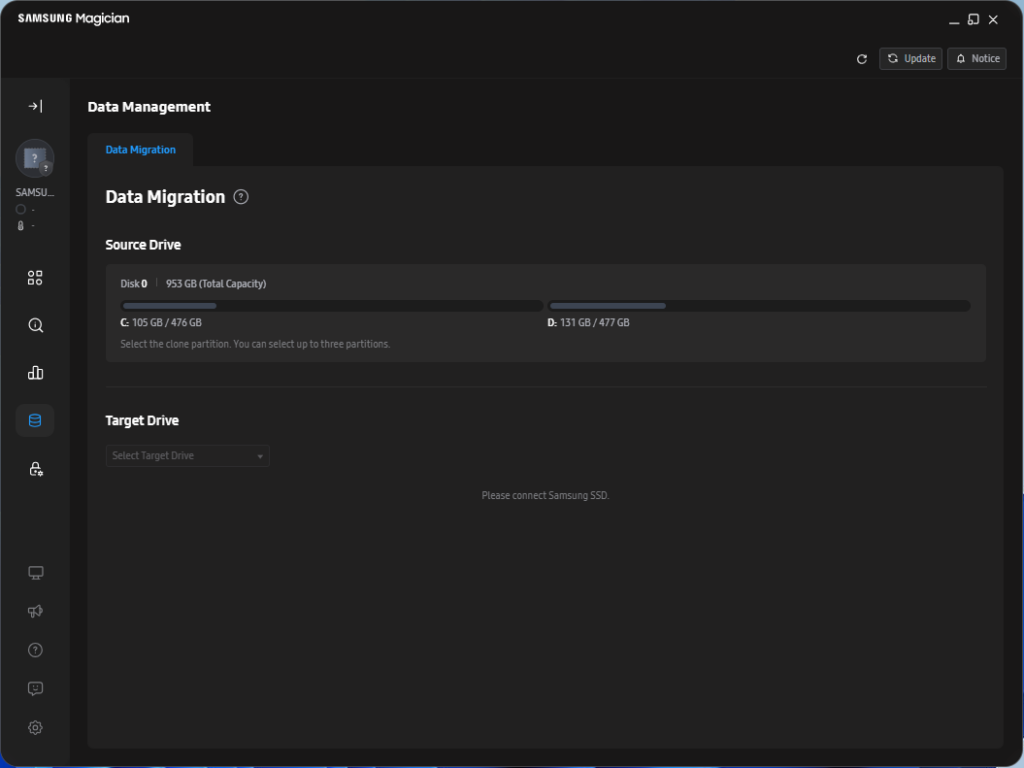
Manufacturer-specific tools are disk cloning and backup utilities developed or co-branded by SSD manufacturers for use within their own hardware ecosystems. Representative examples include Samsung Magician, Acronis True Image for Western Digital, Kingston, and Crucial, and DiscWizard for Seagate, etc. These tools are typically activated only when a supported brand drive is detected and are primarily designed to simplify SSD upgrades, OS migration, and basic data protection for in-brand users.
Unlike independent third-party cloning software, manufacturer-bundled tools focus on seamless hardware compatibility rather than cross-platform flexibility. They often include disk cloning, system imaging, and bootable recovery media creation, while some (such as Samsung’s solution) also integrate drive health monitoring, firmware updates, and performance diagnostics.
| Pros ✅ | Cons ❌ |
|---|---|
| Free with supported SSD hardware. | Brand-restricted usage requires supported manufacturer drives. |
| Optimized compatibility within the brand ecosystem. | Limited flexibility in mixed-brand environments. |
| Simple migration workflow for SSD upgrades. | Fewer advanced disk management or customization features compared to dedicated third-party cloning suites. |
| Often powered by established imaging engines (e.g., Acronis). |
Overall, manufacturer-specific tools are ideal for straightforward, same-brand SSD upgrades but are less suitable for complex migration scenarios or cross-vendor deployments.
How to Choose the Best Disk Cloning Software
Selecting the right disk cloning software is not just about price; it’s about matching the tool to your upgrade scenario, technical level, and risk tolerance. Below are the key evaluation criteria you should consider before making a decision.
- Ease of Use: Choose beginner-friendly GUI tools for guided steps or advanced tools if you need more control.
- Reliability: Look for clear disk identification, warning prompts, stable cloning engines, and optional data verification.
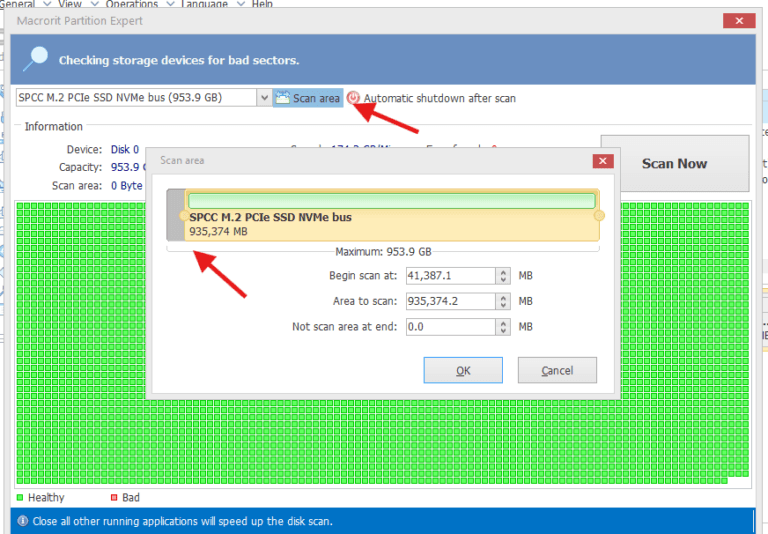
- Features: Check for sector cloning, partition resizing, MBR/GPT conversion, and rescue media creation.
- Performance: SSD-specific optimizations like 4K alignment and intelligent copy improve stability.
- Cost: Balance free vs. paid versions based on feature needs and deployment scale.
What to do after cloning?
I want to make this article more than just a list; I want to provide a guide on how to run your system using the new drive with the cloned operating system.
1. Enter the BIOS or UEFI
Depending on your motherboard, there will be a special key like Esc, Del, F11, F12, etc, which you’ll have to press repeatedly when the system is booting up. You will then enter the BIOS or UEFI menu of your computer. It can look something like this.

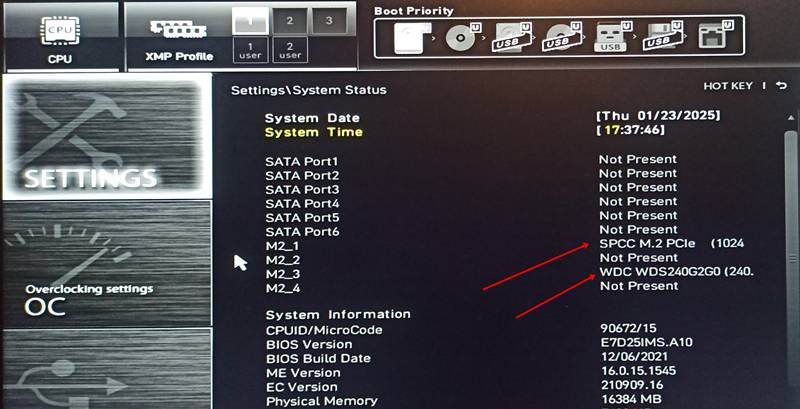
2. Change Boot Order
Make sure the drive is connected to the computer. Now, find the boot option, which is easy to locate in the older BIOS menus. In the modern UEFI menus, you can find them in the Advanced folders. You move your new drive (where the OS is installed) to the top of the list.

If you don’t find the option, you can see the BIOS/UEFI guide for your motherboard model on the internet. Once you have changed the boot order, you just save the settings and reboot. You’ll now boot into your system from the new or upgraded drive with the same files and operating system. However, if you face any issues, the comment section is always open for you.
Conclusion
To recap:
- Macrium Reflect (Best Overall & Best for Reliability): Known for speed and “Rapid Delta Cloning,” which only copies changed data blocks to save time.
- EaseUS Disk Copy (Best User-friendly): Built for speed and simplicity and best for one-time disk upgrades or creating identical replicas.
- DiskGenius (Best Free Alternative for Windows Drive Migration): Recommended as a solid free alternative for Windows drive migration and recommended for its ability to handle partitions when cloning.
- Clonezilla (Best Overall Free/Open-Source): A powerful, open-source, text-based tool. It is ideal for advanced users and IT professionals who need to clone many machines at once.
- Rescuezilla (Best User-Friendly Alternative for Clonezilla): Often called the “Clonezilla GUI,” it provides a user-friendly, point-and-click interface while remaining completely free and open-source.
- Acronis True Image (Best Paid/Feature-Rich): Best for security; it includes anti-malware tools and supports cloning for both Windows and Mac.
- Aomei Cloner (Another easy to use/Paid): Offering a balance of ease-of-use and advanced features for cloning disks or migrating OS.
- EaseUS Todo Backup (Best Disk Backup and Cloning for Home): Ranked as the best overall for its user-friendly interface and ability to clone systems to different hardware.
- Hasleo Disk Clone (Best Free Windows-Native): A free tool for Windows that allows system and disk cloning without a bootable USB.
- Manufacturer-Specific Free Tools: Samsung Magician for Samsung SSDs, and OEM edition of Acronis True Image for Crucial/Western Digital/SanDisk.
I hope this helps!


DiskGenius is great.
Definitely.
SSD Cloning is really tough for beginners. SSD manufacturers should try to involve and make things easier for the end user. This article is a real help. Macrium Reflect saved me.
Glad it helped. Most popular SSD brands have their own or partenered cloning programs. Some SSD might come without any software at all or the program without cloning features. But, you got your solution. That is the biggest win.
I use easeus clone, easy and excellent.
Used both EaseUS Disk Copy and Macrium Reflect for SSD upgrades, here’s my take:
EaseUS Disk Copy is dead simple. The interface walks you through everything, and I cloned my 500GB boot drive to a new NVMe in about 45 minutes with zero headaches. Perfect if you just want to get it done without reading a manual.
As for Macrium Reflect? That’s my daily driver now. Yeah, the interface looks a bit more intimidating at first, but once you get used to it, the speed is insane. The 30-day trial was plenty for my one-time migration, though the UI has way more options than I actually needed.
If you’re a casual user who wants point-and-click simplicity, go easeus. If you want speed and don’t mind digging through menus, Macrium’s your tool. Both got the job done, but easeus felt less intimidating for my first clone.
I used Hasleo Disk Clone Free Edition to clone my OS drive to an external SSD, but I failed. Could you please tell me why could this happen?
I’ve never tried cloning before because I’m worried about boot issues after swapping drives. Does it usually just work?
Totally get that: a lot of people worry about boot issues the first time. In most cases, if the clone is done properly, it should just work since the system and boot data are copied over together. The only hiccups I’ve seen are usually things like boot order still pointing to the old drive or minor partition differences. A simple trick is to disconnect the old drive for the first boot, so you can quickly confirm everything is working.