Affiliate Disclosure: This post may include affiliate links. If you click and make a purchase, I may earn a small commission at no extra cost to you.
SSDs use NAND flash memory for data storage. Each cell can hold 1 to 4 bits of data. The data format in NAND flash is binary, meaning only 0s and 1s. On a fundamental level, it is just high and low levels of electric charge inside the cells. As the number of cells increases, the number of charge levels will increase. This increases storage density but also the complexity and the risk of errors.
When we write the data, the memory cells are programmed at different charge levels. In modern SSDs, charge-trap flash cells are used for data storage. Earlier, they were floating gate transistors. You can know the difference here.
NAND flash can’t overwrite data directly. It must first erase entire blocks before new data can be written. Without TRIM, the SSD wouldn’t know which blocks are genuinely free, causing extra erase/write cycles and slowing things down. TRIM clears this uncertainty by marking deleted data as disposable, letting the controller maintain clean blocks for future writes.
Let me elaborate this more.

The process of data storage in SSDs
SSDs use NAND Flash memory, a type of non-volatile memory. Non-volatile memory retains the data even when the power is removed. NAND Flash memory has nanoscopic cells, and a single cell looks something like this.

A single memory cell can hold from one to four bits of data. A single cell is then combined into a line called a string. A string looks like this.

After this comes a page that is again a combination of thousands of cells, with capacities of around 4KB and 16KB. The interesting thing about a page is that it is the smallest writable unit in a NAND flash chip.
Then comes a block, which is a combination of pages (typically 128 to 512 pages per block). A block is the smallest erasable unit. Then, we create planes and dies for higher-level grouping of cells for parallel operations.
I discussed all this to tell you that we can’t write or erase a single cell directly. We work with bigger number of cells altogether to increase speed and keep note of things easily. It will take a lot of time to do this and chance of errors will increase due to the interference.
The process of deleting the data in SSDs
The data is stored in the form of bits inside the NAND flash. When we delete the data, these bits are deleted. But, in SSDs, the process is a little complex as the individual memory cells aren’t read or written directly. The smallest readable and writable unit in SSDs is a page, typically consisting of 4 KB to 16 KB. The smallest erasable unit is a block, which is generally bigger, with a size ranging from 512 KB to 4 MB. These abstractions are to enhance the read/write speed, reduce overhead/errors.


However, when we talk specifically about the writing process, there is a catch to it. Data can be written to a page, but only if the page is completely empty. This is because the cell must be activated with the control line in order to write or read the data from and to the bit line. You can learn more about the control line and bit line here. Having a clean page makes the writing process faster and less prone to errors. If the controller has first to erase the memory cell and then write the data, it will take a lot longer than writing on an empty page.
What is the role of TRIM?
TRIM is the process being run by the operating system. Most modern operating systems, like Windows 7 and later, macOS, and many Linux distros, support TRIM. With the help of TRIM, an operating system informs the SSD which blocks of data are no longer in use and can be cleared internally. The TRIM command proactively clears these unused blocks to the SSDs so that they don’t have to erase them during a future write operation.
TRIM has major benefits in performance, longevity, and garbage collection. But when TRIM is enabled, data recovery (if required) is generally impossible. Without TRIM, this deleted data can be recovered if we want, because the pages or blocks are marked as available, even though the data is still there. But with TRIM enabled, the OS will clear out those locations when the system is idle. In this case, once TRIM has cleared those data blocks, the data can’t be recovered.
Why is TRIM important?
TRIM is most helpful in increasing the data write speed because the NAND flash has inherently slower write speed than the read speed due to the programming steps involved. Having to erase the memory cells before writing the data makes the writing process much complex and time-consuming. TRIM helps in enhancing the data write speed by clearing out the unused data blocks and pages.
If TRIM isn’t working, the write amplification increases. Write Amplification is a phenomenon in SSDs where the actual amount of data written on the NAND flash becomes greater than the total data that we intended to write. This happens due to the additional steps of block erasure and data movement. TRIM reduces the Write Amplification by informing the SSDs of unused data and improving garbage collection.
Without TRIM, the SSD is not informed about which blocks are no longer required to hold the older data. In that case, for future writes, SSD requires reading the old data, erasing the block at the same time (not by background garbage collection), then writing new data. This tedious process also has a name called RWM, which stands for Read-Modify-Write, a process slow and inefficient.
With the TRIM command, the SSD is immediately informed about the block no longer in use, helping it clean in the background. As A result, new data is written very quickly.
We know that SSDs have a limited number of cycles for writing and erasing (P/E cycles). Without TRIM, the SSD performs unnecessary writes and erases, which reduces the lifespan. With TRIM, the write-erase operations are minimized, and hence, wear and tear.
Working of TRIM
There are several steps in which the TRIM command works in any SSD. They can vary, but the basic idea is as follows.

1. File Is Deleted (or Modified) in OS
The user or a system process deletes a file. The file system (e.g., NTFS, ext4, APFS) marks the space as free in its structure, and the operating system knows that. Normally, the physical data still exists on the SSD.
2. OS Issues a TRIM Command
The operating system sends a TRIM command to the SSD, specifying the Logical Block Addresses (LBAs) that are no longer in use. These LBAs map to NAND flash memory pages, and the OS is mainly responsible for choosing the right blocks.
3. SSD Marks Pages as Invalid
The SSD flags the specified pages in its internal Flash Translation Layer (FTL) as “invalid” or “available”. These invalid pages are now eligible for erasure during future garbage collection.
4. Garbage Collection (Later)
When the SSD needs free space, it performs garbage collection. In this process, it collects valid pages from a block. It skips the TRIMed or invalid pages and rewrites valid data to a new block. Then erases the entire old block, which now contains only invalid pages. This clears the TRIMed data, physically erasing it.
The length of the TRIM command varies in format and length. In SATA SSDs using the ATA protocol, the command name is DATA SET MANAGEMENT, and the command code is 0x06. This command can specify 8 or 256 Logical Block Addresses per command, but can vary based on the ATA version. In NVMe SSDs, thousands of LBA’s can be specified in a single TRIM command.
When Is the Data Actually Cleared?
TRIM does not clear out the data immediately, but it just marks the data that is no longer needed. The erasure actually happens during the garbage collection, which is done by the SSD’s controller. The erasure will happen generally when the SSD runs out of free blocks or when the system is idle. In simple words, the erasure is asynchronous and non-deterministic. It can be done immediately or sometimes hours or days later. However, the marking is done almost instantly by the operating system and the command is sent directly to the SSD.
Erasing the data and need of TRIM
We discussed that the data is erased from the block but written in a page. Also, whenever the new data comes, it is written to an empty page and can’t be overwritten in an already filled or partially-filled page. Any update to existing data involves a multie-step process which happens like this:
- New data is written to a fresh, unused page.
- The old page is marked as invalid, but its data physically remains. This is to reduce unnecessary write operations and reduce wear.
- Over time, blocks fill up with a mix of valid and invalid pages.
- The SSD’s garbage collection process identifies blocks with mostly invalid data, moves any valid data elsewhere, and then erases the entire block to free it up for new writes.
This is where TRIM comes handy.
TRIM is a command issued by the operating system to the SSD, telling it which blocks of data are no longer in use (e.g., deleted files). Without TRIM, the SSD has no way of knowing whether deleted files are actually safe to erase.
Let’s put it more simply.
Whenever you delete a file from your PC, you might think the operating system immediately removes the data from the SSD. Instead, what it does is it only marks the space as “free” in the file system. The SSD still finds the memory blocks in use until the TRIM command enters the scenario.
SSD Trim is a command that, when triggered, enables the operating system to inform the Solid State Drive about the data block that is no longer in use and can be erased.
Let’s break down the entire process and understand through a real-life example.
The moment you delete a file, the OS marks space free in the file system and sends a command to the SSD, telling it:
“Hey, these file blocks from where the data is deleted are no longer in use. You can erase them and prepare them to do new writing.”
Let’s get into more depth.
- Step 1: You delete a file. At the OS level, it is deleted, and the OS marks the file blocks as unused in the file system table.
- Step 2: OS sends a command called TRIM to the SSD. This command contains the exact addresses of blocks from which the file was deleted.
- Step 3: SSD controller receives the TRIM information. SSD controller marks those specific blocks as “invalid” in its FTL (Flash Translation Layer) mapping table. This mapping tells SSD that “There is no need to keep the data here anymore”.
- Step 4: The SSD doesn’t physically erase the block immediately. Instead, it waits for the garbage collection process to go on in the background. Later, whenever required, the SSD will erase all those marked “invalid” blocks in bulk to prepare for new writes.
SSDs with TRIM and without TRIM
| Operation | With TRIM | Without TRIM |
|---|---|---|
| File Deletion | OS notifies SSD via TRIM which pages are no longer needed | OS marks file as deleted, but SSD doesn’t know the data is invalid |
| SSD Awareness | OS marks the file as deleted, but SSD doesn’t know the data is invalid | SSD treats all pages as potentially valid |
| Write Operation | SSD can use pre-erased blocks more efficiently | SSD may need to move and rewrite data, increasing write load |
| Garbage Collection | Skips TRIM-marked pages (deleted data) — less data moved | Copies both valid and invalid (deleted) data — more internal write activity |
| Write Amplification | Lower — fewer internal writes needed | Higher — more internal writes due to unnecessary copying |
| Performance Over Time | Maintains high performance as SSD stays cleaner | Gradually degrades due to increasing write amplification |
| SSD Lifespan | Extended — fewer program/erase cycles required | Shortened — more wear from redundant data movement |
| Efficiency | High — less overhead, better garbage collection | Low — inefficient block management |
| Example Scenario | Delete a 1 GB file → SSD erases marked pages directly | Delete a 1 GB file → SSD may keep moving those pages until overwritten |
How to Enable TRIM in Your System?
The supported operating systems for TRIM are: Windows 7 and above, macOS 10.6.8 and above, and most modern Linux distros.
Enable TRIM in Windows
In the latest builds of Windows (10/11), TRIM runs automatically during the drive optimization by default. However, if you want to check or enable, here is the process.
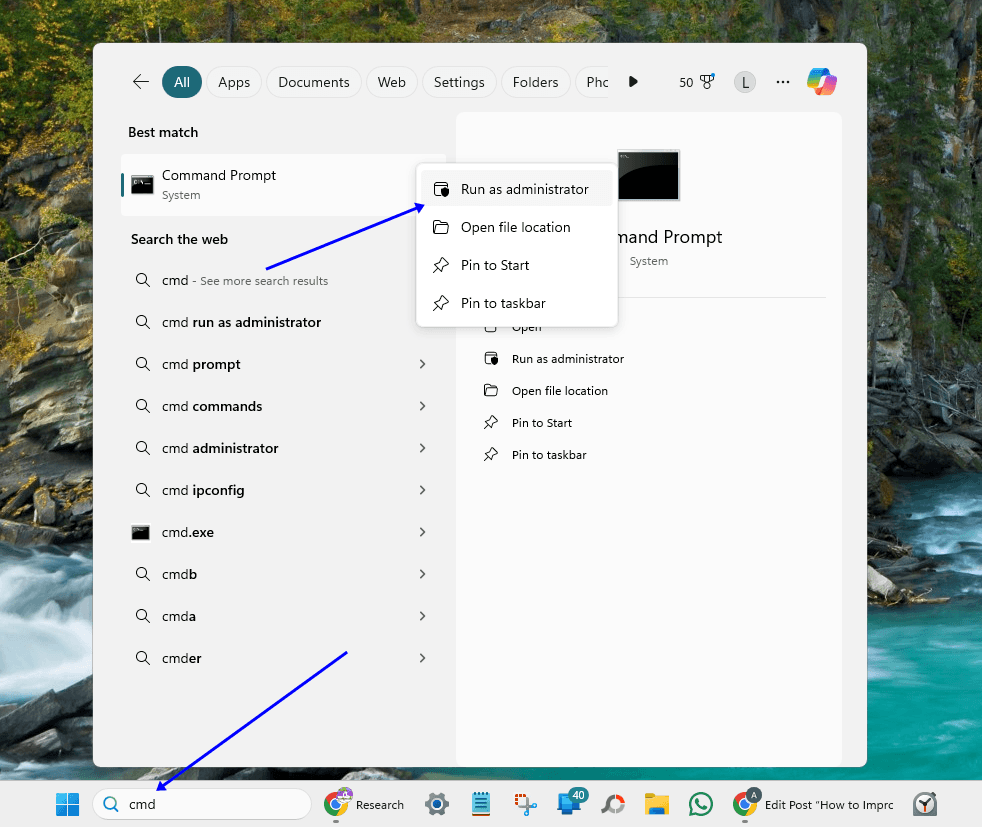
Open Command Prompt as Administrator:
- Press
Windows + S, type cmd, right-click it, and select Run as administrator.
- Run this command:
fsutil behavior query DisableDeleteNotify

Interpret the result:
DisableDeleteNotify = 0→ TRIM is enabledDisableDeleteNotify = 1→ TRIM is disabled
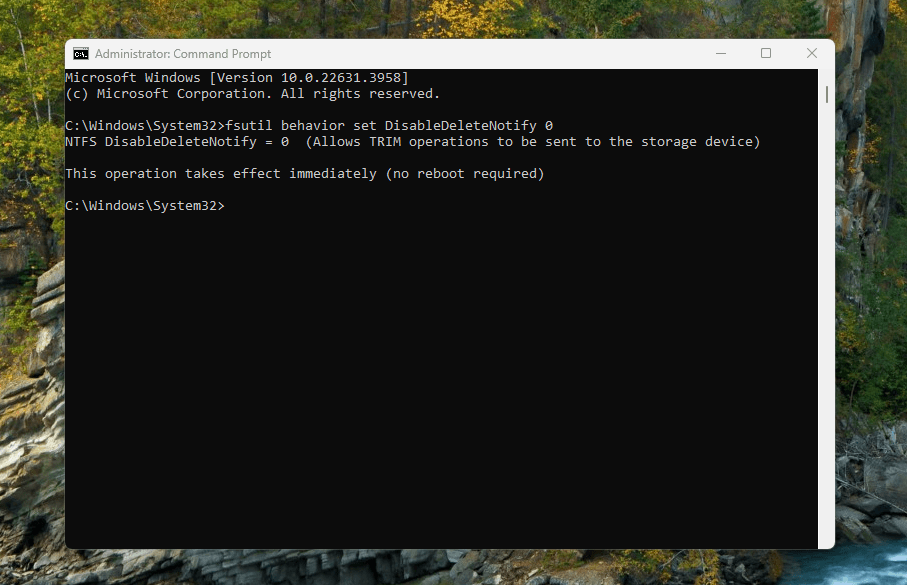
If TRIM is disabled in your system, which means the results shows the value 1, you can simply run this command.
fsutil behavior set DisableDeleteNotify 0
Enable TRIM in macOS
For macOS, TRIM is enabled by default only for Apple-branded SSDs. For any third-party SSDs, users may need to enable them manually. You can do this using terminal pretty easily. You can check if TRIM is enable with this command.
system_profiler SPSerialATADataType | grep 'TRIM Support'
However, if you want to enable TRIM, open Terminal and run the command given below:
sudo trimforce enable

Note: It may warn you to enable it at your own risk.
Enable TRIM in Linux
In Linux, you can enable TRIM by using periodic TRIM (recommended). Using periodic TRIM makes TRIM run automatically once a week using the fstream command through the system interface. To check if TRIM is enabled in Linux, Open a terminal and run the following command:
sudo fstrim -v /

If the command is executed successfully, showing you how much space was trimmed, TRIM is working. If now, you’ll see some sort of warning message like I get in my system. To enable TRIM, open the terminal and run the following code.
sudo systemctl enable fstrim.timer
sudo systemctl start fstrim.timer

Conclusion
TRIM is a critical SSD command that helps maintain performance, increase lifespan, and reduce write amplification. It prevents the SSDs from wasting resources and time copying and rewriting stale data during the internal processes like garbage collection. TRIM minimizes unnecessary write operations and controls the already limited program/erase cycles of the flash memory. However, data recovery is generally impossible when TRIM is enabled. But, this is the only drawback that you get with TRIM. Everything else is just benefits.