Microsoft Defender Antivirus (formerly Windows Defender) is built into Windows 10 and Windows 11, offering real-time protection against viruses, ransomware, phishing attacks, and other security threats. For most users, it’s an effective security solution that works quietly in the background.
However, there are situations where you may want to disable it permanently. For example, you might be installing a third-party antivirus, testing software that Defender keeps flagging as suspicious, deploying Windows across multiple devices, or troubleshooting performance issues caused by real-time scanning.
The problem is that simply turning off Real-time Protection in Windows Security doesn’t last. Wndows automatically turns it back on after a restart or after a short period of inactivity, leaving many users wondering how to permanently disable Windows Defender.
In this guide, you’ll learn several ways to disable Microsoft Defender, including using Local Group Policy Editor, Registry Editor, and third-party antivirus software. We’ll also explain when it’s appropriate to disable Defender, what risks are involved, and why it sometimes turns itself back on.
🎯 Important:
- Permanently disabling Windows Defender can leave your computer vulnerable to malware if you don’t have another security solution installed. Unless you have a specific reason, Microsoft recommends keeping Defender enabled.
- If you’re only trying to stop Windows Defender from deleting a specific file, adding an exclusion is usually a safer choice than disabling it entirely.
Can You Permanently Disable Windows Defender?
Yes, but the answer depends on your Windows edition and your security configuration.
Many users believe that turning off Real-time Protectionin Windows Security permanently disables Microsoft Defender. Unfortunately, that’s not how it works.
When you disable Defender through Windows Security, you’re only turning off real-time scanning temporarily. Windows automatically re-enables it after:
- Restarting your computer
- A scheduled security check
- Installing Windows Updates
- Detecting that no active antivirus software is installed
To permanently disable Windows Defender, you’ll need one of these methods:
| Method | Windows Home | Windows Pro/Enterprise | Permanently? |
| Windows Security | ✅ | ✅ | ❌ |
| Group Policy Editor | ❌ | ✅ | ✅ Mostly |
| Registry Editor | ✅ | ✅ | ✅ (Limited on newer Windows versions) |
| Install a Third-Party Antivirus | ✅ | ✅ | ✅ Recommended |
Things to Know Before Disabling Windows Defender
Before disabling Microsoft Defender permanently, it’s important to understand the potential consequences. Defender is deeply integrated into Windows and serves as your first line of defense against malware, ransomware, spyware, and phishing attacks.
For most home users, leaving Defender enabled is the safest option. If you decide to disable it, consider the following points first.
Explore more: Is Windows Defender Good Enough for Windows 11 (Full Guide)
1. Your PC Will Lose Real-Time Malware Protection
Once Defender is disabled, Windows will no longer actively scan files, downloads, email attachments, or running applications for malicious activity. Your computer becomes significantly more vulnerable to viruses, ransomware, trojans, spyware, rootkits, and phishing attacks.
2. Install Another Antivirus First
If your goal is to use another security solution, install it beforedisabling Defender. Popular alternatives include Bitdefender, Norton, ESET, Kaspersky, Avast, and AVG.
3. Create a Restore Point
Changing Group Policy or Registry settings always carries some risk. Creating a System Restore Point allows you to roll back changes if something goes wrong.
4. Windows Updates May Re-enable Defender
Even after you’ve disabled Microsoft Defender, certain Windows feature updates or major security updates may restore default security settings.
5. Consider Using Exclusions Instead
If Defender is only blocking a trusted application or slowing down a specific workload, you don’t necessarily need to disable it entirely. Adding an Exclusionis often a better solution. This keeps your computer protected while preventing Defender from interfering with trusted software.
Method 1. Temporarily Disable Windows Defender
If you only need to disable Microsoft Defender while installing software, testing an application, or performing a specific task, you can temporarily turn off its real-time protection through Windows Security.
Keep in mind that this method does not permanently disable Windows Defender. Windows will automatically turn protection back on after a restart or after a period of inactivity.
How to Steps:
- 1. Press Windows + I to open Settings.
- 2. Go to Privacy & Security > Windows Security.
- 3. Click Virus & threat protection.
- 4. Under Virus & threat protection settings, select Manage settings.
- 5. Turn Real-time protection Off.
- 6. Confirm the User Account Control (UAC) prompt if prompted.
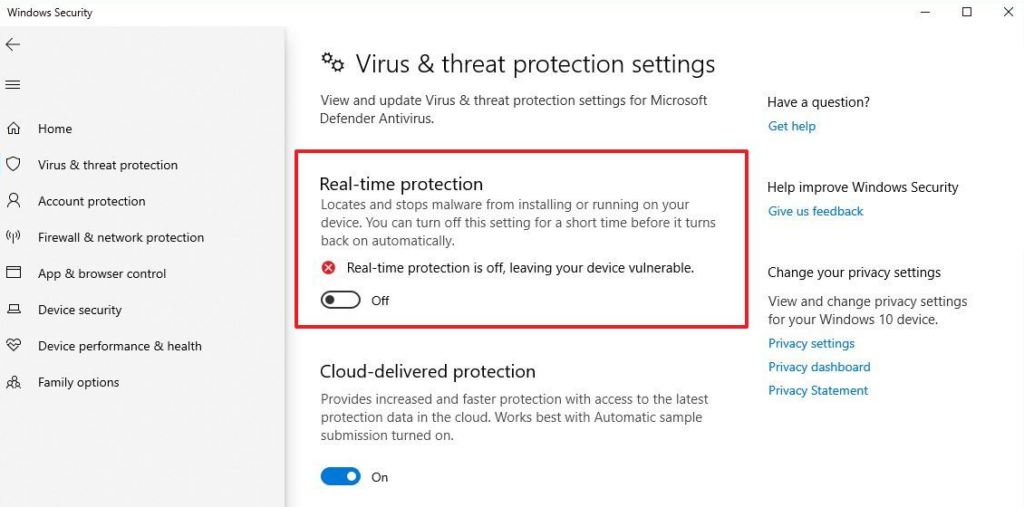
Your device will remain unprotected until Windows automatically restores Defender or you manually enable it again.
Best For: Installing trusted software, running scripts that Defender blocks, temporary troubleshooting, short-term performance testing
Note: If Defender keeps re-enabling itself, that’s expected behavior. Continue with the following methods if you need a longer-lasting solution.
Method 2. Permanently Disable Windows Defender Using Group Policy
Best for: Windows 11 Pro, Windows 10 Pro, Enterprise, and Education editions.
The Local Group Policy Editor provides the most reliable built-in method for disabling Microsoft Defender. Unlike temporarily turning off real-time protection, this policy instructs Windows to stop running Defender Antivirus.
Before You Begin, disable Tamper Protection first: Windows Security > Virus & threat protection > Manage settings > Tamper Protection > Off
How to Steps
Step 1. Open Local Group Policy Editor
Press Windows + R, type: gpedit.msc, and press Enter.
Step 2. Navigate to Defender Policy
Computer Configuration > Administrative Templates > Windows Components > Microsoft Defender Antivirus.
Step 3. Open the Policy
Double-click Turn off Microsoft Defender Antivirus.
Step 4. Enable the Policy
Select Enabled, and click Apply > OK.
Step 5. Restart Your Computer
Restart Windows for the changes to take effect.
To verify the result, open Windows Security, you should see that Microsoft Defender Antivirus is no longer actively protecting the system, or Windows Security may indicate that another antivirus solution is managing protection.
Note: On some recent Windows 11 versions, Microsoft may ignore this policy unless another antivirus solution is installed.
Method 3. Permanently Disable Windows Defender Using Registry Editor
Best for: Windows Home users who don’t have access to Local Group Policy Editor.
Windows Home doesn’t include gpedit.msc, but you can attempt to disable Defender through the Windows Registry.
How to Step:
Step 1. Disable Tamper Protection
Open Windows Security > Virus & threat protection > Manage settings > Tamper Protection, and turn it Off.
Step 2. Open Registry Editor
Press Windows + R, type regedit, and click OK.
Step 3. Navigate to the Following Key
HKEY_LOCAL_MACHINE
\SOFTWARE
\Policies
\Microsoft
\Windows Defender
If the Windows Defenderkey doesn’t exist, create it manually.
Step 4. Create a DWORD Value
Right-click the right pane, select New > DWORD (32-bit) Value. Name it DisableAntiSpyware, and set its value to: 1.
Step 5. Restart Windows
Restart your computer.
Microsoft has deprecated the DisableAntiSpyware Registry value on many newer versions of Windows 10 and Windows 11. As a result, this method may no longer permanently disable Defender unless the device is managed by an organization or specific enterprise policies are applied.
Method 4. Install a Third-Party Antivirus
If your goal is simply to stop Microsoft Defender from running because you prefer another antivirus, this is the safest and most reliable method. When Windows detects a compatible antivirus solution, it typically disables Defender’s real-time protection automatically to avoid conflicts between security programs.
Popular Antivirus Alternatives:
- Bitdefender
- Norton 360
- ESET NOD32 Antivirus
- Avast One
- AVG Internet Security
- Kaspersky Standard
You may be interested: Avast vs Windows Defender
Why Does Windows Defender Keep Turning Back On?
One of the most common complaints from Windows users is that Windows Defender keeps turning back oneven after they disable it. If you’ve searched for how to permanently disable Windows Defenderbut found that it re-enables itself after a reboot or Windows Update, you’re not alone.
In most cases, this behavior is intentional. Microsoft designed Defender to automatically restore protection if it detects that your PC is no longer adequately secured.
Here are the most common reasons why Microsoft Defender keeps reactivating itself.
- 1. You Only Disabled Real-time Protection
- 2. Tamper Protection Is Enabled
- 3. Windows Update Restored Security Settings
- 4. Your Third-Party Antivirus Was Removed
- 5. Group Policy or Registry Changes Are No Longer Supported
Windows Defender vs. Third-Party Antivirus
Many users searching for disable Windows Defender Windows 11 or disable Windows Defender Windows 10 simply want to use another antivirus solution. Before making the switch, it’s worth comparing Microsoft’s built-in protection with dedicated security software.
| Microsoft Defender | Third-Party Antivirus | |
| Cost | Free | Free & Paid Options |
| Built into Windows | ✅ | ❌ |
| Real-time Protection | ✅ | ✅ |
| Ransomware Protection | Basic | Usually More Advanced |
| Firewall | Windows Firewall | Often Includes Enhanced Firewall |
| Web Protection | Basic SmartScreen | Advanced Anti-Phishing Features |
| VPN | ❌ | Often Included (Premium Plans) |
| Password Manager | ❌ | Frequently Included |
| Identity Monitoring | Limited | Available with Many Premium Suites |
| Performance Impact | Low | Varies by Vendor |
| Automatic Windows Integration | Excellent | Good |
If you’re switching to another antivirus, there’s usually no need to manually turn off Windows Defender permanently. Windows will automatically place Defender into passive mode after detecting a compatible security program.
Should You Disable Windows Defender?
For most people, the answer is NO. Microsoft Defender has improved significantly over the past few years and now provides strong malware protection with minimal impact on system performance. For everyday users, it’s one of the best free security solutions available.
Read more: Windows Defender SmartScreen Prevented an Unrecognized App? How to Fix It Safely
However, there are legitimate situations where disabling Defender makes sense.
You Should Consider Disabling Defender If:
- You’re installing another trusted antivirus.
- You’re an IT administrator deploying Windows images.
- You’re testing software in a controlled environment.
- Defender repeatedly blocks trusted development tools.
- You’re troubleshooting conflicts with specialized software.
You Should Keep Defender Enabled If:
- You don’t have another antivirus installed.
- You use your PC for everyday work, school, or gaming.
- You aren’t familiar with Windows security settings.
- You frequently browse the internet or download files.
- You store sensitive personal or financial information on your computer.
Best Practice: If Defender is only interfering with one application, consider adding a Windows Defender exclusioninstead of trying to turn off Windows Defender permanently. This approach maintains overall system security while allowing trusted software to run without interruption.
FAQs
1. Is it safe to disable Windows Defender permanently?
Only if another trusted antivirus is already installed. Running Windows without any active antivirus protection significantly increases the risk of malware infections, ransomware attacks, and other security threats.
2. Does installing Bitdefender or Norton automatically disable Windows Defender?
Yes. Most reputable antivirus programs automatically register with Windows Security. Windows then disables Defender’s real-time protection to prevent conflicts between multiple antivirus engines.
3. Does the Registry method still work?
Sometimes. The DisableAntiSpywareRegistry value has been deprecated on many modern Windows 10 and Windows 11 versions. As a result, Registry-based methods may not permanently disable Defender on newer systems.
4. What’s the difference between disabling Defender and adding exclusions?
Disabling Defender turns off malware protection for your entire computer. Adding an exclusion tells Defender to ignore only a specific file, folder, process, or application while continuing to protect the rest of your system.
Final Verdict
If you’re looking for how to permanently disable Windows Defender, there isn’t a one-size-fits-all solution. The best method depends on your Windows edition, your reason for disabling Defender, and whether you plan to use another antivirus.
For Windows 11 Proand Windows 10 Pro, Group Policy Editoroffers the most reliable built-in way to turn off Windows Defender permanently. Windows Home users can try the Registry Editor, but its effectiveness has been reduced in newer Windows releases. If you’re switching to another security solution, simply installing a trusted third-party antivirus is the easiest and most future-proof option, as Windows will automatically place Microsoft Defender into passive mode.