Affiliate Disclosure: This post may include affiliate links. If you click and make a purchase, I may earn a small commission at no extra cost to you.
If you have just bought a new SSD and have plugged it into your system, your system may not directly show the drive – don’t panic.
So what does that signify?
In simple terms, SSD initialization is akin to setting the stage so that the computer recognizes how to utilize this device. Without it, the drive is merely a piece of hardware attached to the system, sitting there blank and invisible.
Technically, Initialization is the process of setting up the partition structure of an SSD so that the operating system can recognize and use the drive. It is the first step before making the SSD ready to store files, install applications, or run an operating system.
When and why do you need to initialize the SSD?
- Brand New SSDs – When you buy a new SSD and plug it into your system, it won’t immediately appear in the File Explorer; instead, the SSD will be displayed as unallocated space in Disk Management. At that moment, they must be initialized before they can be formatted for use.
- Reformatting or Repurposing – If you are installing the SSD into a new system or repurposing one from an old device, initialization makes sure that it is properly configured for the new environment.
After Corruption or Errors – Sometimes, your SSD may require reinitialization due to partition table corruption.
Warning:
- One important thing to understand is that initializing an SSD erases all the existing data inside the drive if it has been used before. The process removes the file system architecture and the partition table, eventually making the previous file inaccessible.
- Initializing the wrong drive is a very common error made by people, so double-check everything before taking any such step.
Before You Begin
If your SSD has been used before, a quick step is to back up all the important data before proceeding. As mentioned above in the warning, initialization wipes out all previously stored data by erasing the entire drive. Once initialized, the recovery of data is complex and sometimes impossible. Having ensured that, check that your SSD is properly connected to the system. For SATA SSDs, verify that the data cable is securely attached to the motherboard/power supply.
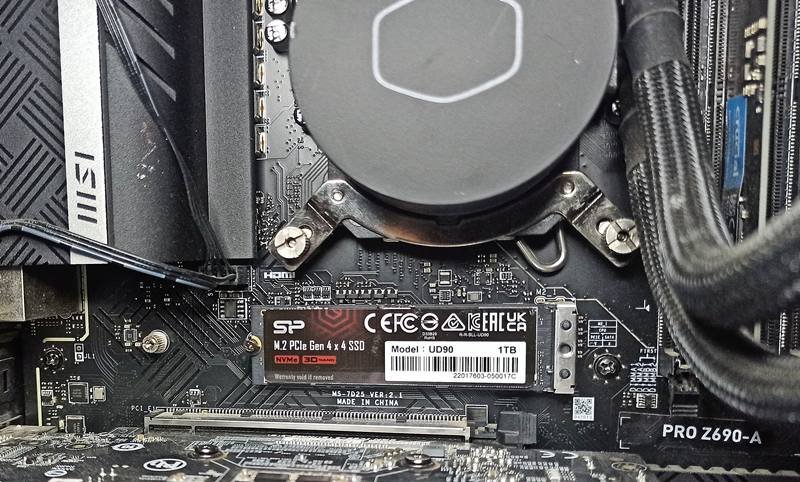
For NVMe or M.2 SSDs, ensure the drive is connected to the correct M. 2 slot and screwed in properly if required.
Detecting the SSD in Your System
If, by any chance, the system does not display a pop-up upon connection. You can verify the SSD connected to your system by using the following methods.
In Windows
Enter the BIOS if using Windows during startup, usually by pressing Del, F2, or Esc during the bootup. You can check this article to learn more about entering the BIOS for your manufacturer. Once entered, find the storage or boot menu that lists the connected devices. If the SSD appears here, that means the SSD is recognized at the hardware level. If not, check this article.
Initialize using Device Manager or Disk Management
1. Connect and detect the SSD
The first step is to properly connect the drive to your computer. Boot into Windows. If it’s brand new, it usually won’t show up in File Explorer yet — that’s normal.
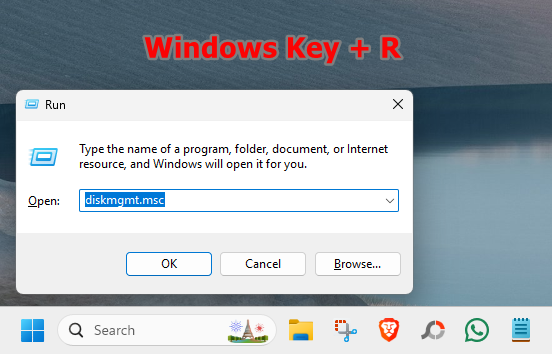
2. Open Disk Management
Press Windows + X and select Disk Management. Or press Windows + R, type diskmgmt.msc, and hit Enter.
3. Find the new SSD
In the lower panel, look for a drive labeled “Unknown” and “Not Initialized”.
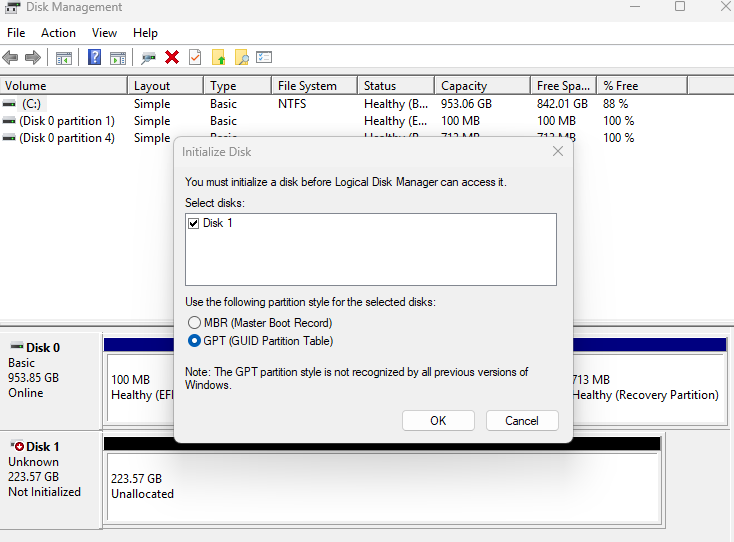
It will usually be listed as Disk 1, Disk 2, etc. (Make sure you’re selecting the correct one — do not initialize your primary OS drive by mistake.)
4. Initialize the SSD
You must select the desired drive if there are multiple options and choose the correct partition style. You get two options.
- GPT (GUID Partition Table) — recommended for modern systems and SSDs, supports drives over 2 TB, required for UEFI boot.
- MBR (Master Boot Record) — older format, use only for legacy systems or compatibility reasons.
Creating a New Volume
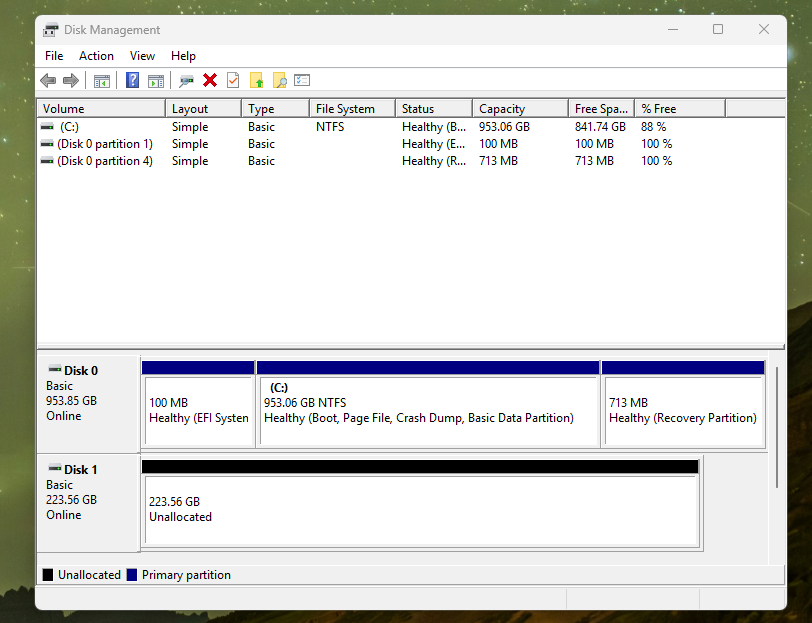
Your drive will not be of any use until you create a volume from it. This includes giving it a name, setting the partitions, and formatting the drive. You will be able to do it after the initialization. You will find your drive allocated with the total usable size in the disk management menu.
- Right-click on the “Unallocated” disk label and select New Simple Volume.

- Assign drive letter or path
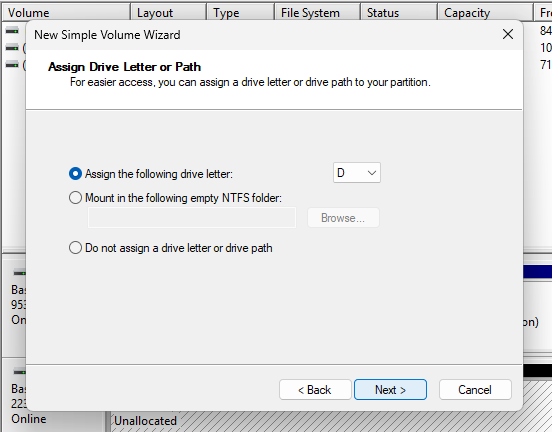
- Choose NTFS or exFAT (NTFS is standard for Windows).
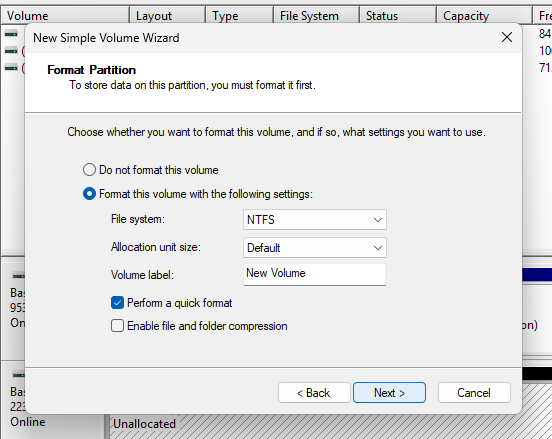
Perform a Quick Format.
The SSD should now appear in File Explorer under the assigned drive letter and be ready to use.
Initialize a Disk in MacOS
Step 1: Open Disk Utility in Applications.
Step 2: Select the SSD from the left panel, which may be labeled as “Untitled” or “Uninitialized”.
Step 3: Press “Erase” at the top and select a name that you prefer and format it as either APFS or macOS Extended.
Step 4: Choose the GUID partition type.
Step 5: Click Erase to format and initialize the SSD.
Initialize a Disk in Linux
1. Identify the disk
Before touching anything, make sure you know which drive you want to initialize. Open a terminal and run either of these commands.
lsblkor
sudo fdisk -lYou’ll see output like:
NAME   MAJ:MIN RM   SIZE RO TYPE MOUNTPOINTS
sda      8:0    0  1000G  0 disk
├─sda1   8:1    0  128G  0 part /
└─sda2   8:2    0  400G  0 part /data
sdb      8:16   0  256G  0 disk
Here, sdb is an unpartitioned disk.
Double-check the device name to avoid erasing your OS drive.
2. Initialize (create a partition table)
Option A – Using fdisk (MBR or GPT)
sudo fdisk /dev/sdbInside fdisk:
- g → Create a new GPT partition table
(orofor MBR) - n → Create a new partition
- w → Write changes and exit
Option B – Using parted (better for large disks)
sudo parted /dev/sdbInside parted:
mklabel gpt     # or msdos for MBR
mkpart primary ext4 0% 100%
quit
3. Format the partition
After creating the partition, format it with a filesystem (e.g., ext4):
sudo mkfs.ext4 /dev/sdb1
4. Mount the disk
sudo mkdir /mnt/mydisk
sudo mount /dev/sdb1 /mnt/mydisk
To mount automatically at boot, add it to /etc/fstab using the disk’s UUID:
sudo blkid /dev/sdb1Conclusion
Disk initialization is a crucial step, especially when purchasing an SSD, as it ensures the drive is properly set up. The initialization process prepares your drive for new use. It is done in multiple scenarios, such as when troubleshooting a storage issue on your laptop, or when installing a new SSD in the system, upgrading the system itself, or repurposing an old drive.
Although the steps involved in initialization differ for various platforms, the core idea remains the same: properly organizing the overall space in the drive to enable efficient read and write operations.
Once initialized, the SSD will be ready for full use. It will be prepared for further partitioning or formatting.