Affiliate Disclosure: This post may include affiliate links. If you click and make a purchase, I may earn a small commission at no extra cost to you.
A computer consistently booting directly to the BIOS (a “BIOS loop”) usually means the system cannot find a bootable operating system on your hard drive or SSD. If your computer keeps booting to BIOS instead of Windows, you’re not alone. This is a common issue on laptops and desktops from brands like ASUS, Dell, HP, MSI, Lenovo, and Acer.
In most cases, this issue is fixable without replacing your entire system. In this article, we’ll explain why your PC boots directly into BIOS and how to fix PC keeps booting into BIOS.
Why Does My Computer Keep Booting to BIOS?
The BIOS (Basic Input/Output System) is firmware that initializes your hardware before loading your operating system, like Windows 10 or Windows 11. If your PC keeps entering BIOS automatically, it usually means:
- The system cannot detect a bootable drive
- Boot order is incorrect
- Hard drive/SSD has failed
- Windows system files are corrupted
- CMOS battery issues
Common causes include:
- Incorrect boot order
- SSD/HDD not detected
- Loose or damaged cables
- Corrupted Windows bootloader
- Dead CMOS battery
- Failed or failing drive
How to Fix PC Keeps Booting to BIOS
The following are the common solutions to fix the BIOS boot loop.
Fix 1. Remove External Devices
Often, the problem is less complicated than you think. First, unplug all non-essential external devices, including USB drives, external hard drives, external sound cards, and even extra USB devices besides your keyboard and mouse. Sometimes, a faulty USB device can interfere with the Power-On Self-Test (POST), tricking the system into thinking there’s no bootable drive.
Fix 2. Verify Boot Order in BIOS
The most common reason a PC keeps booting into BIOS is incorrect boot priority. When the system cannot find a properly prioritized boot device, it will automatically redirect to firmware settings. This is especially common after adding a new drive, updating BIOS, or resetting CMOS settings.
Here is how to check the boot order in the BIOS/UEFI settings:
Step 1. Restart your PC.
Step 2. Enter BIOS (usually press F2, F10, F12, DEL, or Esc during startup).
Step 3. Navigate to Boot or Boot Priority.
Step 4. Make sure your system drive (SSD/HDD with Windows) is set as Boot Option #1.
Step 5. Save changes and exit.
If your PC boots normally after this, the issue was simply boot priority.
Fix 3. Check If Your Drive Is Detected
If your system drive doesn’t appear in BIOS, Windows cannot load. In this situation, the issue is no longer just configuration-related – it may involve hardware connectivity. Before assuming your drive is dead, it’s important to verify physical connections and detection status.
- Enter BIOS.
- Go to Storage, SATA Configuration, or Storage Configuration.
- Check if your SSD/HDD is listed.
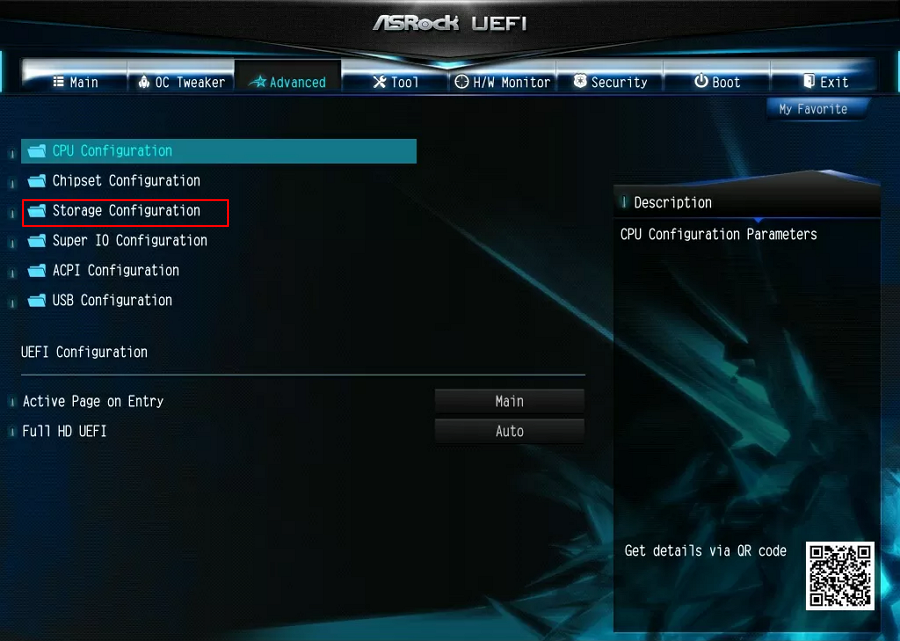
If NOT detected:
- Power off your PC.
- Unplug the power cable.
- Open the case.
- Reseat SATA cables or NVMe SSD.
- Try a different SATA port or cable.
If the drive still isn’t detected, it may be failing.
Fix 4. Disable Fast Boot and Secure Boot
Sometimes BIOS settings conflict with Windows startup. Modern systems include additional security and acceleration features that can unintentionally interfere with boot detection. Adjusting these settings often resolves boot loops caused by firmware miscommunication.
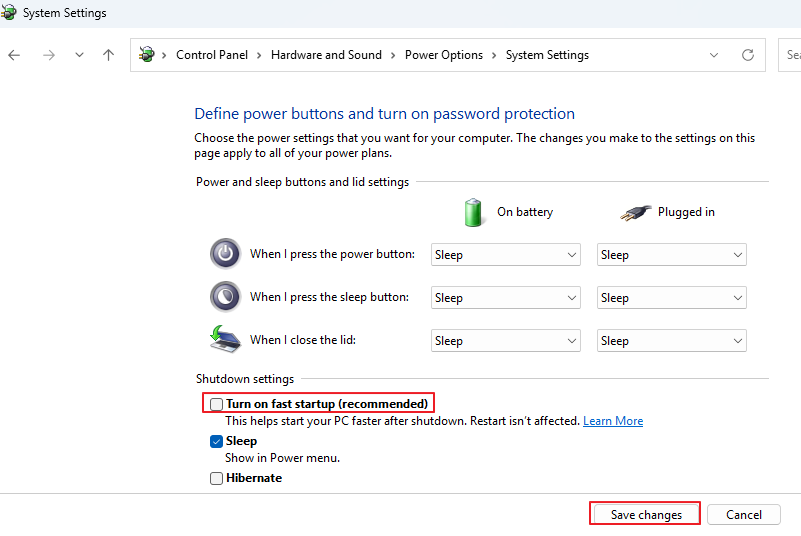
Disable Fast Boot:
Step 1. Search for “Control Panel” in the Windows search bar.
Step 2. Select “Hardware and Sound” (set view to Category), then click “Power Options”.
Step 3. Click “Choose what the power buttons do” on the left pane.
Step 4. Click the “Change settings that are currently unavailable” link at the top (requires administrator rights).
Step 5. Under “Shutdown settings,” uncheck “Turn on fast startup (recommended)” and click “Save changes”.
Disable Secure Boot (if necessary):
- Restart your computer and repeatedly press the BIOS key (common keys: F2, F10, F12, Del, or Esc).
- Use arrow keys to find the “Security” or “Boot” tab.
- Select “Secure Boot” and change the setting to “Disabled”.
- Press F10 to save changes and exit.
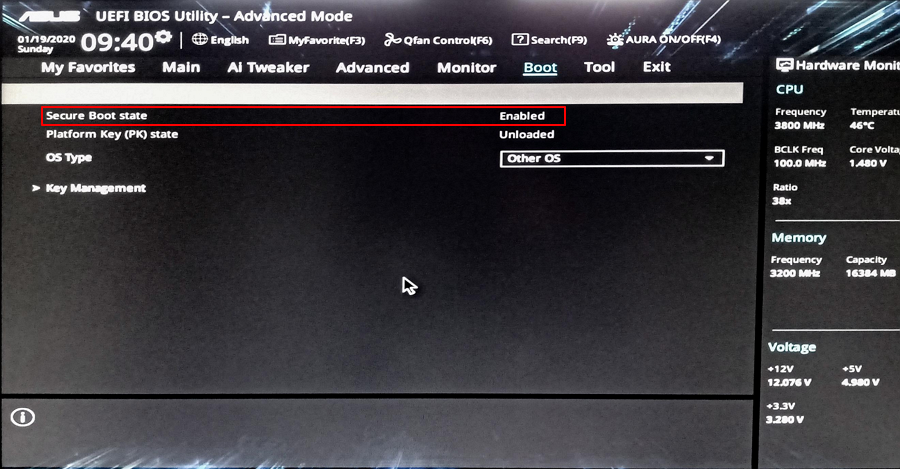
If Windows loads, you’ve found the culprit.
Fix 5. Toggle CSM/UEFI Modes
A mismatch between Windows installation mode and BIOS boot mode can cause repeated BIOS booting. This usually happens after cloning a drive, migrating to a new SSD, or switching motherboard settings. When the firmware mode doesn’t match the partition style, Windows simply won’t start.
Step 1. Enter BIOS.
Step 2. Find Boot Mode.
Step 3. Check if it’s set to:
- UEFI
- Legacy (CSM)
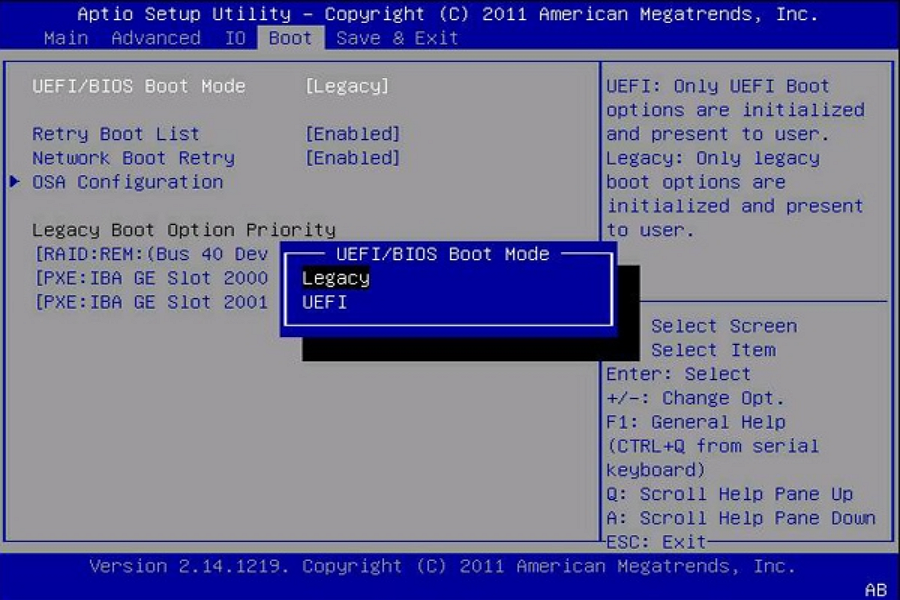
If Windows is installed in UEFI mode, BIOS must also be set to UEFI.
Fix 6. Reset BIOS to Default Settings
Corrupted firmware settings can trigger BIOS loops. Even minor configuration errors can prevent proper boot device initialization. Restoring default settings ensures the system returns to a stable baseline configuration.
Step 1. Restart your computer.
Step 2. Press the BIOS key (common keys: F2, F10, F12, Del, or Esc) repeatedly during startup.
Step 3. Once in the menu, look for an option named “Load Setup Defaults,” “Load Optimized Defaults,” or similar.
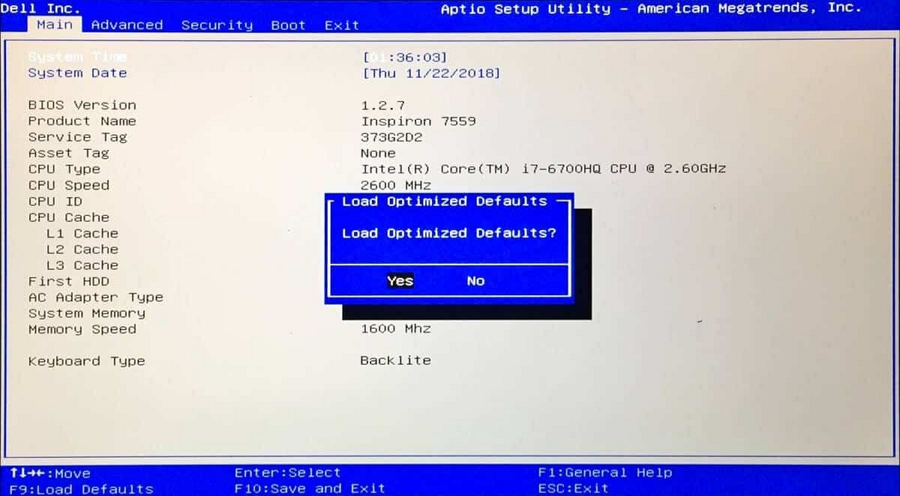
Step 4. Select it, confirm the action, and select “Save & Exit” (often F10)
Fix 7. Reset CMOS Battery
If your PC keeps forgetting settings or date/time resets, the CMOS battery may be dead. A weak CMOS battery can cause BIOS to reset every time the system powers off. This often leads to repeated boot priority issues and unexpected firmware behavior.
- Power off and unplug your PC.
- Open the case.
- Remove the small coin-cell battery from the motherboard.
- Wait 1-5 minutes.
- Reinsert or replace it (CR2032 battery).
- Reassemble and boot.
Note: If your motherboard features a dedicated “Clear CMOS” button, you can use it as a convenient shortcut. With the PC powered off and the power cable unplugged, simply press and hold this button for 5-10 seconds.
Fix 8. Check for Drive Failure
If nothing works, your drive may be failing. Storage devices degrade over time, and early symptoms often appear as boot detection issues. Identifying drive failure early can help prevent permanent data loss. If the BIOS does not list your hard drive at all, the drive may have failed and might need replacement.
Signs of a failing hard drive include:
- Clicking noises
- Drive disappearing intermittently
- Extremely slow detection
- SMART errors
In this case, immediately:
- Stop using the drive
- Connect it to another PC (if possible)
- Back up important data
If the drive is dead, replacing it and reinstalling Windows may be necessary.
Conclusion
If your computer keeps booting to BIOS, don’t panic. Most cases are caused by boot order errors, drive detection issues, or a corrupted bootloader – all of which are usually fixable with systematic troubleshooting.
But remember: boot problems can sometimes signal early drive failure. What looks like a minor configuration issue today could turn into data loss tomorrow.
That’s why maintaining regular backups is essential. Whether you use system images, file backups, cloud storage, or disk cloning, having a recent backup ensures you can recover quickly – without starting from scratch.


![How to Optimize SSD Read/Write Speed? [Expert Guide]](https://storedbits.com/wp-content/uploads/2024/08/cdm-result-768x449.png)