Affiliate Disclosure: This post may include affiliate links. If you click and make a purchase, I may earn a small commission at no extra cost to you.
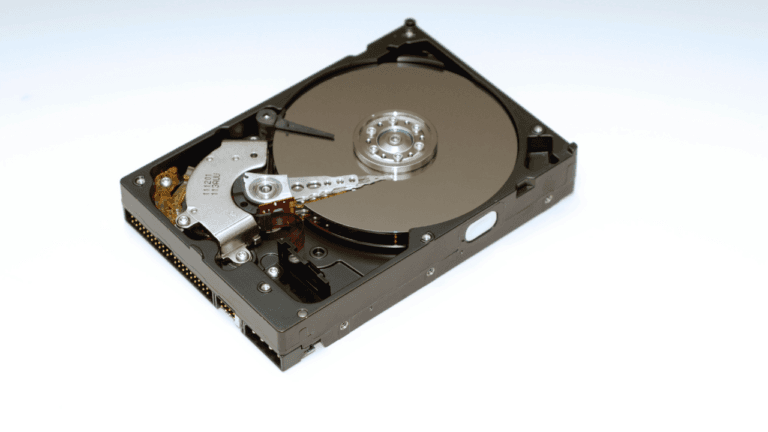
There are numerous SSD and Hard drive cloning software on the internet but Clonezilla has its own legacy. Of course, the GUI programs make our work easier but most of them are either paid or are really slow and heavy on our computer computers. Clonezilla can be really helpful where huge data movements are important.
It is open-source, customizable, fast, and secure. It supports multiple operating systems and file systems like Linux (ext2, ext3, ext4, Btrfs, XFS), Windows (NTFS, FAT32, FAT16), macOS (HFS+), and even others. It offers compression and encryption options. In fact, it can work perfectly to clone encrypted drives. However, the biggest issue with Clonezilla is its somewhat steep learning curve. It is hard to use for most common computer users. So, in this article, I am going to give you a detailed guide on how to clone any drive using Clonezilla and then restore it to move your files or OS here and there. Let’s get started.
How to Clone Drive using Clonezilla?
Step 1: Download & Create a Bootable Clonezilla USB
- Download Clonezilla from the official website.

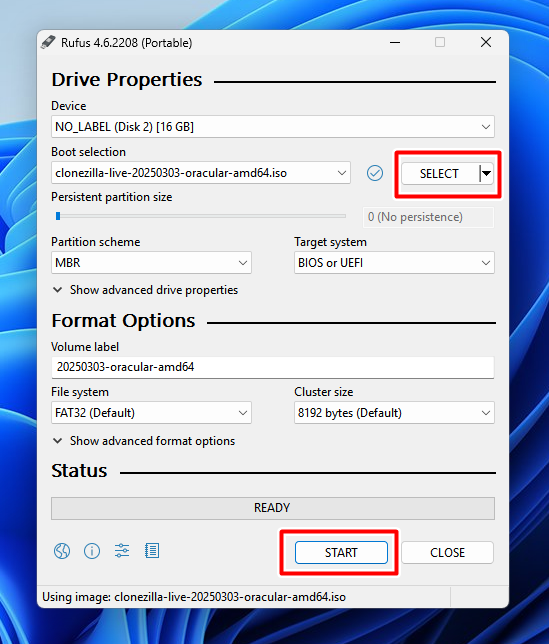
- Create a bootable USB drive using Rufus (Windows) or balenaEtcher (Mac/Linux). I am on Windows, so I’ll pick Rufus. Just connect the USB drive and launch the Rufus.

- In Rufus, choose your USB flash drive and select the ISO file that you have downloaded. Just press Start to create the bootable USB flash drive.
Step 2: Boot from Clonezilla USB
- Insert the bootable USB into your computer.
- Restart your system and enter the BIOS/UEFI (usually by pressing
F2,F12,Esc, orDelat startup). - Change the boot order to prioritize USB.

- Save and exit to boot into Clonezilla.
Step 3: Select Cloning Mode
- Now, you’ll be asked to choose the mode. It is best to choose the first option i.e. Clonezilla Live (VGA 800×600).

- Once Clonezilla loads, select your language and keyboard layout and press
Enter.

- Choose “Start Clonezilla” and press
Enter. - Select “Device-Device (disk to disk)” mode for direct disk cloning.

The device to image mode saves disk images which are often smaller than full-size disks and can be restored multiple times. This is great for backup use cases because the image file is smaller than the actual drive size. This is the option we are going to use today. So, choose the first option. Difference between disk imaging and disk cloning.
The device-to-device mode clones the content and layout from one drive to another. This one is great if your goal is just to migrate from one drive to another. In device-to-device cloning, the destination drive must be equal to or larger than the source drive.
There are remote cloning features that allow cloning drives from two machines connected over a network but these features are of no use today.
Step 4: Choose the cloning mode
- In the next menu, you’ll be asked to choose the cloning mode. You get many options including a ram disk, server cloning, shell, etc. Just choose the local_dev option which is the first option. Make sure all the drives including the destination, source, and USB are connected to the computer.

- On the next page, you’ll see all your disks connected to the computer. Make sure to check if the source disk, destination disk, and Clonezilla USB flash drive are showing up. If everything is fine, press Ctrl-C to exit this window.

Step 5: Choose the Destination Drive
- In the next menu, you’ll have to select the destination drive i.e. the drive where you want to move the image file.

- Check and repair the file system (optional). I am skipping this part because I know the SSD partition is in good working condition.

- Then you’ll have to choose the folder in the destination drive if you have folders inside it. If the drive is empty, you’ll proceed directly.
Step 6: Choose the cloning wizard
On the next menu, you’ll be asked to choose the cloning wizard. You can either choose Expert mode with many options or the Beginner mode to accept the default settings and make the process easier for you. I am choosing the Beginner mode here.

Step 7: Choose savedisks or savepart
- Next, you’ll have to choose the whole disk or individual partitions. Saving individual partitions can be complex for most users so you are good to go with the savedisks option.

- Now, you can name the disk image if you want or keep it as it is.

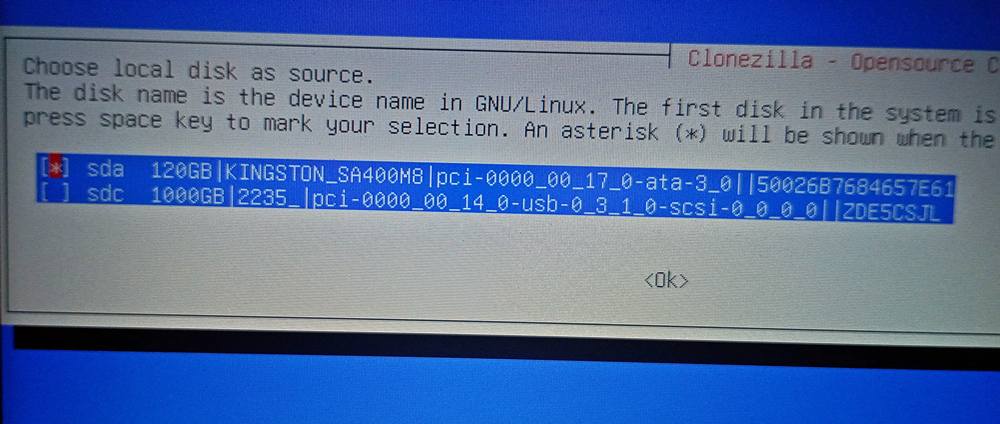
Step 8: Choose the Source Disk
Finally, you choose the source disk from where you want to copy the data. It is generally your OS drive but can vary depending on your goal.
- To choose the disk, you’ll have to add a STAR symbol (using the Space key) before you hit Enter.
- If you want, you can choose to compress the data but it is good to keep the default option checked.

- You can choose the check the file system before you save the settings. Again, you can skip it if you want but choosing to check won’t hurt either.

- Next, you can choose to check if the image is restorable (recommended). Also, you can choose the encrypt the image. For enterprise backups, this option can be good but you can skip it for personal use.


You can also be asked to keep or refuse the log files. You can refuse if you want. Some commands will run and you will be asked to continue or discard by entering (Y/N) and then hitting Enter.
Then you can save the settings and choose whether the system will reboot or shut down after the cloning is finished. The move will take some time depending on the size of the data.

How to Restore a Clonezilla image to a new system?
The restoration of the image file is almost similar to the cloning process. We choose just a few different options where the restore instead of cloning. Let’s see how we do that.
This time, make sure to have the destination drive with the capacity same or larger than the actual size of source drive.
Step 1: Boot into Clonezilla and run the program
Just do the basic steps like entering the BIOS, choosing Clonezilla bootable drive, choosing a language, keyboard, local device, etc. Also, I plug in the drive containing the image and then select the drive.

You can skip the checks like repair drive.
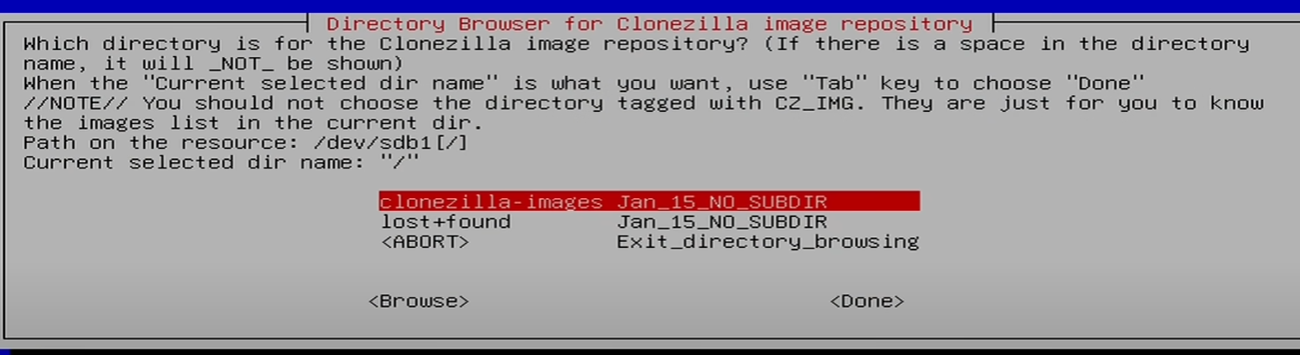
Step 2: Select the image directory
Just choose the image directory. Do not enter the directory and choose the actual image file. Clonezilla know what to do with the main directory. In other words, as you hit enter on the image subdirectory, just hit Done and nothing else.

Choose the beginner mode as we did earlier.

Step 3: Choose the Restore Mode
In the cloning process, we selected savedisk option here. But, this time, we are going to select the restoredisk option.

Step 4: Select the target drive
On the next page, you’ll select the target drive where the image will restored. All the data from the drive will be deleted.

You can choose the default options after that and continue further. Once, you make all the selection, you will be asked twice to continue by hitting enter and the cloning/restoration process will start.

Here is a great video illustrating the whole process of using Clonezilla. I hope this helps!