Affiliate Disclosure: This post may include affiliate links. If you click and make a purchase, I may earn a small commission at no extra cost to you.
If you see macrium reflect clone failed error 9, error 8, or error 0 when performing disk imaging and disk cloning, it means that the disk cloning process has been interrupted due to I/O problems, permission conflicts, or disk integrity issues. These errors commonly appear when using Macrium Reflect to clone HDD to SSD, migrate Windows, or back up system partitions.
This guide shows you the Step-by-step solutions that actually fix macrium reflect clone failed issues.
Why Macrium Reflect Clone Failed Error 9, 8, 0?
Although the codes differ slightly, they are usually related to read/write failures during cloning.
| Error Code | Meaning | Typical Causes |
| Macrium Reflect Error 9 | I/O read/write failure | Bad sectors / Poor device contact / USB bridging issues |
| Macrium Reflect Error 8 | File system read error | File system corruption / Unmounted volume / Active system partition conflict |
| Macrium Reflect Error 0 | Generic failure | Unexplained failure / Driver conflict / Target disk driver incompatibility |
Fix 1. Repair Source Disk Bad Sectors(Read/Write Issues – Error 9, 8)
One of the main reasons for clone failure is the presence of bad sectors or file system corruption on the source disk, which causes Macrium Reflect to encounter Error 9 / CRC errors when reading data. The CHKDSK utility can scan the entire drive, repair logical errors, mark unrepairable sectors, and ensure data integrity and stability during the cloning process.
Steps on how to fix bad sectors in SSD with CHKDSK:
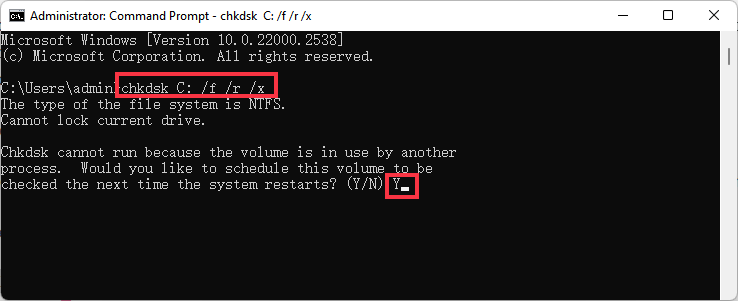
Step 1. Search cmd to find Command Prompt. Choose Run as administrator.
Step 2. Enter the command chkdsk C: /f /r /x and press Enter. Then type Y and press Enter to confirm it.
- /F: Fix file system errors
- /R: Locate bad sectors and attempt data recovery
- /X: Force volume dismount
Step 3. If prompted, restart the computer and allow the scan to complete. Retry the cloning operation after completion.
👉Note: Before running CHKDSK, ensure you back up important files. CHKDSK may relocate or delete unrecoverable data blocks while repairing bad sectors.
CHKDSK may take several hours or even tens of hours to run; please allow sufficient time. Do not interrupt the scan, as this may cause more serious damage to the file system.
Fix 2. Ignore Bad Sectors Option
If the source disk has a small number of unrecoverable bad sectors, Macrium Reflect provides the Ignore bad sectors option. Enabling this allows the clone process to skip problematic sectors without interrupting the operation, allowing most data to be cloned successfully. This is suitable for non-critical or temporary migrations.
Steps to enable ignore bad sectors in Macrium Reflect:
Step 1. Open Macrium Reflect and click Other Tasks > Edit Defaults.
Step 2. Select Advanced Backup Options and check “Ignore bad sectors when creating images” option.
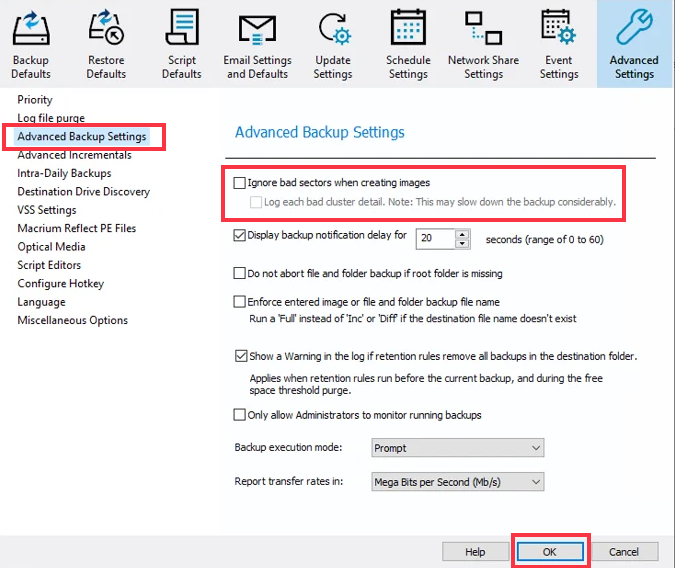
Step 3. Execute the cloning task.
👉Note: Before enabling this option, confirm that this is a temporary migration; the source disk containing bad sectors should be replaced as soon as possible afterwards.
Fix 3. Check Target Disk Health and SMART Status(Error 8)
Target disk health issues are a common cause of Error 8 (write failure). SMART monitoring can display SSD/HDD lifespan, reallocated sectors, and potential failures. Detecting issues in advance can prevent clone failure and data loss.
Step 1. Use command line to check disk status: wmic diskdrive get status. Alternatively, use third-party tools like CrystalDiskInfo to view SMART attributes.
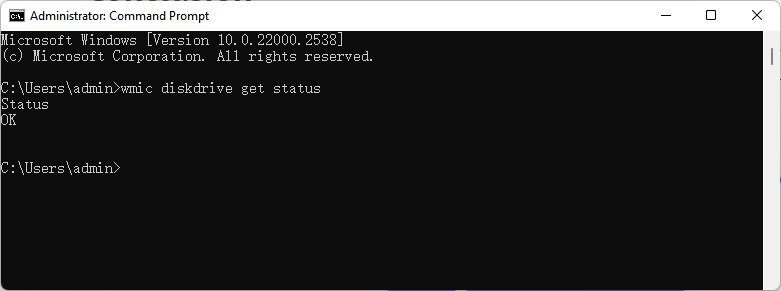
Step 2. If the status is abnormal (e.g., Caution or Bad), you need to replace the disk.
Step 3. Confirm disk health and retry the clone.
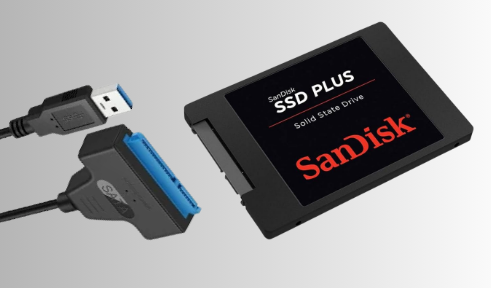
Fix 4. Check and Replace SATA / USB Connections(Error 0)
Unstable data connections often cause Error 0 (I/O error). Loose or low-quality SATA/USB cables can interrupt disk communication, resulting in read/write failures. Ensuring the disk is connected directly to the motherboard SATA port and using high-quality cables stabilizes the transfer and improves cloning success.
Step 1. Power off the computer. And connect the target SSD/HDD directly to a motherboard SATA port.
Step 2. Avoid front-panel USB ports or low-speed USB adapters.
Step 3. Use new or high-quality SATA/USB cables.
Step 4. Power on and retry the clone.
Some users have reported that using cheap USB-to-SATA cables or inferior casings can easily cause I/O interruptions, especially when copying large files. It is recommended to prioritize using the motherboard’s SATA ports, avoid USB hubs, use high-quality cables, and ensure a secure connection.
Fix 5. Disable Antivirus or Disk Monitoring Software
Antivirus or real-time disk monitoring software may block Macrium Reflect’s sector-level I/O operations, causing clone failures or errors. Temporarily disabling these programs allows cloning to proceed smoothly and reduces the chance of Error 0 / write failure.
Steps to disable antivirus software on your Windows PC:
Step 1. Temporarily disable Windows Defender or third-party antivirus.
Step 2. Exit all disk monitoring or backup software.
Step 3. Execute the cloning operation.
Step 4. Re-enable security software after cloning is complete.
Fix 6. Use Macrium Reflect Rescue Environment
Some volumes may be locked or have driver conflicts in the Windows environment, causing clone failures. Using the Rescue Bootable Media allows cloning in a standalone environment, avoiding file system locks, driver conflicts, and antivirus interference, which is especially useful for system disk migrations or advanced cloning tasks.
Step 1. Open Macrium Reflect > Other Tasks > Create Rescue Media.
Step 2. Create a bootable USB drive.
Step 3. Restart the computer and boot from the USB.
Step 4. In the Rescue Environment, select the clone task.
Step 5. Execute the clone operation.
If you encounter UEFI/Legacy boot conflicts or BIOS failure to recognize the boot disk when creating a rescue boot USB drive, it is recommended to confirm the system boot mode, temporarily disable Secure Boot in the BIOS/UEFI if necessary, and ensure that the USB drive is correctly formatted as FAT32 or NTFS.
Fix 7. Disk Initialization and Formatting
For brand-new SSDs or HDDs, if the target disk is not initialized or formatted, it may not accept writes, triggering Error 8 (write failure). Initializing the disk creates a partition table (MBR or GPT), and formatting establishes a file system (NTFS/FAT32), ensuring Macrium Reflect can write data correctly. Please back up your disk data before initialization.
Step 1. Right-click Start icon or press Win + X to open Disk Management.
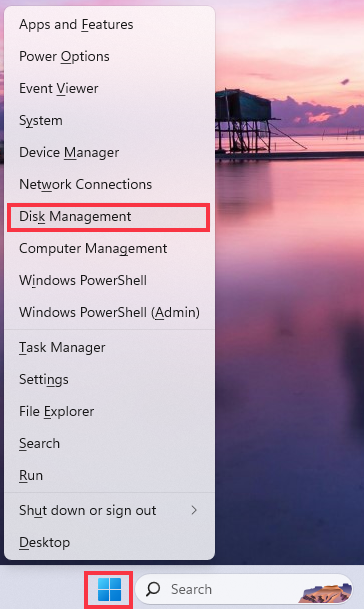
Step 2. Locate the new disk > Right-click > Initialize Disk.
Step 3. Choose partition style:
- MBR: For older systems or compatibility needs
- GPT: Recommended for modern UEFI systems
Step 4. After initialization > Right-click the disk > New Simple Volume > Format. Retry the cloning process.
Fix 8. Partition Alignment
Incorrect partition alignment may degrade SSD performance or cause write anomalies, indirectly causing Error 8 / 0. Macrium Reflect supports automatic alignment, but in manual or advanced cloning scenarios, verifying partition alignment ensures the SSD’s page size aligns with logical partitions, improving write efficiency and stability.
Step 1. Open Macrium Reflect > Clone Wizard.
Step 2. In the target disk partition adjustment interface > Confirm Align partitions to 1MB.
Step 3. Save settings > Execute clone.
Step 4. After cloning, check SSD performance in Windows.
Cloned SSD Won’t Boot? Causes and Quick Fixes
Even if cloning completes successfully in Macrium Reflect, the target SSD may still fail to boot. In most cases, the issue is not the cloning process itself, but a mismatch in boot structure or partition configuration.
Common Causes
- EFI partition not copied correctly (GPT disks): Bootloader files may be missing or not properly recognized.
- GPT/MBR partition style does not match BIOS mode: GPT disks require UEFI mode, while MBR disks require Legacy (CSM) mode.
- BCD (Boot Configuration Data) not updated: After cloning, the system may still reference the original drive’s boot path.
- Incorrect boot order in BIOS: The motherboard may still be attempting to boot from the old drive.
Quick Fixes
- Check Boot Order in BIOS: Enter BIOS/UEFI settings and ensure the new SSD is set as the first boot device. Also confirm that the firmware mode (UEFI or Legacy) matches the disk partition style.
- Rebuild Boot Records (Recommended): Boot from a Windows installation USB → Repair your computer → Command Prompt, then run:
bootrec /fixmbr
bootrec /rebuildbcd
bcdboot C:\Windows
This recreates the bootloader and updates boot configuration data.
- Disconnect the Old Drive Temporarily: Shut down the system and unplug the original disk. This prevents firmware from referencing outdated boot entries.
If your cloned SSD boots normally but you want to further improve its speed and overall performance, you can continue reading our detailed guide on how to improve SSD performance after cloning.


![5 Best File Compression Software for Windows [Free & Paid]](https://storedbits.com/wp-content/uploads/2025/12/best-file-compression-software-768x432.png)