Affiliate Disclosure: This post may include affiliate links. If you click and make a purchase, I may earn a small commission at no extra cost to you.
If your hard disk not detected in BIOS, the computer simply cannot see the drive at the hardware level. When this happens, the disk will not appear in the boot priority list, Windows installation wizard, or storage configuration pages. In many cases, the system may fail to boot altogether.
This problem can occur in several typical situations. For example, you may have just installed a brand-new SATA or NVMe SSD, replaced the old system drive, or added a second disk for extra storage. Everything seems connected properly, yet the BIOS shows nothing. Sometimes the drive was working before, but suddenly disappears after a reboot, power outage, or firmware change.
The good news is that detection failures are usually caused by configuration issues, loose connections, or compatibility settings rather than permanent hardware damage.
In this guide, you will learn eight proven methods, from real test experience and discussions on Reddit, to fix an hard drive that is not showing up in BIOS. We’ll start with the simplest physical checks and move toward firmware, initialization, and cross-device testing, so you can isolate the exact cause efficiently.
Why Disk Is Not Detected in BIOS (Common Causes)
Before jumping into the fixes, it helps to understand what might prevent the motherboard from recognizing the drive. Below are the most common causes of the HDD or SSD not detected in the BIOS.
- Loose or improper connection. A SATA cable, power connector, or M.2 seating problem is still the number one reason. Even a slightly tilted NVMe drive can cause detection to fail.
- Faulty or disabled SATA/M.2 port. The port you are using may be damaged, blocked by lane sharing, or disabled in firmware.
- Disk not initialized or contains incompatible metadata. Some BIOS environments struggle to display drives that are brand new, unallocated, or previously configured under RAID/VMD modes.
- Incorrect BIOS/UEFI configuration settings, such as AHCI vs. RAID/IDE, CSM vs. UEFI, disabling a storage controller, and hidden NVMe configuration can all prevent proper identification.
- Outdated BIOS firmware. Older firmware versions may lack support for newer SSD models or larger capacities.
- Corrupted BIOS configuration. Improper shutdowns, failed updates, or unstable overclocking may cause the storage controller to misbehave.
- Driver or controller communication issue. In some scenarios, especially on modern Intel/AMD platforms, hardware detection depends on specific controller states that may need troubleshooting tools or resets.
- Disk hardware failure. If the drive cannot be recognized by any system, the controller or NAND may be defective.
Based on the causes of hard disk not being detected in the BIOS, we offer 8 effective solutions to fix the issue. Keep reading.
Fix 1. Check & Change Physical Connections
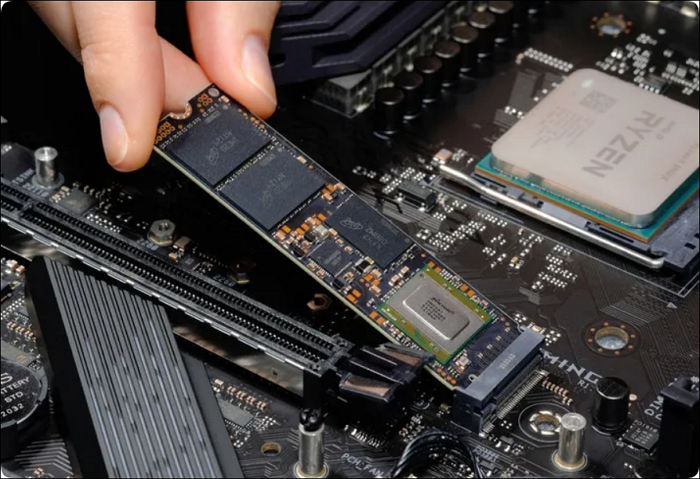
Many “dead drives” are actually poor connections. This method is helpful for newly installed SSD, recently moved hardware, or the drive disappeared after transportation or cleaning. Ensure both the data and power cables are securely plugged into the SATA SSD and the motherboard. For M.2 drives, remove and reseat the drive.
How to fix:
Step 1. Power off the PC completely and unplug the power cable.
Step 2. If you are using a SATA SSD, disconnect both the SATA data and power cables, then reconnect them firmly until you feel a solid fit.
Step 3. If you are using an M.2/NVMe SSD, remove the screw, reseat the drive at a 30° angle, and resecure it.
Step 4. Boot into BIOS and check whether the hard drive appears.
Pro tips:
- Avoid bending the SATA cable sharply.
- Dust inside the slot can block contact, use compressed air if needed.
Fix 2. Connect the SATA SSD to a Different SATA Port
If you are using an SSD, before diving into complicated firmware changes, many builders report that simply moving the drive to another motherboard port immediately solves the issue. Some motherboards automatically disable certain SATA ports when an M.2 slot is occupied, or ports controlled by third-party chipsets may behave differently from the primary controller.
In multiple community troubleshooting discussions, users found that the original port was disabled, shared bandwidth with another device, or had silently failed.
How to fix:
Step 1. Shut down the computer and disconnect the power.
Step 2. Locate where your SATA data cable is currently plugged into the motherboard.
Step 3. Unplug it and move it to a different SATA port. If available, try a new SATA cable as well.
Step 4. Boot back into BIOS and check the storage list.
If the drive appears after switching, the original port may be faulty or lane-shared.
Fix 3. Initialize Hard Drive
If your disk is physically connected and visible in Disk Management (or shows up under another system), but does not appear in BIOS boot lists or cannot be selected for partitioning, you can try this way.
Many users and hard drive manufacturers recommend initializing a new or previously unpartitioned disk before it can be recognized properly by both the OS and BIOS. This step establishes a valid partition table and helps the firmware enumerate the disk correctly.
How to fix:
Step 1. Right-click the Start button and open Disk Management, or type Disk Management to open it.
Step 2. If the disk appears with a black bar (unallocated), a prompt will ask you to Initialize Disk.
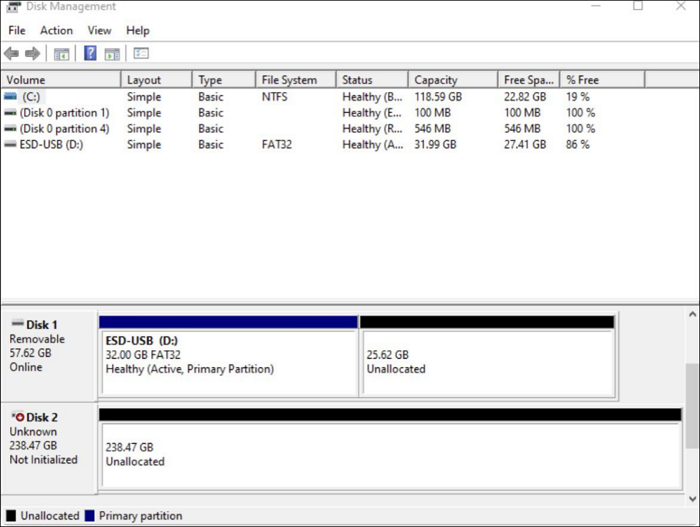
Step 3. Select the SSD, and choose a partition style:
- GPT — recommended for modern systems with UEFI
- MBR — for legacy BIOS systems
Click OK to initialize the drive.
Step 4. Once initialized, create a new volume, format it (NTFS), and assign a drive letter.
Step 5. Restart your PC and check the BIOS again for the disk detection.
Fix 4. Configure BIOS Settings
Modern motherboards provide multiple controller modes, compatibility layers, and lane options. A single incorrect setting can prevent the system from enumerating your drive. Therefore, verifying the BIOS configuration is a necessary step.
How to fix:
Step 1. Restart the computer and enter BIOS/UEFI (commonly Del, F2, or F10).
Step 2. Open Advanced, Storage Configuration, or a similarly named menu.
Step 3. If it is set to RAID or IDE, switch to AHCI (unless RAID is required).
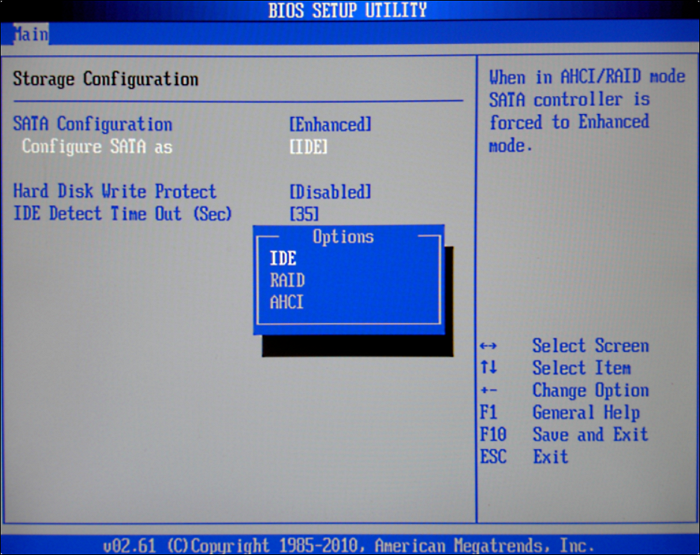
Step 4. Check whether the M.2 / NVMe slot is enabled. Some boards allow Auto / SATA / PCIe selection. Choose Auto or the correct mode for your drive.
Step 5. Disable Fast Boot temporarily. Fast Boot may skip hardware initialization during POST.
Step 6. Save changes and exit BIOS.
Step 7. Re-enter BIOS after reboot to see whether the disk is now listed.
Fix 5. Update BIOS
Motherboards rely on firmware-level compatibility to recognize storage devices. If the BIOS version is outdated, it may lack microcode or NVMe/SATA support required for newer drives. In such cases, updating the BIOS can immediately restore detection.
How to fix:
Step 1. Identify your motherboard model and current BIOS version (shown in the BIOS main page).
Step 2. Download the latest BIOS file that matches your exact model.
Step 3. Reboot into BIOS. After reboot, enter BIOS again and check whether the disk is detected.
Pro tips:
- Never power off during the update process. After upgrading, load optimized defaults once before testing.
Fix 6. Reset BIOS to Default
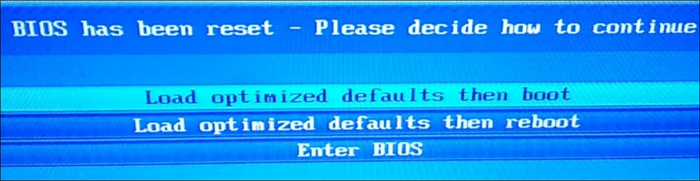
Incorrect parameters in the storage controller, boot environment, or PCIe/SATA mapping can prevent proper drive initialization. Resetting BIOS to factory defaults forces the motherboard to rebuild hardware detection from a clean state.
How to fix:
Method 1. Reset via BIOS/UEFI Menu (Recommended)
Step 1. Restart the computer and enter BIOS/UEFI (commonly F2, Del, F10, or Esc).
Step 2. Navigate to the Exit tab or look for options such as:
- Load optimized defaults then boot
- Load optimized defaults then reboot
- Enter BIOS
Step 3. Confirm the action. Save changes and allow the system to reboot.
Step 4. Enter BIOS again and check whether the hard drive is now detected.
Method 2. Remove the CMOS Battery
Step 1. Shut down the PC and unplug the power cable.
Step 2. Open the case and find the round silver CMOS battery on the motherboard.
Step 3. Carefully remove it, and wait about 1–5 minutes to ensure settings are cleared.
Step 4. Reinsert the battery, and power on the system and enter BIOS to verify detection.
Fix 7. Run Hardware & Devices Troubleshooter
While BIOS detection is hardware-based, controller states can still be influenced by OS-level diagnostics. Running the built-in troubleshooter may repair device communication or refresh hardware enumeration.
How to fix:
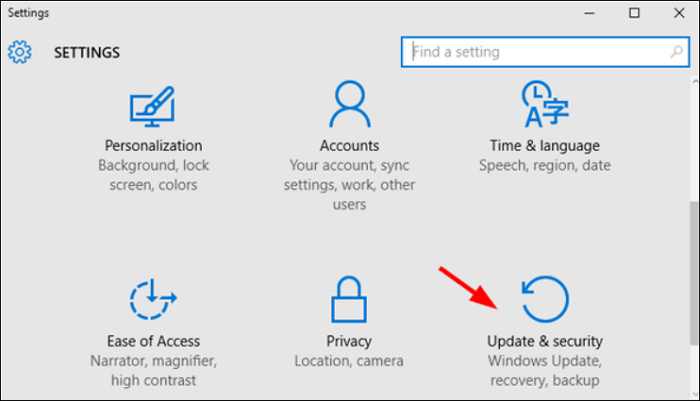
Step 1. Go to Settings, and click on Update & Security.
Step 2. Select the Troubleshoot option.
Step 3. Under Hardware and Devices, click on Run the troubleshooter.
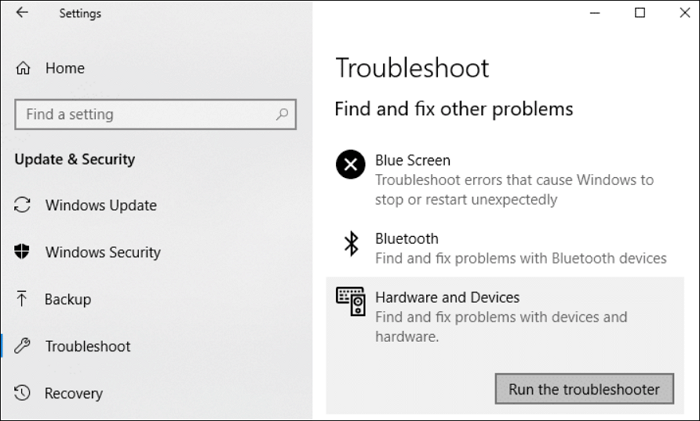
Step 4. It will scan your hardware and devices for any problems.
Step 5. The troubleshooter will try to fix the problem automatically.
Step 6. Once the troubleshooter is finished, it will let you know if it was able to fix the problem.
Fix 8. Test SSD in Another Device
At this stage, most configuration possibilities have been eliminated. Cross-testing in a different system is the fastest way to isolate hardware failure.
How to fix:
Step 1. Power off and remove the SSD.
Step 2. Install it into another computer, external enclosure, or adapter.
Step 3. Enter the BIOS on that device.
Step 4. Check whether the drive is detected.
Summary
If your hard disk is not detected in BIOS, the issue is usually due to connection problems, port conflicts, incorrect firmware settings, or compatibility limitations, rather than an immediate hardware failure. By following a structured approach, starting from reseating cables and switching ports, then moving to initialization, BIOS configuration, updates, and finally cross-device testing, you can narrow down the root cause efficiently.
In most cases, one of these methods will restore visibility and allow the system to recognize the drive normally. If the hard disk still cannot be detected, it may be time to consider professional diagnostics or a warranty replacement.