A bad sector in any storage device is an unusable section or block for reading or writing data. However, in this article, we will address the bad sectors or bad blocks in solid-state drives. In solid-state drives, memory cells store data in the form of single bits (in SLC) or multiple bits (in MLC, TLC, and QLC). These memory cells are then combined to form a page (generally of size between 4KB and 16KB). A page is the smallest readable unit in NAND Flash, while the block is the smallest erasable unit. A block usually consists of 64 to 256 pages.
In most cases, a bad block occurs on the block level. When a block in the SSD NAND flash becomes corrupted, the pages within it become unusable for any purpose, although SSDs generally have error correction capabilities. Most modern SSDs employ techniques such as wear-leveling and bad block management to maintain their performance, but even with these measures, bad blocks can still occur, and not all SSDs incorporate these advanced mechanisms.
In this article, we will discuss everything related to bad blocks in SSDs. Let’s get started.
Understanding SSD Bad Sectors
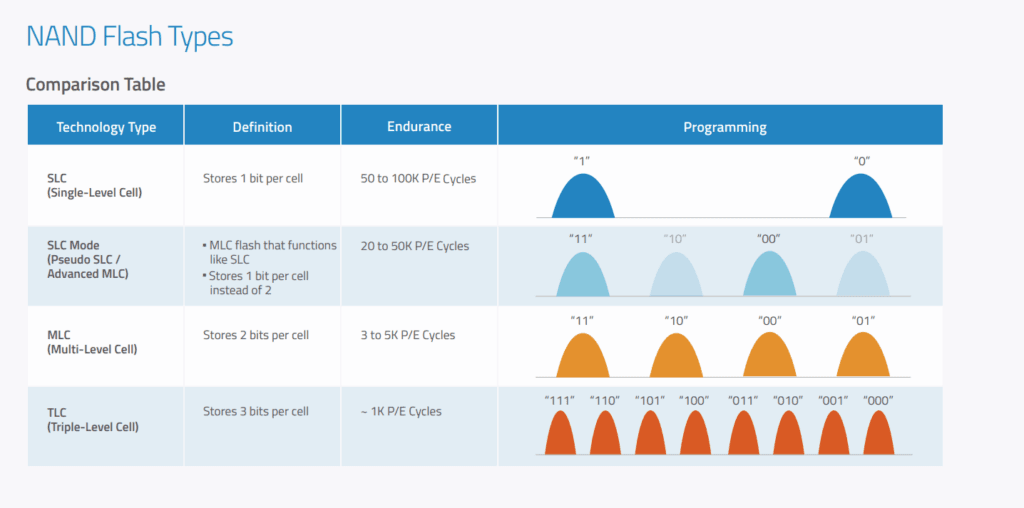
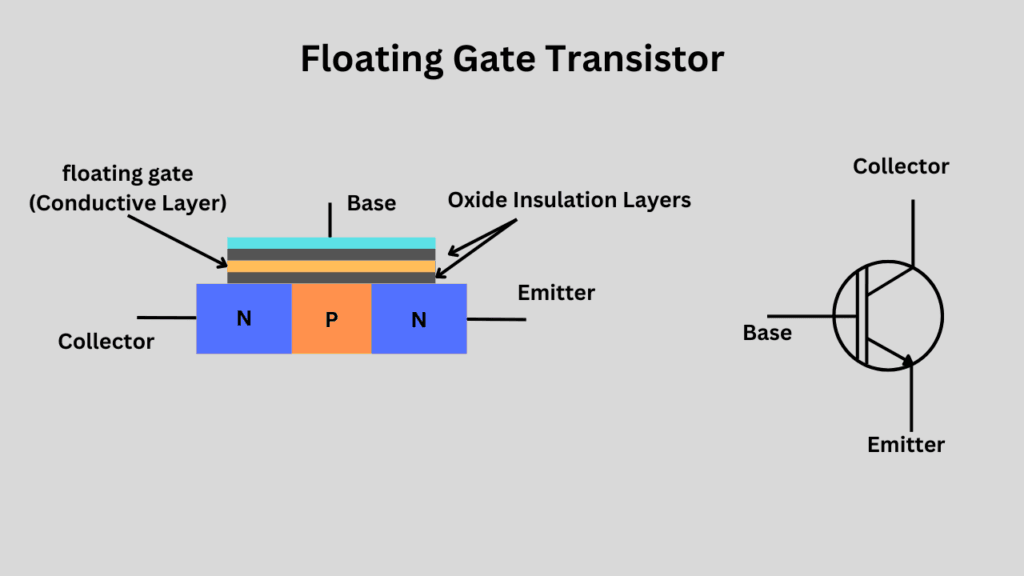
A memory cell in NAND flash SSD memory is made up of a floating gate transistor or a charge-trap flash cell. When examining an SLC NAND flash cell, it represents the bit value “0” when a charge is stored inside the floating gate or the charge trap. When it is empty, it means a bit “1”. In multi-level cells, these discrete voltage levels increase, allowing each memory cell to store more than one bit of data.
The problem with a bad block: If we examine a single cell within a bad sector, the controller has access to the cell, but it can’t trust it. This is because those discrete voltage levels have become ambiguous or corrupted. The data is no longer valid, and reading from the cell produces errors that ECC cannot correct. Now, because SSDs have a built-in error correction mechanism, it attempts to solve the issues; however, sometimes the number of errors in a page exceeds the ECC’s capabilities. The controller then flags that block as bad, and the cells become inaccessible. This isn’t because the controller can’t access them, but they are no more reliable for data storage.
Types of Bad Sectors
Let’s say the SSD controller has written “0” in a cel,l which means it has programmed the cell with an electric charge. The NAND flash memory cells tend to leak some of this charge out because of their inherited properties. But, the ECC is there is check these voltage errors and fix them as they appear. However, sometimes, these errors are pretty big for the ECC to handle. In this case, the controller can mark that portion of the memory as a bad sector.
Logical (Soft) Bad Sectors:
For example, a TLC memory cell can store three bits of data in a single cell. This means there will be 8 different potential voltage levels. Now, the chances of errors here are higher because the two voltage levels (high and low) are now divided into 8 parts. Manufacturers employ much more intense error correction codes than SLC or MLC to handle these errors. The QLC may have a much more rigid ECC. However, because multi-level cells have the inherent ability to catch errors, issues will still occur regardless of the type of ECC used.

There is no single reason for a bad block. It can happen due to multiple-bit errors in a single block, charge leakage, cell-to-cell interference, program/erase disturbance, or sudden power losses.
The primary reasons are charge leakage and sudden power losses. Charge leakage is common in the memory cells but the power failures result in errors because if a cell is left partially-charged, the error correction code can’t decide what to do with it. Cell-to-cell interference is common in high-density solid-state drives. However, the program/erase disturb is again more of a design failure where a block being erased affects the neighboring block and impacts its state. We will discuss the reasons in detail just below.
Physical (Hard) Bad Sectors:
Physically bad sectors are mostly related to cell degradation. This happens over time after a good usage of an SSD and is not fixable. As we all know, SSDs come with limited program/erase cycles, and beyond that, the cells become naturally unreliable. The number of P/E cycles depends heavily on the type of cell levels.
The QLC NAND flash has the lowest P/E cycles and often goes below 1000.
The number of P/E cycles is closely related to the degradation of the oxide layer surrounding the floating gate or charge trap layer. The total number of P/E cycles indicates how fast this oxide layer will degrade, after which the cell will no longer be reliable. The QLC NAND flash has the highest storage density because a single cell can store 4 bits of data. This reduces the cost of NAND flash, but the writing process is much more destructive for the oxide layer as compared to any other type of Flash. Also, because of 16 discrete voltage levels, the chances of errors are higher, and that is the reason much more effective ECC is required to correct the errors.

In simple words, the physical bad blocks aren’t very common because they will happen only when the memory cells are actually unable to do their job. You have no fix for that because this is a result of aging and continuous use. However, bad manufacturing and rough use of your drive can result in premature failure of these cells.
What are the causes of bad sectors in SSDs?
1. Aging
Aging is the primary reason for the physical or hard bad sectors. SSD comes with specific TBW and MTBF limits (because of the limited P/E cycles). Once the drive reaches near these numbers, the chances of bad blocks increase. In the consumer markets, you get only two options of TLC and QLC, to choose from the NAND flash. QLC has lower endurance than TLC and will degrade faster. New SSDs tend to have fewer bad sectors. With age, the insulation layer around the floating gate or charge trap degrades as we discussed earlier. This can lead to permanent failures of the cells, after which they will become unusable.
2. Excessive bit errors
We talked about the bit errors above and understood that they are caused when the ECC can’t properly distinguish between different voltage levels, and the controller has to mark that block or cell as unreliable. Now, these errors are generally caused by natural degradation, environmental interference, and charge leakage.
3. Retention Loss
This again is related to the aging and surpassing of the P/E cycles. Because the insulating layer has been degraded, the charge will eventually leak out. Even with the ECC, there would be some errors.
4. Cell-to-Cell interference
This happens mostly in high-density drives when the adjacent cells impact the nearby cells while reading or writing the data. This interference can flip the bit values of the unwanted cells and can result in bit errors. Because these cells are closely packed, this interference is inevitable. ECC is the best way to correct those errors, but some errors just happen.
5. Program/Erase Disturbance
Frequent programming and re-programming of cells in the blocks can result in unwanted disturbance to the nearby blocks. This happens because of the high voltage pulses going to the cells for programming them. The nearby cells or the targeted block can experience residual power or electrical noise, which can shift their voltage levels. This results in logical bad sectors and can be fixed using some methods that we will discuss below.
6. Power Failures
Sudden power loss is again a primary reason for logical bad blocks, as we discussed above. The partially programmed cells are hard for the controller to resolve in either erased or written form.
Symptoms of Bad Sectors on SSDs
There aren’t very clear symptoms of bad sectors because they happen in a part of the memory chips. The wear-leveling algorithm will just ignore them until the number has become pretty huge. As you fill up your drive to more than 70 to 80%, you can start to see some problems like system crashes, file corruption. In most cases, you will face issues with the file reading and writing. You may see errors like “files cannot be saved” or CRC errors. Some drives can have issues reaching files, and you may see missing folders on your computer.
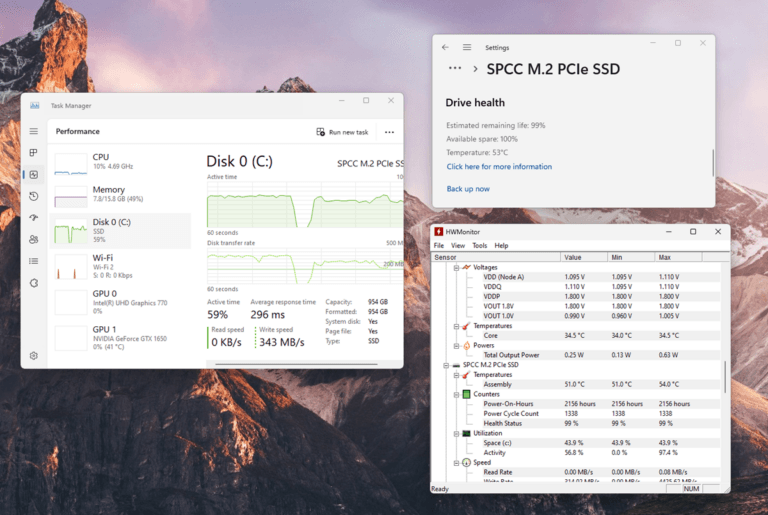
You can also detect the bad blocks using any SMART tool. For example, tools like CrystalDiskInfo would start to show your drive in bad health. However, data transfer failures and system crashes are the most common symptoms. However, because these symptoms are pretty common in computers, most people think this is happening because of RAM issues. Most people would ignore them because they won’t be very frequent. However, it is good to keep a check on the SMART data of your drive because it can pull up the health status of your drive pretty effectively.
How to check your SSD for bad sectors/blocks?
There are many free software which you can use to check your SSD for bad sectors. However, I would recommend checking the official software before anything else. For my drive (Silicon Power UD90), the brand provided a pretty basic tool that shows the SMART data and also the wear-out count. I can run a real-time scan and check for any errors. For Samsung drives, you can use the Samsung Magician, while the WD drives have the WD Dashboard. Most of the popular SSDs have their own management software,e and most would show the wear-out count or some kind of SMART data. However, if you are not able to see, I have some great third-party options coming for you.

Built-in OS Tools for checking bad sectors in SSD:
The most basic built-in tool in Windows is the wmic (Windows Management Instrumentation command). It is pretty easy to run, but it just says Ok or any error in case of any problem with your drive.
To use this tool, you just run Command Prompt as an administrator and enter this command:
wmic diskdrive get statusCHKDSK can also be used to see the errors in your SSD. To run this command, open the Command Prompt as an administrator again and run this command.
chkdsk C: /f /rIn this command above, C: is the targeted drive that I want to check with this command. The /f fixes file system errors while /r checks for bad sectors and recovers readable data.
In macOS, you can use the diskutil command in the terminal just like this:
diskutil verifyDisk disk0On the Linux operating system, you can smartctrl command to check your drive’s health.
First of all, install the smartmontools if not installed already using this command:
sudo apt-get install smartmontoolsThen check your SSD’s status using this command:
sudo smartctl -H /dev/sdXJust make sure to replace /dev/sdX With the correct drive identifier (e.g., /dev/sda).
Third-party Software to check SSD bad sectors
Two software programs that I personally like the most are HD Tune and Disk Genius to check the bad sectors in any SSD or hard drive. Both have their free and paid plans, but the free plans are enough to check the bad sectors. CrystalDiskInfo can also give a basic health report of your drive.

HD Tune is much easier to use, but gives enough details after running the bad sector scan.

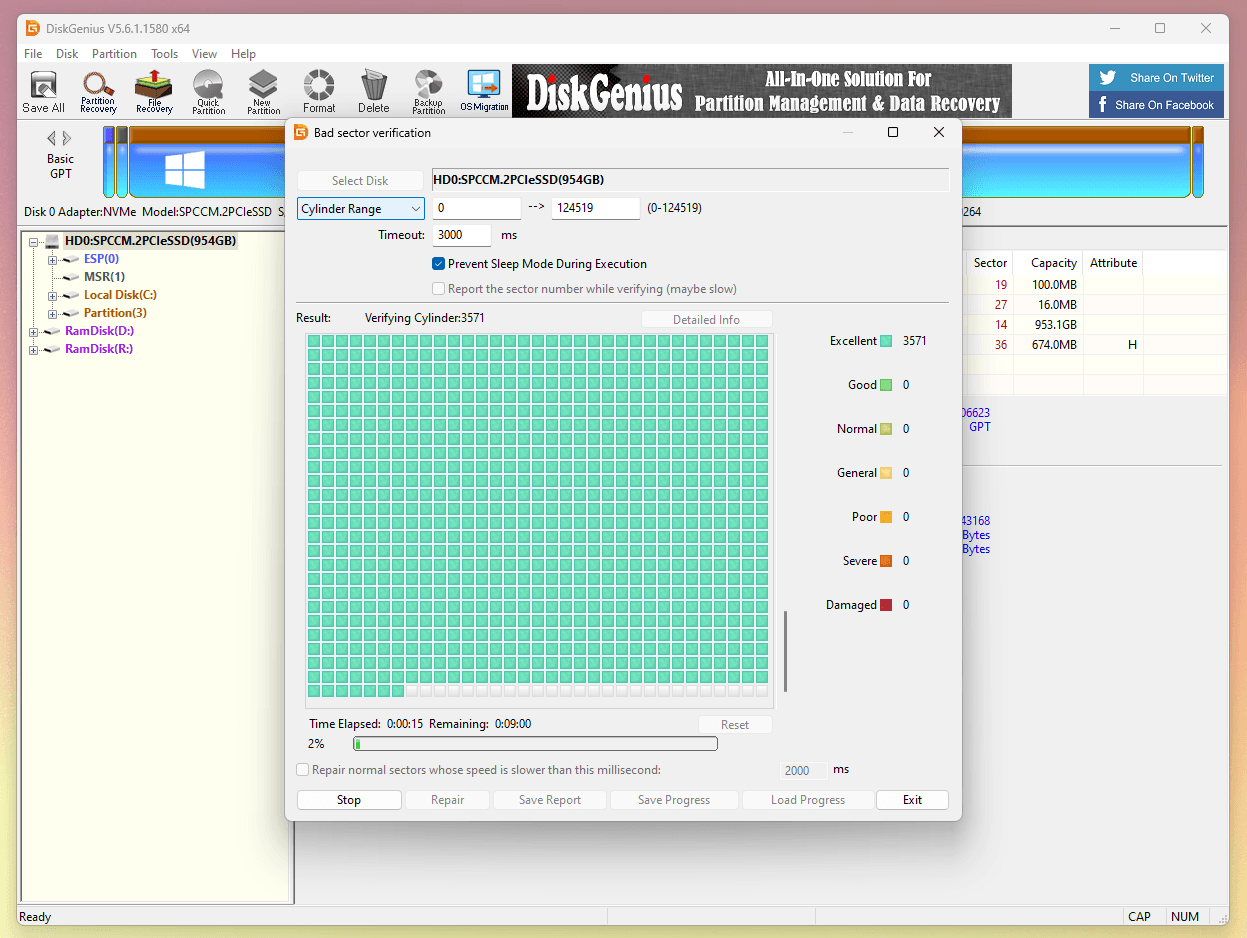
Disk Genius is a much more advanced tool and gives more details about the scan and the available bad sectors. Running the scan is pretty easy. You just right-click your targeted drive and click verify or repair bad sectors. The software will run an automatic scan to check for any bad sectors. You get some options to change, like sector range and capacity range, but leave them as it is.

The scan will take some time to run.
How to Repair Bad Sectors in SSD?
Again, for physical bad sectors in the SSDs, there is no fix. How do you decide if it is a bad sector? Well, we will fix the logical bad sectors, and if some of them remain, they are the physical bad sectors. Make sure to back up your drive before you perform these repair functions.
1. Automatic Repair using Disk Genius (Free Trial)
To fix the bad sectors, we are going to use Disk Genius first of all. It has a great repair tool that remaps the detected logical bad sectors automatically. You just open Disk Genius, right-click on your drive, and select the option to verify or repair bad sectors again. In the dialog box, you click the repair option this time. It will run the repair process and will take some time to run. Just wait for it to complete.

2. Manual Repair using Macrorit Partition Expert (Free Version)
The next tool that I am going to use is the Macrorit Partition Expert. With this software, you can run a surface test first to check the bad sectors and then use it to fix the logical ones pretty easily.
- Open the program and right-click on a specific partition or the whole drive to run the surface test. In my case, I am running the surface test on the C: partition only.

- Click the Scan button, and the surface test will start.

- Once the test is completed, check for the bad sectors and their location.

- Depending on the position of the bad sectors, we now have to change the scan area and run the test again until all the scanned sectors are green. You can just move the slider in the scan area section and try to keep as little space as possible for those bad sectors. If the bad sectors are in different areas, you can try dividing sections and remembering the beginning of the scan address. The idea is to keep the bad sectors out of the next scan and then use that affected area for cleaning.

- In my case, I began the scan at 41,387.1 MB, and the whole scan was completely green. Now, I know the affected area.
- Now, go back to the main menu, click the C: drive, and click Resize/Move volume.

- I will just unallocate that starting affected area from the C: partition. You can do this for different sections that have bad sectors. In my case, I am entering the same size i.e. 41387.

- Now, you will see an unallocated partition which can be refreshed or remapped depending on your choice.

- Now, click the Unallocated space so that it is highlighted, and then click Wipe unallocated space.

- Choose the most undestructive way to remap your bad sectors (from the unallocated space) i.e. Fill sectors with 0.

- You can now run the surface test again to check if the bad sectors are fixed. If not, they are most probably the physical bad sectors that can’t be fixed using any other method as well.
- Also, make sure to merge the partitions back. For that, you will have to create the new volume of the unallocated volume first.

- Right-click your main C: drive and click Merge Drives. Then choose both your partitions and merge. Make sure to merge the secondary partition into the main C: partition.

How to prevent SSD bad blocks?
The best way is to limit the write and erase cycles, or in other words, write amplification. It is good to avoid unnecessary writing. Make sure to check if your drive has TRIM and is enabled. On Windows, you can enable TRIM by running this command in the command prompt.
fsutil behavior set DisableDeleteNotify 0Make sure to keep your SSD’s firmware updated. Also, avoid using your SSD at full capacity as it impacts the over-provisioning algorithms negatively. You can also use drives with power management features like power-loss protection. Also, it is good to have a UPS to avoid unexpected shutdowns while the SSD is doing its job. Avoid frequent large operations, and if you have plans to put a heavy workload on your drive, make sure to go for a good drive with TLC NAND instead of QLC. Having DRAM in your SSD will also be beneficial.
I hope this helps!

