Affiliate Disclosure: This post may include affiliate links. If you click and make a purchase, I may earn a small commission at no extra cost to you.
Kill Disk is a very simple tool that erases your Hard drive or SSD so that the data can’t be recovered using any method. In flash storage specifically, data isn’t deleted when you clean it from the recycle bin. Inside the NAND flash chips, it is marked as invalid data which can be recovered easily using a recovery tool. However, there is software that can re-write everything with gibberish on the NAND flash so that no chances of recovery are left.
In the hard drives, the same process happens in a different way. When you delete a file from a hard drive, the system removes its reference from the file table. It is like deleting the index of that file like a book but not the content. The file still physically exists on the drive but again, the data locations are marked as “free space”.
Now, recovery is possible in both cases and if you want it to become impossible, software like Active Kill Disk can help. In fact, there are a few free software like DiskGenius, Bleachbit, Eraser, and Parted Magic are there but we’ll today have a detailed look at Kill Disk.
I have been using the Kill Disk Ultimate for a year but the free variant will do the job without any issues. So, let me give you a detailed review and also a guide on how to use it.
Pros and Cons of Active@ Kill Disk
| Pros | Cons |
|---|---|
| Offers both one-pass and multi-pass methods that meet industry standards (e.g., DoD 5220.22-M). | The interface might look outdated to some |
| The ability to create bootable USB/CD/DVD to wipe system drives reliably. | Multi-pass wipes, while more secure, are significantly slower. |
| Generates logs and offers verification. | |
| Work with SSDs, HDDs, and USB drives | |
| The free version is more than enough for almost every kind of drive erasing and wiping |
Features and Specifications of Active@ Kill Disk
There are key features and specifications of Active@ Kill Disk that make it a great competitor to all other popular programs like DBAN, Parted Magic, Eraser, and Blancco. Let’s talk about some of the main features.
1. Various Wiping Methods and Security Standards
The wiping methods start from the basic and quick one-pass zero fill to much more advanced multi-pass methods adhering to standards like DoD 5220.22-M. Depending on the level of security and available time you have, you can choose between different passes.
2. Verification and Logging
Once the wiping is done, Kill Disk can generate logs and run verification processes to double-check if the wiping was done properly. This is great in industrial applications and also where you have to be responsible for the data erasure tasks in a firm.
3. Bootable Media and System Drive Support
With Kill Disk, you can create bootable media and wipe your drive even when it is in use. In this way, your operating system would not interfere with the process and your primary drive will be erased properly.
Some issues with the Kill Disk
Even a single pass for 16GB can take more than half an hour, while an advanced pass can take multiple hours to complete. These timings may vary depending on your drive and the system. But, people with low patience can find this really frustrating. Many times, the wiping process stops at 100% (for verification) and then nothing happens for 10 to 20 minutes. So you may have to wait all that time.

As per my experience, DBAN has the fastest speed even though it also supports verification. This is the only problem that I have found while using Kill Disk. Otherwise, it is a 10 on 10 for me.
A simple test to approve Kill Disk as a professional
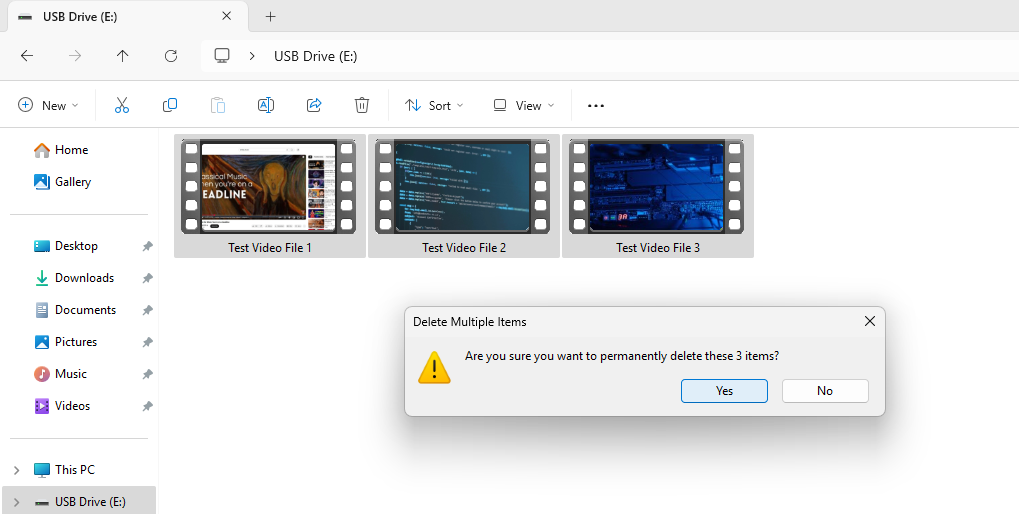
Before talking about the features, let’s test its capabilities first. So, I have a 16GB flash drive which I just formatted. I have given it the name “Cheap Drive”.
Before formatting, it had just two large video files on it. No secure erase, no fancy deleting mechanisms, just a simple format from Windows File Explorer and my drive is clean (from the outside).
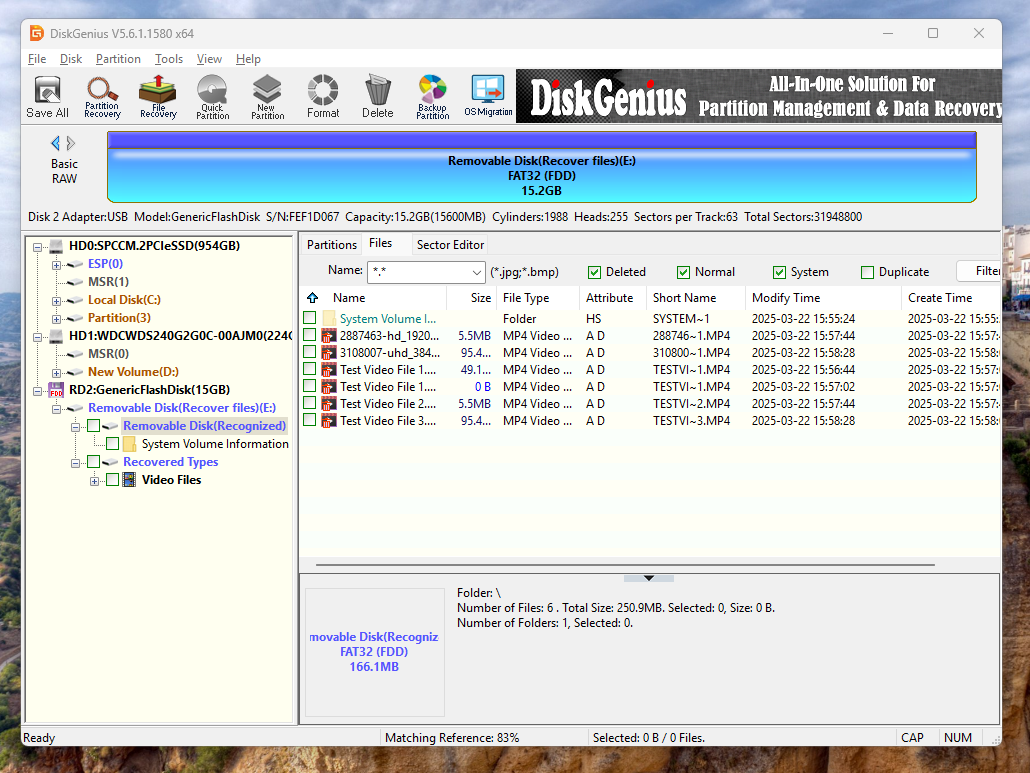
Recovering the deleted data
Now, I’ll try to recover the data using DiskGenius and DiskDrill which are both very popular data recovery programs. I am going to use the professional versions of both programs to employ them at their best. Then, to be 100% sure, we’ll perform a Hex check as well. First, let’s try with the DiskGenius.
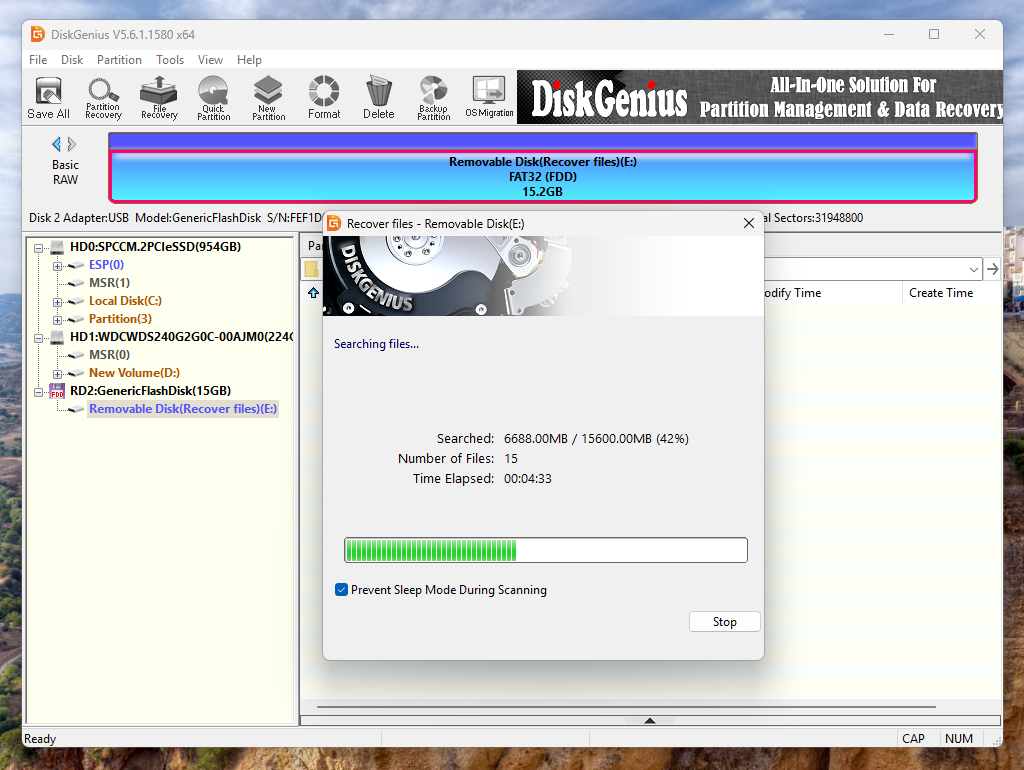
Surprisingly, I was able to recover all the files that I had deleted using the free variant of the DiskGenius backup. Look at the results.
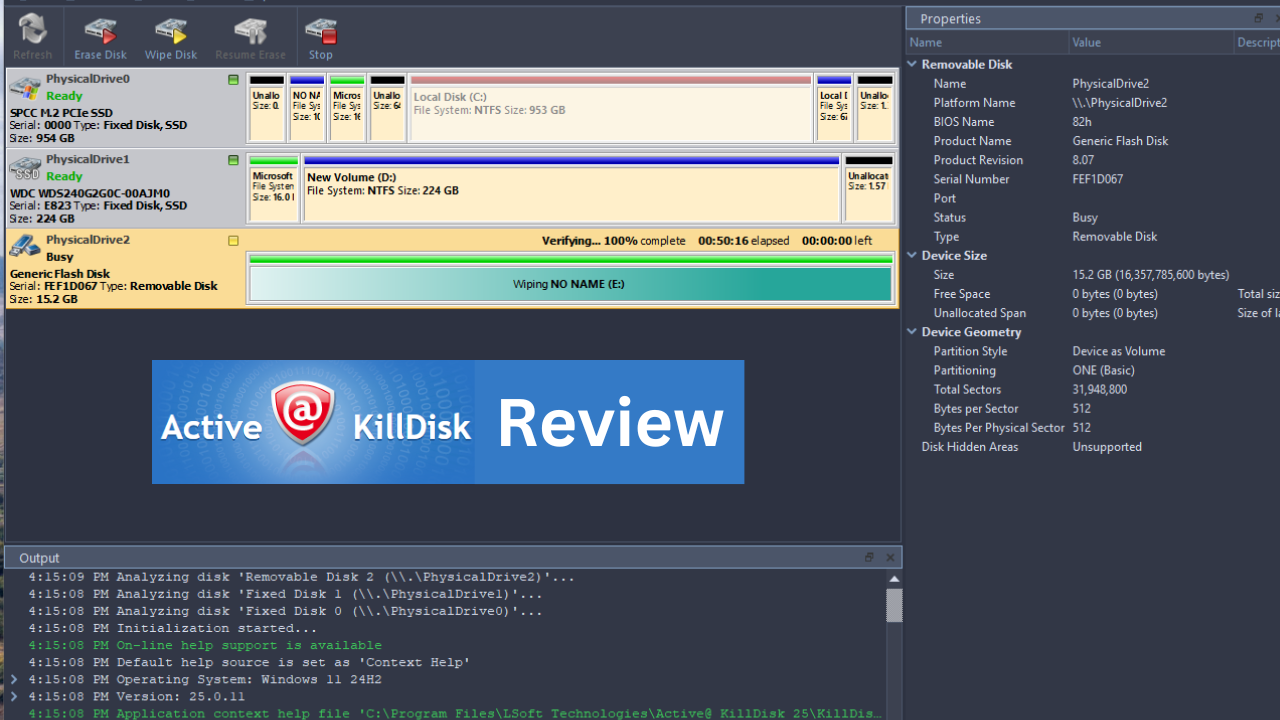
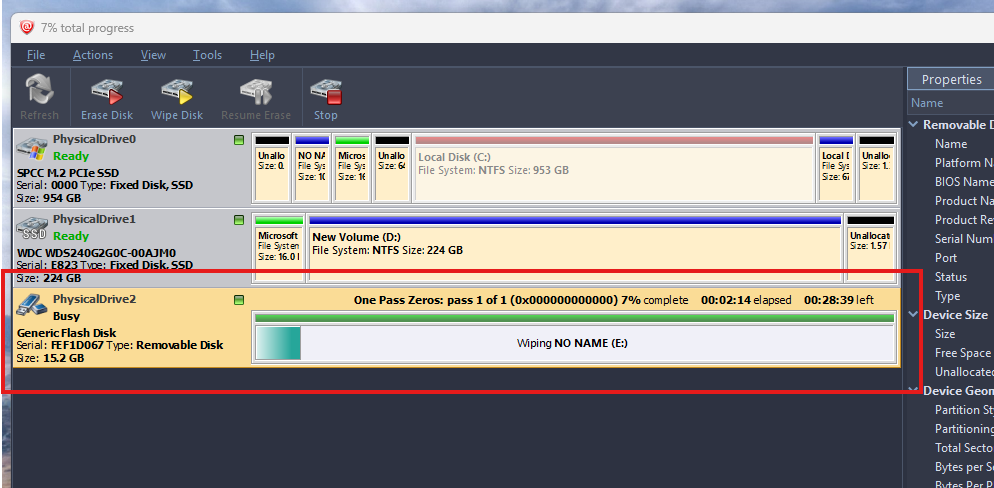
Wiping the data using Kill Disk
Now, let’s wipe the drive using Kill Disk. We can use the simple erase disk but that’ll be similar to normal formatting. I am selecting the basic One Pass Zeroes wipe method here for simplicity. For a 16GB drive, it took around 10 minutes for One Pass Zeroes to wipe.
Keep in mind that there is a big difference between erasing and wiping the data. Drive Erasing simply means you are removing the file system structure like the directory indexes and partitions. However, wiping is a thorough process that overwrites every sector of the drive. It is always better to first erase the drive before you wipe it in Kill Disk because wiping will only clear up the unused space and not the data that you have on the drive. So, let’s proceed with wiping.
The wiping is now done in around half an hour and the Kill Disk program has done its job with a certificate that we can print frame and put on our wall. But, let’s see if this certificate is of any use.
Real Test: Recovering the deleted data again after wiping
Now, I will try both DiskGenius recovery and Disk Drill to check if I can recover the data. Some gibberish files were found by DiskGenius and I have no idea what they actually are. I also tried EaseUS Data Recovery Pro, but nothing came out of the drive.
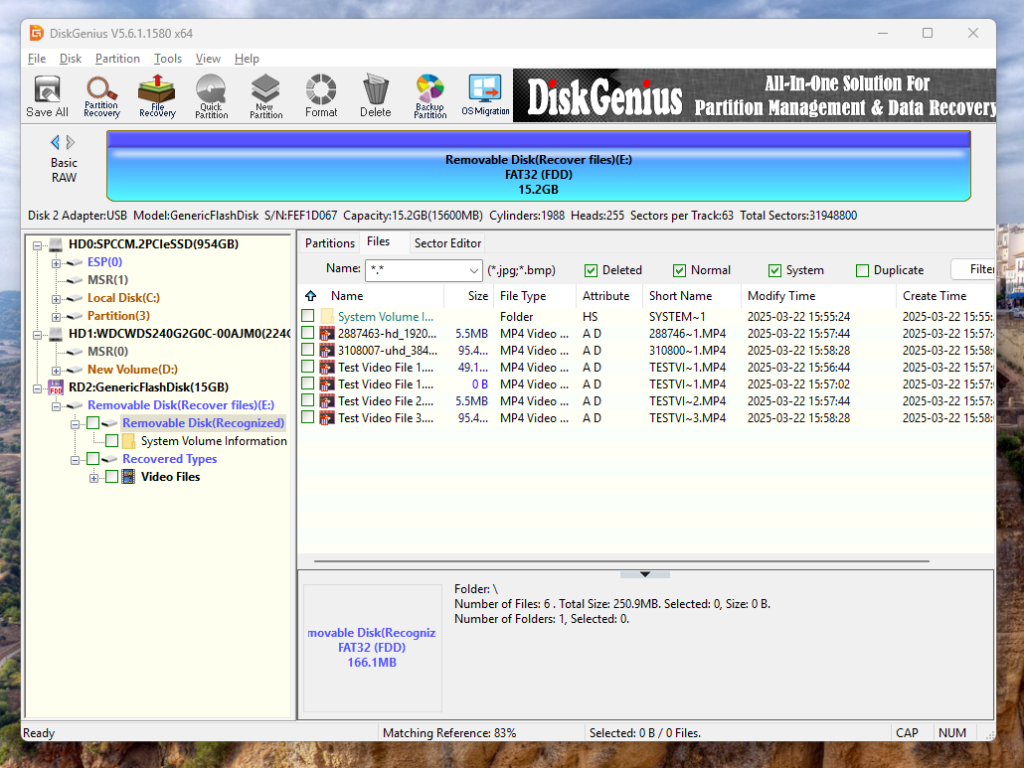
I can clearly say that the job was done but there is a final check only after which we can come to a conclusion. Both DiskGenius and DiskDrill recovered the metadata, most probably from the system record but obviously those files didn’t work because there was nothing inside them. It is a great way to make people purchase the Pro plans because they think that they can somehow recover the data which isn’t actually there anymore. However, with the Hex check, we can confirm everything.
Hex Check
The One Pass Zeroes wiping method that we used replaced every memory bit location with zeroes. Before writing those locations with zeroes, there were bits of information that could be restored (as we did earlier). By re-writing every bit of information with just zeroes, there is nothing to be recovered using any method. We can actually use Hex code checkers to see whether that certificate has any value or not. We can see whether there are only zeroes or some data on it.
There is a popular software for this called HxD for the Windows operating system that I am going to use here. When I checked the detail, there were 31,948,799 sectors in this flash drive. Let me show you a video of the output.
At the top, the data for the Master Boot Record is still intact and has nothing to do with the actual data. This particular data appears to be a FAT32 boot sector, meaning if this drive was formatted with FAT32 before wiping, the boot sector structure remains. So, we can say that Disk Drill actually does the job.
Conclusion
While most SSD manufacturers provide their official software like WD Dashboard and Samsung Magician for secure erasing and wiping of their drives, some drives might not come with those free add-ons. Also, some people and especially enthusiasts like me try to experiment with third-party tools like Kill Disk. I think Kill Disk is the best data-wiping and erasing software for Windows, macOS, and Linux operating systems. If you want a review of other programs, let me know in the comments.

Kill Disk is good but how does it compare with DataEliminator from github
I will test it and maybe publish a comparison soon. Thanks