Affiliate Disclosure: This post may include affiliate links. If you click and make a purchase, I may earn a small commission at no extra cost to you.
SSDs come with a limited number of P/E (Program/Erase) cycles. In terms of numbers, SSD lifespan is measured in TBW (Terabytes Written), but most SSDs exceed this limit and last significantly longer than expected. In reality, you cannot predict the lifespan of your SSD because non-wear-out failures may occur even before the TBW endurance rating is reached. Wear-out failures typically happen before the TBW limit is reached.
There are several methods to eliminate these non-wear-out failures, which we will discuss in this article. However, in some cases, you can prevent wear-out failures with these. Some precautions, such as temperature control, firmware updates, and TRIM, can help mitigate both types of failures. However, when the TBW limit of an SSD is exceeded, the endurance rating of the cell is likely to exceed its limits. In these scenarios, it is wise to replace the drive, as it could fail at any time without warning.
There are some tried and tested methods to increase SSD lifespan, which we will discuss one by one.

1. Enable TRIM
TRIM is an operating system command that informs the SSD which data block is no longer in use. TRIM makes that data block free for erasure or reallocation.
The process of writing data on an SSD isn’t straightforward. Whenever we delete any data from the SSD, it isn’t deleted instantly. The operating system marks the block as free space for future storage. However, it doesn’t immediately become clear. The TRIM command is sent to the SSD, and in the background, when the SSD is idle, the garbage collection process is run. TRIM is a method that enhances garbage collection efficiency by preemptively erasing free blocks. Without TRIM, the erasure will occur in real-time as the data is being written, which will increase the write time. Additionally, the SSD must move and erase more data than necessary, which increases wear and reduces its lifespan.
Most modern SSDs, SSD firmware, and operating systems (e.g., Windows 7 and later, macOS 10.6.8 and later, and Linux with specific file systems) support the TRIM command. Most of the time, it will be enabled automatically; however, you should double-check that it is enabled on your system. This is how you can enable TRIM on your computer.
Enable TRIM in Windows
In the latest builds of Windows (10/11), TRIM runs automatically during the drive optimization by default. However, if you want to check or enable, here is the process.
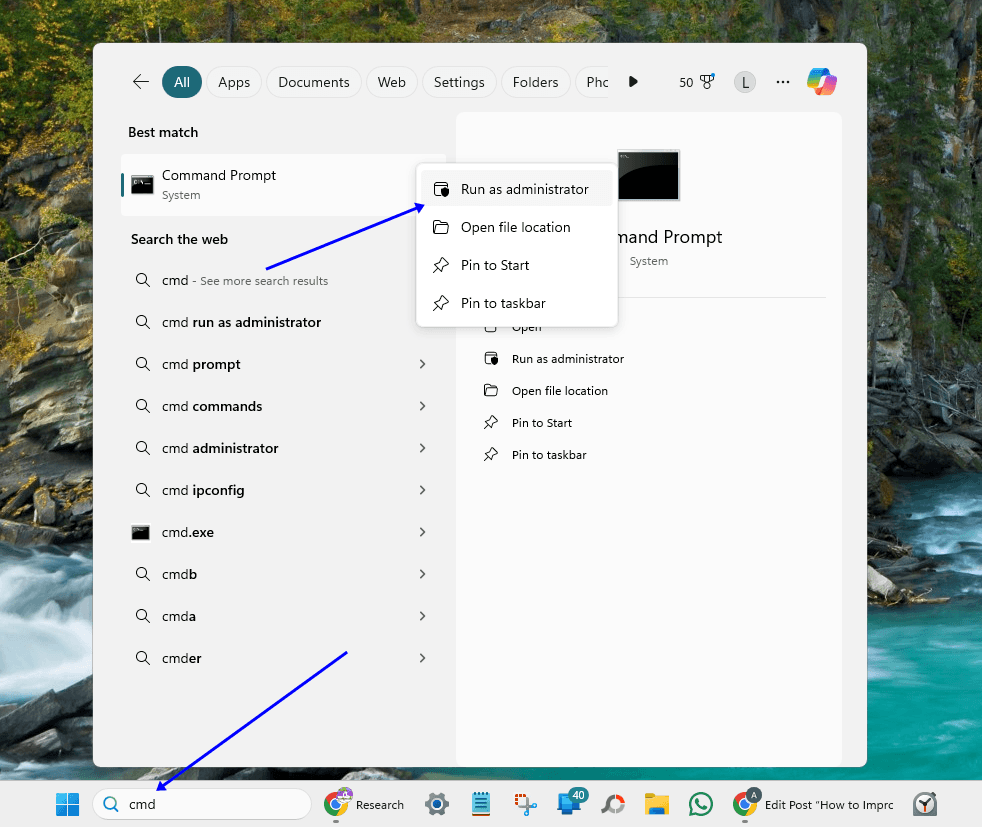
Open Command Prompt as Administrator:
- Press
Windows + S, type cmd, right-click it, and select Run as administrator.
- Run this command:
fsutil behavior query DisableDeleteNotify

Interpret the result:
DisableDeleteNotify = 0→ TRIM is enabledDisableDeleteNotify = 1→ TRIM is disabled
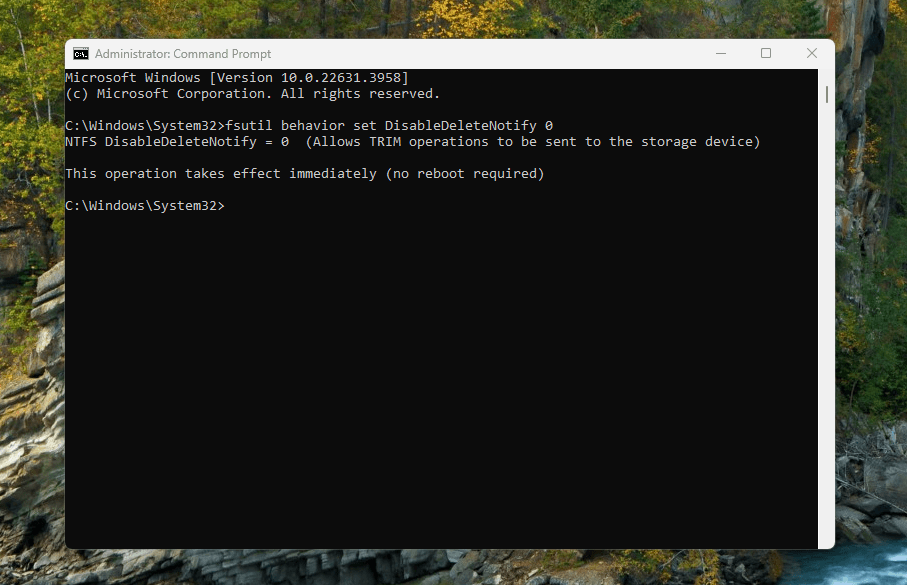
If TRIM is disabled in your system, which means the results show the value 1, you can simply run this command.
fsutil behavior set DisableDeleteNotify 0
Enable TRIM in macOS
For macOS, TRIM is enabled by default only for Apple-branded SSDs. For any third-party SSDs, users may need to enable them manually. You can do this using the terminal pretty easily. You can check if TRIM is enabled with this command.
system_profiler SPSerialATADataType | grep 'TRIM Support'
However, if you want to enable TRIM, open Terminal and run the command given below:
sudo trimforce enable

Note: It may warn you to enable it at your own risk.
Enable TRIM in Linux
In Linux, you can enable TRIM by using periodic TRIM (recommended). Using periodic TRIM makes TRIM run automatically once a week using the fstream command through the system interface. To check if TRIM is enabled in Linux, Open a terminal and run the following command:
sudo fstrim -v /

If the command is executed successfully, showing you how much space was trimmed, TRIM is working. If now, you’ll see some sort of warning message like I get in my system. To enable TRIM, open the terminal and run the following code.
sudo systemctl enable fstrim.timer
sudo systemctl start fstrim.timer

In most modern systems and operating systems, you will find trim already enabled, but it’s good to verify. After enabling, you can reboot your system and allow some time for it to work. You will likely notice a performance boost over time.
2. Disable Unnecessary Writes
We all know that SSDs have limited write cycles, and writing is the most impactful thing causing wear to our drives. There are specific processes in computers that write data to the SSD even when we are not actively doing so. These are mostly unnecessary things for most users, and disabling them can have a good impact on enhancing SSD lifespan.
2.1. Disable Hibernation in Windows
Hibernation differs from sleep mode in Windows. In sleep mode in Windows, the system enters a low-power state but remains on. In hibernation, the system files and open programs are saved, and the system is shut down. A file named hiberfile.sys is created, which can be several gigabytes in size. If we use hibernation frequently, this file is written to repeatedly in the SSD. This heavy writing places an unwanted load on the memory cells, causing wear. So, instead of hibernation, it is better to use the sleep mode.
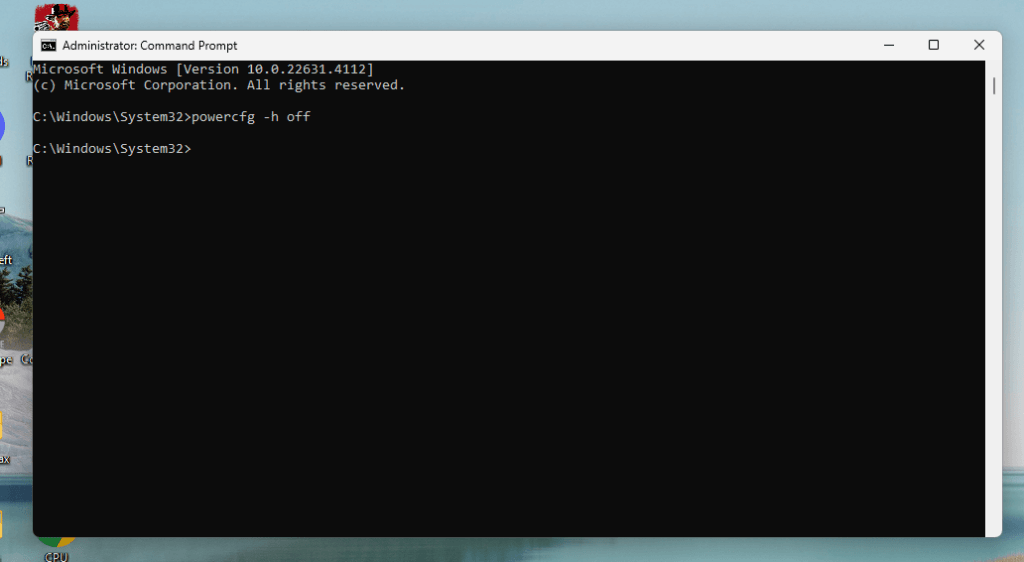
To disable hibernation in Windows, open the Command Prompt as an administrator. Type powercfg -h off and hit Enter. This will disable hibernation and delete the hiberfil.The sys file is stored on the drive.
Hibernation could be vital if you do not want to go into sleep mode for some reason. Most people choose hibernation because it protects running files in case of a power failure while the system is in sleep mode. However, hibernation has its drawbacks when turned on, but benefits when turned off. If it is not essential for you, it is best to keep it off.
2.1. Disable or Limit Paging (Virtual Memory)
Virtualization is the process of utilizing a computer’s storage (SSD or HDD) to simulate the system’s RAM. This increases the RAM artificially and uses this extra space to run programs when required. This can be helpful when running demanding programs that require more RAM than your system has. However, this places a significant load on the SSD due to the additional write operations. A pagefile.sys file is created on your SSD to store the overflow data when the RAM is full.
If you have sufficient RAM in your system and believe your programs are running smoothly without the need for virtualization, it is best to keep it off or limit it. The process of modifying or disabling virtual memory in Windows is as follows.
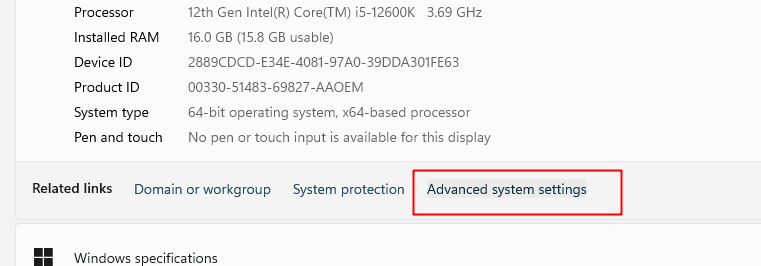
- Go to Control Panel > System > Advanced system settings.

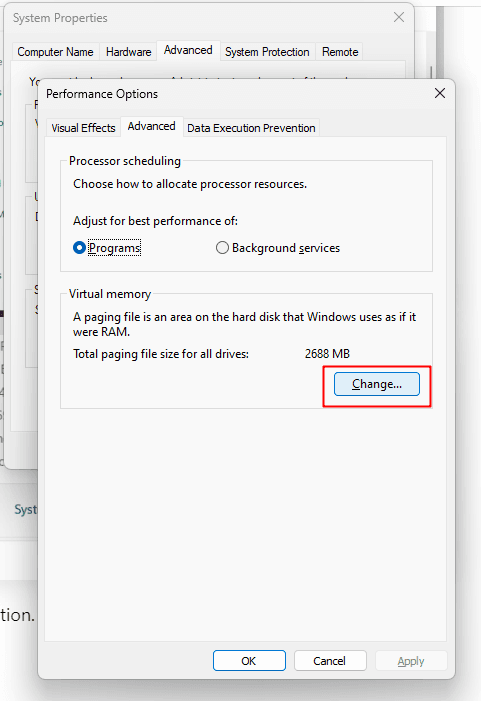
- Under the Advanced tab, click Settings in the Performance section.

- Select the Advanced tab and click Change under Virtual memory.
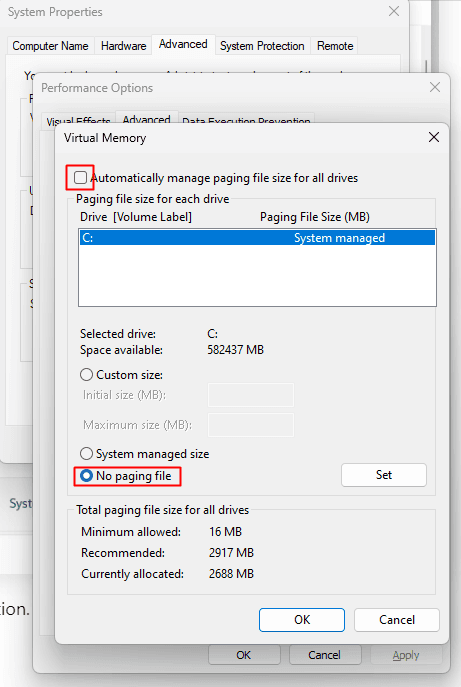
- Either set a lower value or uncheck “Automatically manage paging file size” and disable virtual memory entirely. You can just check No Paging file to disable virtualization.
Virtualization has some negative impacts on SSD lifespan if the system frequently uses it to handle application overflow from RAM. This data often includes multiple write operations, which can result in damage to the SSD memory cells.
2.3. Turn Off File Indexing
Windows search indexing allows the operating system to quickly search through files by creating an index. File indexing increases the file search speed, but this feature isn’t essential for most users. It causes minimal write operations very frequently. This increases the write operations and wears out the memory cells. File indexing is beneficial if you often deal with a large number of files and utilize the Windows search feature. To disable file indexing in Windows, follow the steps outlined in this guide.
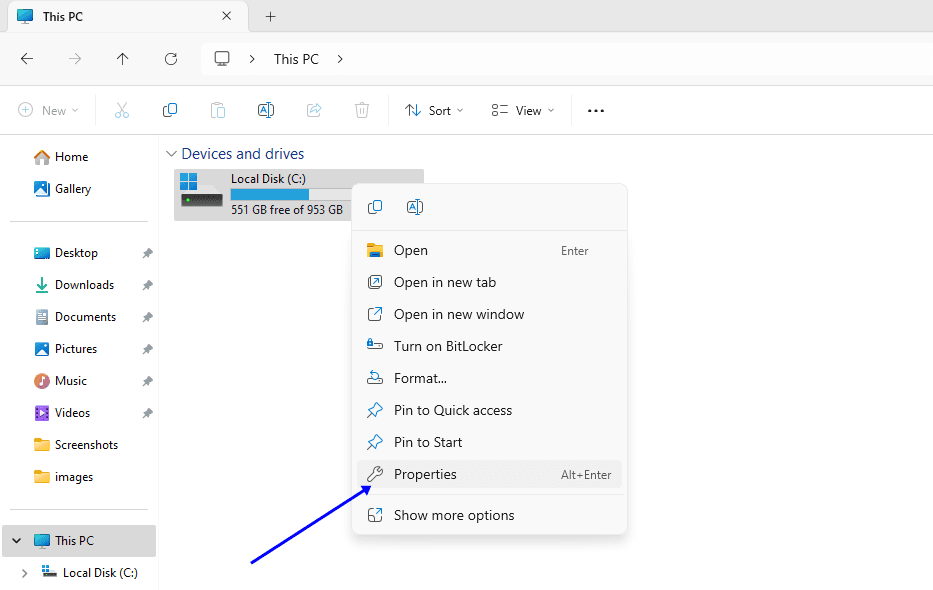
- Open File Explorer, right-click your SSD, and click Properties.
2. Uncheck this option: Allow files on this drive to have contents indexed.

3. Click Ok to confirm the selection.
2.4. Enable Write Caching
Most SSDs support write caching, which temporarily stores incoming write data in a cache, thereby reducing the frequency of small writes. Ensure this feature is enabled on your computer. It would reduce the number of write operations on the NAND flash and utilize the cache memory for the same purpose.
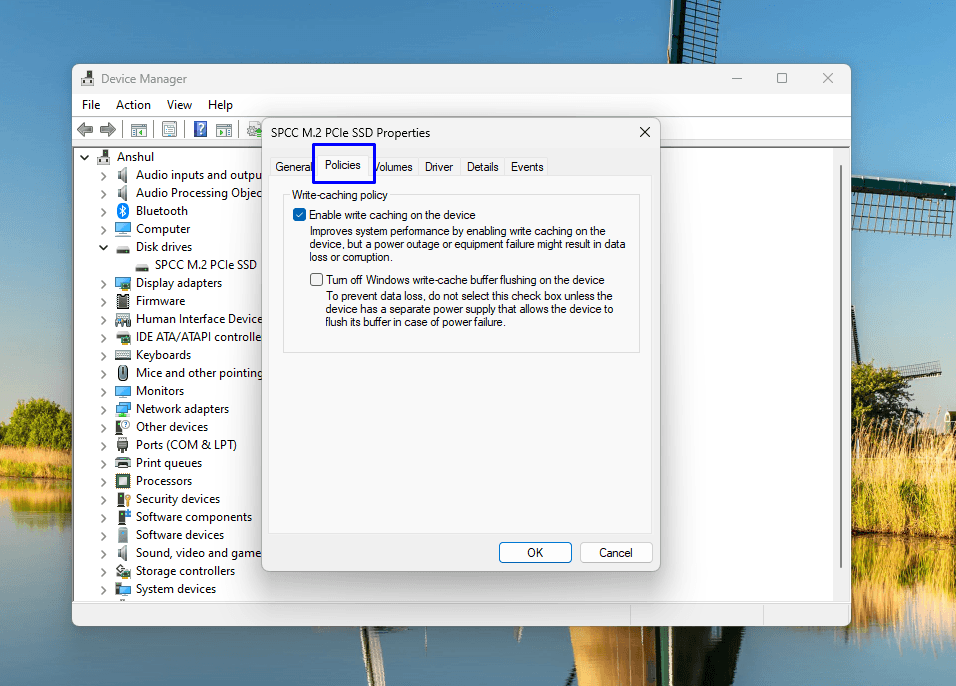
In Windows: Go to Device Manager > Disk Drives, right-click the SSD, select Properties, and check the Enable write caching on the device option.
3. Avoid Overfilling your SSD
According to this study, SSDs operating with high write amplification due to overfilling may experience a reduction in usable lifespan, with some drives showing up to 30% less endurance compared to when they are kept less than 60% full.
SSD NAND flash cells are organized in pages (the smallest readable/writeable unit) and blocks (the smallest erasable unit). A block is larger in size and can contain multiple pages within it. When there is data to be written, it will be written to a page, but if we have to erase a page, the entire block containing that page will be erased. But, first, the valid data in that block is moved to another location. If there is no valid or important data, the entire block can be erased. The selection of blocks and pages for writing and erasing the data is done by the process of wear leveling. It is an algorithm that distributes the wearing of cells evenly across the NAND flash memory.
When there is enough free space to move this data around, the wear leveling algorithm works effectively. However, when there is less free space for wear leveling, data management becomes less efficient. When the SSD is close to its maximum capacity, longevity, and performance issues will arise.
The more data inside an SSD, the more write operations will be required for data management. The garbage collection algorithm also requires free blocks to consolidate partially filled blocks into fuller ones. This process also becomes less effective as there is less available free space.
A general rule is to keep 20-30% of your SSD’s total capacity free to ensure optimal performance and longevity. The exact amount of free space required depends on the SSD and your usage. However, maintaining this much free space enables the SSD to efficiently manage wear leveling, garbage collection, and TRIM operations.
4. Keep the Firmware updated
Firmware is a low-level code embedded in the hardware of your SSD. Firmware controls how the SSD communicates with the system. Also, it is responsible for the effective working of wear-leveling, garbage collection, data storage, and other critical processes. Firmware is one of the most essential piece of software on your drive. It is like the central point in your SSD that determines its behavior and correct functioning.
New firmware updates often come with improvements in most of the algorithms such as wear-leveling, garbage collection, TRIM, etc. Sometimes, new firmware updates can come with latency enhancements.
But, for SSD lifespan, the best benefit is enhancements of algorithms. With improved software performance of your SSD, it can work better on data management which will surely result in increased lifespan of your drive. Most SSD manufacturers have their own SSD software with the features to update firmware automatically. Just pick the software for your drive from this table and make sure the firmware is up to date.
| SSD Brand | Firmware Update Software | Download Link |
|---|---|---|
| Samsung | Samsung Magician | Samsung Magician |
| Crucial | Crucial Storage Executive | Crucial Storage Executive |
| Intel | Intel Memory and Storage Tool (Intel MAS) | Intel MAS |
| Western Digital | Western Digital SSD Dashboard | WD SSD Dashboard |
| SanDisk | WD/SanDisk SSD Dashboard | SanDisk SSD Dashboard |
| Kingston | Kingston SSD Manager | Kingston SSD Manager |
| Seagate | SeaTools for SSDs | SeaTools |
| ADATA | ADATA SSD Toolbox | ADATA SSD Toolbox |
| Toshiba/Kioxia | KIOXIA SSD Utility | KIOXIA SSD Utility |
| PNY | PNY SSD Toolbox | PNY SSD Toolbox |
| Corsair | Corsair SSD Toolbox | Corsair SSD Toolbox |
| Micron | Micron Storage Executive | Micron Storage Executive |
| SK Hynix | SK Hynix Drive Manager | SK Hynix Drive Manager |
With these tools, you can easily update your drive’s firmware with some clicks. All of them are free for your drive and offer many other performance and monitoring features.
5. Use High-Quality Power Supply
Unlike hard drives, SSDs have complex circuitry that operates solely on electric current. The data itself is stored in the form of an electric charge inside nanoscopic floating-gate or charge-trap flash cells. Also, the NAND flash chips are susceptible to power fluctuations. Although most SSDs and motherboards are equipped with power management systems, the incoming voltage must be appropriate.
SSDs require a consistent voltage to operate correctly. High-quality power supplies are equipped with systems to prevent undervoltage and overvoltage. Although this is not very common, a faulty power supply can result in data loss and drive failures.
Ensure you opt for at least 80 Plus certification or higher. Higher ratings, such as Gold, Platinum, and Titanium, are better in terms of power delivery not only for SSDs but also for the overall system.
6. Manage Heat properly
Excess heat is the worst enemy of electronic components. In SSDs, the heat can easily reduce the lifespan of the SSD controller, NAND Flash, and other elements. To tackle the heat, it is essential to ensure a proper heat flow to your SSD. If it is a laptop, try to keep it on a hard surface to allow airflow. On a desktop, ensure a good fan setup for optimal airflow. Ensure that no other components are generating excessive heat that could affect your SSD.
It is beneficial to use a passive heatsink over your SSD. Most motherboards come with SSD heatsinks. You can also purchase heatsink variants of popular SSDs or opt for third-party heatsinks.
Keep track of the SSD temperature using SSD monitoring software, such as CrystalDiskInfo or the official software discussed above. Here is a detailed guide to check and resolve SSD overheating.
7. Optimize Write Intensive Software
Some types of software on our computers are highly write-intensive. These software places an extra write load and contributes to cell degradation much faster. These generally include video editing/rendering, VMs, Database management, photo editing, and backup software. It isn’t that this software is harmful to your SSD, but it contains processes that perform numerous write operations on the SSD. If you also have this type of workload, it is best to opt for an SSD with good SLC Write Cache and its DRAM.
Let’s see what those are and how you can optimize your drive for write workloads.
7.1 Move Cache files and manage autosave in video editing software
Video editing software, such as DaVinci Resolve and Adobe Premiere Pro, uses temporary file locations for caching previews, autosaving, and rendering files. These operations are generally very write-intensive.
So, if you prefer, you can store these cache files in another location, preferably on a Hard Drive or a low-end SATA drive. To change the settings in Premiere Pro, simply go to Edit > Preferences > Media Cache and set the “Cache Files” location to a different drive. Other software will offer similar settings.

You can also change the autosave frequency from Preferences > Auto Save > Change Autosave Time.
This will not impact the performance of your drive in any way, but it can reduce wear on the SSD. However, if frequent autosaves are essential for you, you can leave them as it is.
7.2 Save VM and Database management files in HDD
The Virtual Machine software generates numerous write operations and creates various files on your SSD, potentially resulting in excessive write activity. There is no alternative to them because these files are necessary. The same applies to database management systems like MySQL or PostgreSQL. You can easily change the default storage location to HDD because they are less prone to damage due to these write operations. Keep in mind that this can result in poor performance, so you can opt for an extra SSD as well.
Example Settings in VirtualBox: File > Preferences > General > Default Machine Folder > Select an HDD.
Example Settings in MySQL: Edit my.cnf file to set innodb_log_group_home_dir or tmpdir to an HDD.
Along with these settings, you can also change the scratch disk’s data location to an HDD or another SSD. These files are created in photo editing software like Adobe Photoshop to store temporary files. You can again go to the Preferences Menu and click Scratch Disks to select another drive as the scratch disk. Along with this, you can change the sync intervals of popular backup software like Google Drive or Dropbox.
8. Disable Defragmentation and enable Optimization
SSDs don’t need defragmentation, and it is generally turned off by the operating systems. However, in Windows, you can use the optimization feature that is designed for solid-state drives. Here are the settings to follow.
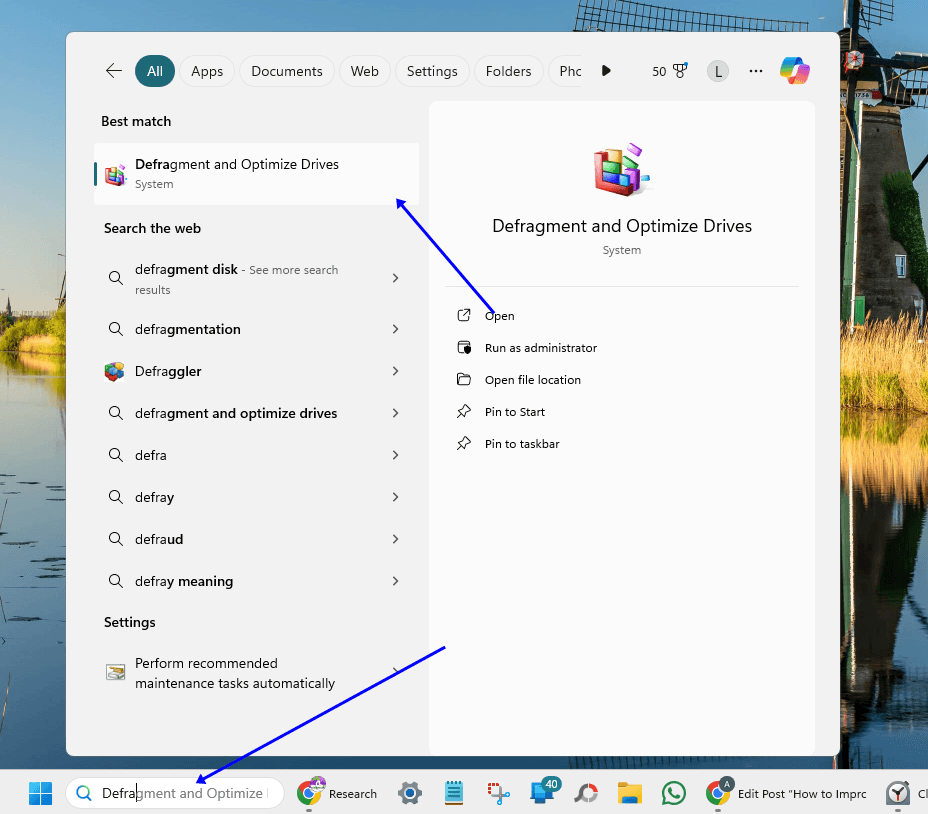
- Open the Start Menu and type “Defragment and Optimize Drives”.
- Select the “Defragment and Optimize Drives” tool.
- In the window that opens, select your SSD from the list of drives.
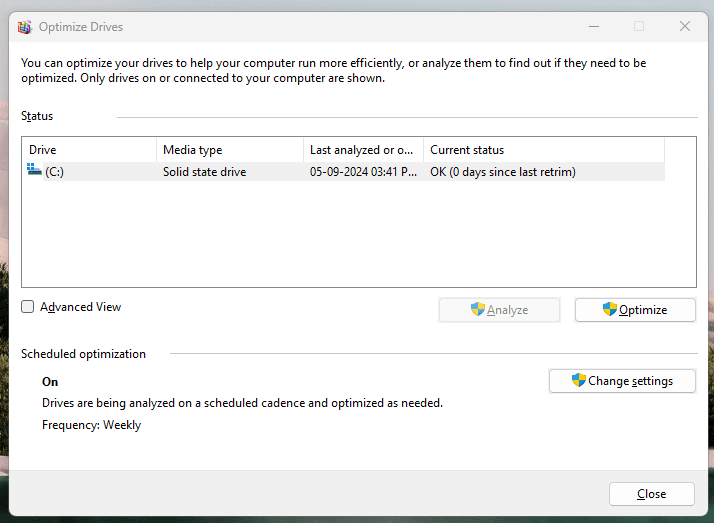
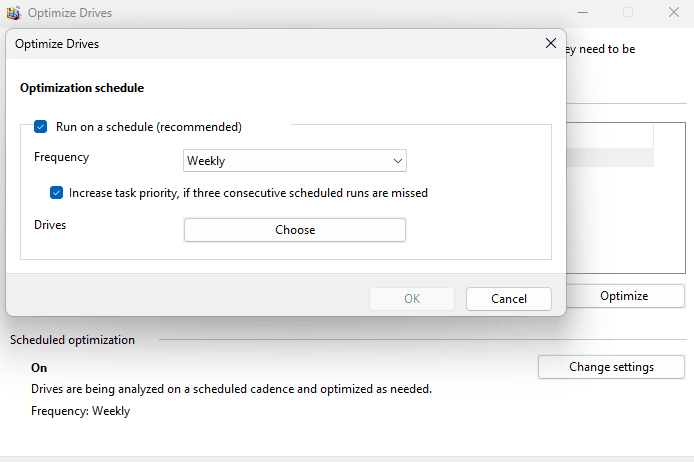
- Click “Change settings” to adjust the schedule.
9. Disable Browser Auto-Sync
If you use any internet browser regularly on your computer, the amount of cache, HTML files, scripts, cookies, and temporary files can be pretty big. These files are generally created to optimize browser performance and improve boot-up times. While this is quite useful for performance, these files must be constantly rewritten with new data. As a result, continuous write and rewrite operations are performed on your SSD, degrading its lifespan by contributing to unwanted write amplification.
9.1 Process for Google Chrome
- Open Chrome.
- Press
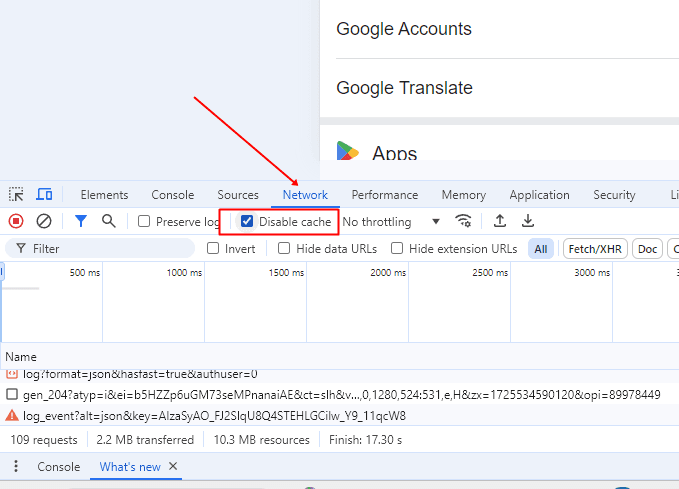
F12or right-click anywhere on a webpage and choose Inspect to open Developer Tools. - In the Developer Tools window, go to the Network tab.
- Check the option Disable cache (only works while Developer Tools is open).
The same process can be followed for other browsers as well. Additionally, you can change the cache storage location using various methods, which can be found online.
10. Disable System Restore (Optional)
This isn’t recommended if you have essential data on your computer that requires regular backups. System restore creates large restore files to create snapshots of your system. These snapshots can then be used to restore the system files and software to their previous state. System restore keep re-writing these restore locations constantly and does write operations on your drive. This is how you can disable System Restore in Windows.
How to Disable System Restore:
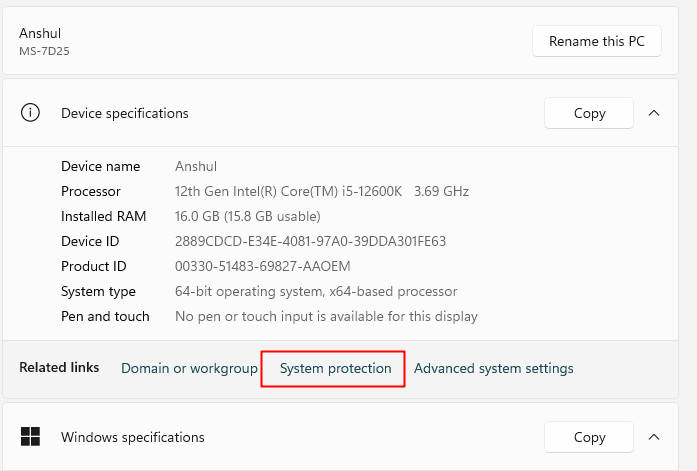
- Open Control Panel > System > System Protection.
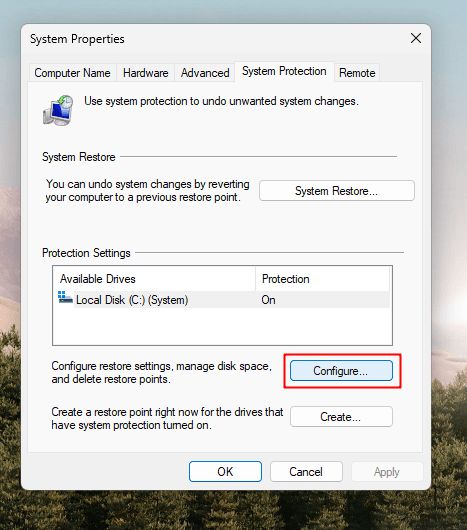
- Under the Protection Settings tab, select the drive (usually C:) and click Configure.
- Select Disable System Protection and click OK.
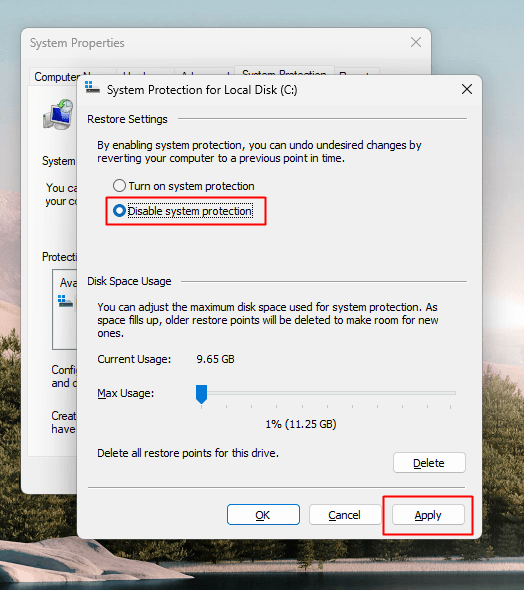
This would stop saving your system snapshots and stop writing the restore file on your SSD.
Conclusion
All these steps can contribute to your SSD’s overall lifespan, endurance, and reliability. You should follow as much as you can. It is all about keeping your SSD cool, updating firmware, and eliminating unnecessary write operations. The SSDs fail as the cells degrade over time. But, you can surely reduce the wear and increase the lifespan with these tips.
I hope this helps!


![5 Best SSD Wipe and Secure Erase Software in 2026 [With Guides]](https://storedbits.com/wp-content/uploads/2025/11/parted-magic-768x404.png)