Affiliate Disclosure: This post may include affiliate links. If you click and make a purchase, I may earn a small commission at no extra cost to you.
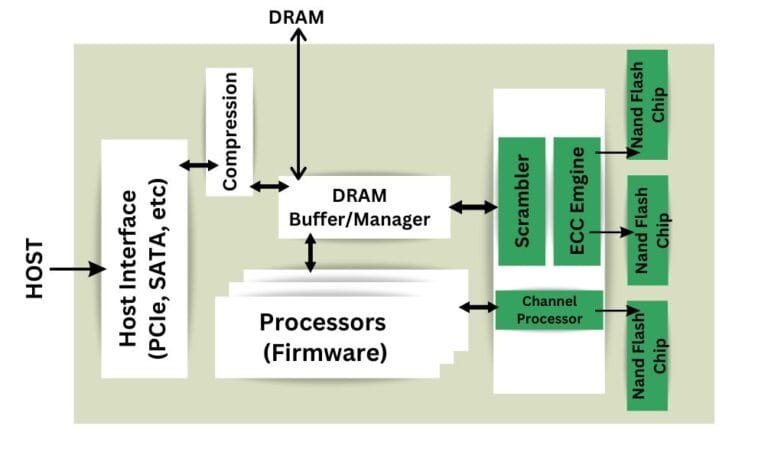
SSDs use the NAND Flash memory to store the data. Each bit of data is stored inside either a floating gate or charge-trap flash cells in the form of an electric charge. So, whether you read or write the data from and to an SSD, there is always an electric charge involved. The memory cells are then divided into bigger units like strings, pages, and blocks. A page is the smaller readable and writable unit in the memory while a page is the smallest erasable unit. In this article, we are talking about erasing the data completely from an SSD. Secure erasing isn’t just a simple format or deletion of files. It is the process of re-writing the flash memory with random or rather “non-sense” data. It could be writing the whole drive with simple 0’s or 1’s.
Secure erasing an SSD could be important and even essential if you are trying to sell your computer or the SSD. If you just format your drive and sell, donate, or repurpose it, anybody can retrieve its data. Formatting an SSD isn’t generally enough because it marks the formatted space as a “Free Space” but doesn’t really erase everything. You can think about it like that. You had some important data stored in your drive. Now, even if you delete it or format it, it’s just the system is made to recognize that there is an empty space. However, this space isn’t empty and will be considered empty when everything from it has been reset.
The Need to Securely Erasing an SSD
Isn’t moving our files to the recycle bin and then clearing this bin enough?
Well No. SSDs don’t immediately erase the data once the user has deleted it even manually. This is because SSDs are designed to be very conscious of the write operations. Until there is a serious need to erase a specific block of data, all its content will remain intact until the SSD controller erases it manually. Now, modern SSDs use things called garbage collection and TRIM which do these cleaning things in the background but generally, the data stays there for longer than you can imagine.
The smallest erasable unit in an SSD is a block which can have a storage capacity of some KiloBytes. So, until that specific block is required, the system will keep it marked as available but the data will remain there.
The important thing is that most modern SSDs come with TRIM and Garbage collection which does the process of cleaning up this space in the background. But, if you are dealing with very sensitive data, it is good to secure erase it before handing your drive to someone else.
The Official Ways to Secure Erase any SSD
All the SSDs in the market come with their official software which can help manage, monitor, check, or optimize our drives. Most of these software will have the features to securely erase our SSDs. In fact, this software is the best in terms of reliability because the manufacturer has provided you with that solution. We will talk about the popular SSD brands and the methods to securely erase them. However, we will provide you the links to most of the software for most SSDs in the market.
Things to know about the Secure erase
Secure Erase is basically a command that is run outside the operating system. Whenever we are using a drive in our computer, the operating system locks the file and prevents the user from having full access to the drive. If you want to have full access you have to get outside from the OS which is why you need a bootable drive so that you can run those commands. Whether you are using official software like the Samsung Magician, make sure to have a free USB flash drive with at least 8GB of storage capacity. Keep in mind that it will be formatted during the operation.
How to Secure Erase a Samsung SSD?
- Download the Samsung Magician Software from this link. Install the program and run it.
- Insert the USB flash drive and select it to create a bootable drive. Once you have selected your drive and the USB flash drive, click Start.
- Once, the bootable device is created, you will see a dialog for restarting the system. Click Ok and when the device is restarting, click Del, Esc, F12, or the BIOS/UEFI key for your specific system to enter the BIOS menu.
- Inside the BIOS/UEFI menu, you just have to change the boot drive to the one that we just created. Now, based on BIOS and UEFI, the settings may vary depending on the motherboard. In the BIOS, you may have to change the boot mode to legacy if you don’t see your USB flash drive.
- Once your system restarts, you will see a menu like this where you will be asked for permission to proceed with the erasure. Type “Y” to proceed and “N” to withdraw.
- On the next page, you will be asked to select the number of drives to proceed with. If you just have one drive, you can enter “1” and hit enter. Otherwise, choose the right number and then proceed.
How to Secure Erase a WD SSD?
- Download the WD Dashboard from the official website. Once, it’s installed, run the program.
- It would automatically detect any WD drive in your computer.
- Click on the Tools tab on the left-hand side.
- Insert the USB flash drive into your computer
- Click Create USB Drive and proceed to create the bootable drive.
- Once the bootable USB image is created, you’ll have to go to the BIOS/UEFI again and follow the steps that we did above with the Samsung SSDs.
How to Secure Erase Kingston SSD?
- For Kingston SSDs, you have got the Kingston SSD Manager software. You can download it from here. Also, there is the official secure erase guide from Kingston.
- The limitation of this software is that it can securely erase only the SATA SSDs (not NVMe SSDs). For NVMe, we are going to see the third-party secure erase guide in the upcoming sections.
How to Secure Erase Seagate SSD?
- To securely erase Seagate SSDs, you can download the Seagate Toolkit software.
- Open the software and it will recognize all the drives installed in your computer. The best thing about the SeaTools software is you can sanitize and block-erase any SSD from any brand.
- Just click the Erase tab and select your drive to be erased. Choose the Sanitize Block Erase
- Keep in mind that these erasures are irreversible and can’t be reverted. Once, you click the Ok button, your device will either be erased or sanitized by the software. Once the erasure process is done, you will see the result page.
How to Secure Erase Crucial SSD?
- Download the Crucial Storage Executive tool from the official website and install it on your computer.
- Open the program and click the Sanitize Drive tab. The storage executive program doesn’t have the secure erase options but the sanitized drive is a much better option and we will know the reason later on.
Official Software for SSDs
There are many SSDs in the market and most of them come with the official software. Below is a list of those software with the links so that you can check if your software has the secure erase feature. If not, we have a third-party tool ready for you below.
| SSD Brand | Software Name | Download Link |
|---|---|---|
| Samsung | Magician Software | Download Here |
| Crucial | Storage Executive | Download Here |
| Western Digital | Dashboard | Download Here |
| Kingston | SSD Manager | Download Here |
| SanDisk | SSD Dashboard | Download Here |
| Intel | Memory and Storage Tool | Download Here |
| ADATA | SSD Toolbox | Download Here |
| Seagate | SeaTools SSD | Download Here |
| Toshiba | Storage Utility | Download Here |
| Corsair | SSD Toolbox | Download Here |
Secure Erase vs Sanitize: What is the difference?
Secure erase that we have used in this article is the method to write either 0’s or 1’s on all the usable space in the drive. Secure erase is more than enough for personal usage because it will make your drive unusable. However, secure erase is generally not enough in the business erasure because the bad blocks and the over-provisioning area are generally left behind when wiping the drives.
Sanitizing an SSD or HDD is a more thorough and deep erasing process. It is supported by both ATA and NVMe standards. This includes a cryptographic erasure which adds every part of the NAND flash inside the erasing process. Sanitizing is a much more secure process used mainly in very sensitive environments such as business drives and military applications.
Third-Party SSD Secure Erase and Sanitize (Applicable for All SSDs)
There are many paid tools like Parted Magic but we are going to use the free software available for us. We are going to use the KillDisk Free program for this.
- Download the KillDisk software from here.
- Open the program
- Just choose your drive and click the Erase Disk option at the top
- You will get to choose many options for wiping the data. One Pass Zero or One Pass Random is more than enough to properly rewrite the drive with either only zeroes or random values. I would recommend not choosing multiple wipe numbers because it will wear your drive more.
Conclusion
I hope this article has helped you understand and perform the secure erasing in SSDs. Secure erasing is just a procedure to write random things within the NAND flash cells so that the previous data can’t be retrieved. However, I believe secure erase isn’t necessary for most of the users. An SSD with encryption turned On is not usable in other systems and that is enough for most people. Formatting it will do the job unless someone is employing a serious data recovery mechanism for your drive. But, for peace of mind, it is good to secure erase and it is easy to do as well. I hope the things we discussed above will help you do the same.

