Affiliate Disclosure: This post may include affiliate links. If you click and make a purchase, I may earn a small commission at no extra cost to you.
I first needed to reinstall Windows 11 from BIOS when my laptop got stuck in a boot loop and wouldn’t reach the desktop. I couldn’t access settings or recovery—just a loading screen that never ended. Most guides I found were either too technical or assumed the system still worked.
In reality, people search for this because their PC won’t start, and they want it to work again. Once I knew what to prepare and what to change in BIOS, the reinstall was much simpler than I expected. This guide walks through the exact steps that worked for me.
When Do You Need to Reinstall Windows 11 from BIOS?
In my experience, reinstalling Windows 11 from BIOS is usually a last resort. Most people don’t look for BIOS settings unless their computer isn’t working normally. That was exactly my situation—I couldn’t reach the desktop or even the recovery options, so reinstalling from BIOS became the only practical solution.
You’ll typically need this method when Windows can’t load at all, such as:
- Your PC is stuck on the loading screen or logo
- You keep getting a blue screen on startup
- Automatic Repair fails repeatedly
- The system restarts over and over
- You see a black screen after turning the computer on
In these cases, you usually can’t access the Settings app or the built-in Reset this PC option. That’s why reinstalling Windows 11 using a bootable USB drive in BIOS is necessary.
If you can still log in to Windows or open the recovery menu, you probably don’t need to use BIOS at all. The built-in reset options are faster and less complicated. But if your PC won’t boot, reinstalling Windows 11 from BIOS is often the most reliable way to get it working again.
Will Reinstalling Windows 11 Delete Your Files?
This was one of my biggest concerns before I reinstalled Windows 11. I wasn’t worried about the system itself—I didn’t want to lose my personal files. The answer depends on how you reinstall Windows, because there are two very different options.
Option 1 – Keep Your Personal Files
If you use Reset this PC and choose Keep my files, Windows will:
- Keep your personal files (documents, photos, etc.).
- Remove installed apps and programs.
- Reset system settings to default.
This option is safer if your system still boots into recovery mode.
Option 2 – Full Clean Reinstall
If you reinstall Windows 11 from BIOS using a bootable USB and choose a custom installation, it usually means:
- All files on the system drive are deleted
- All apps are removed
- Windows is installed like a brand-new system
This is the method I used when my PC wouldn’t boot at all. It fixed the issue, but it also wiped everything on the system drive.
Here’s a quick comparison:
| Option | Personal Files | Apps | Settings |
| Reset (Keep files) | Kept | Removed | Reset |
| Clean reinstall | Deleted | Deleted | Reset |
💡Notice: If your computer still shows signs of life, it’s worth trying the “keep files” option first. But if the system won’t start at all, a clean reinstall from BIOS is often the only reliable solution—just make sure you back up anything important if you still have the chance.
What You Need Before Reinstalling Windows 11
Before I started the reinstallation, I made sure I had everything ready. This saved me a lot of frustration because once you start the process, you don’t want to stop halfway to find a missing file or device.
Here’s what I actually needed:
- A USB drive (at least 8GB)
This will be used to create the Windows 11 installation media. - Another working computer
Since my main PC wouldn’t boot, I used a second computer to download the Windows installer and create a bootable USB drive. - A stable internet connection
You’ll need this to download the Windows 11 installation files. - About 30–60 minutes of time
The process itself isn’t very complicated, but it does take some time for files to copy and the system to set up.
💡One important thing I learned: you can’t reinstall Windows directly from BIOS alone. The BIOS only lets you choose where the computer boots from. You still need a bootable USB drive with the Windows 11 installation files. Once I had that ready, the rest of the process was much more straightforward.
How to Reinstall Windows 11 from BIOS Using a USB Drive
When my PC wouldn’t boot, reinstalling Windows 11 from the BIOS using a USB drive proved the most reliable solution. The idea is simple: you create a bootable Windows 11 USB drive on another computer, then use the BIOS to start your PC from it instead of the broken system.
Here’s the exact process I followed.
Step 1. Create a Windows 11 Bootable USB
Since my computer wouldn’t start, I had to use another working PC to prepare the installation media.
1. Plug an empty USB drive (at least 8GB) into a working computer.
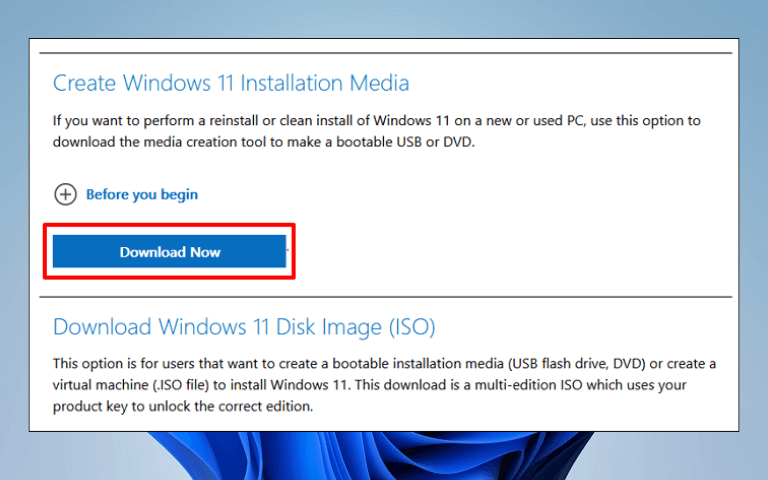
2. Download the official Windows 11 Media Creation Tool from Microsoft.
3. Go to Create Windows 11 Installation Media and click Download Now.
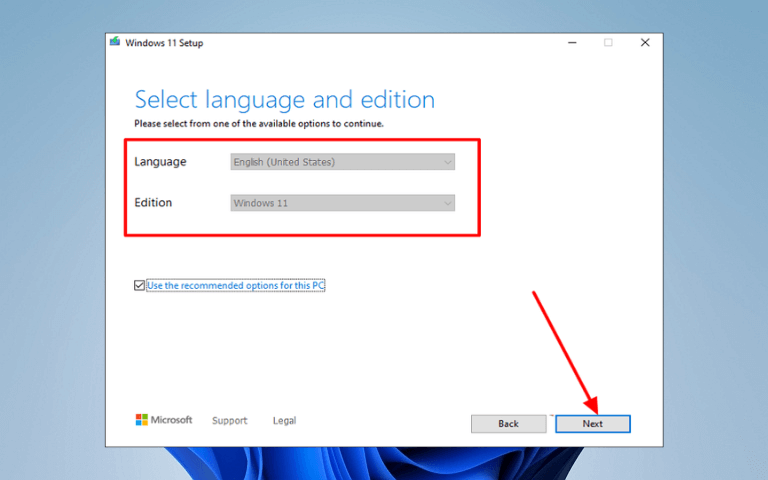
4. When the file is downloaded, click on it to enter the Windows 11 setup.
5. Accept the terms of service, select Language and Edition. Then, click Next.
6. Select USB flash drive > Next. Choose the USB drive connected to your PC.
7. Click Next, follow the on-screen instructions to create a bootable USB drive.
8. Once it finishes, safely eject the USB drive.
Step 2. Enter BIOS on Your PC
1. Turn off the computer completely.
2. Insert the bootable USB into the PC that won’t start.
3. Turn it back on and repeatedly press the BIOS key.
🚩Common BIOS keys include:
| Brand | BIOS Key |
| Dell | F2 |
| HP | Esc / F10 |
| Lenovo | F2 / Novo button |
| ASUS | Del / F2 |
| Acer | F2 / Del |
💡Notice: If the first key doesn’t work, restart and try another. Pressing the wrong key won’t damage your computer.
Step 3. Change Boot Order to USB
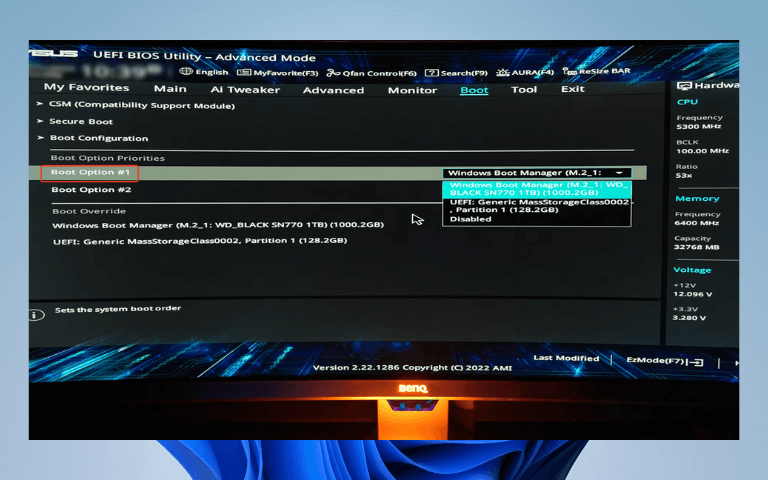
Once I was inside the BIOS menu, I needed to make sure the PC would boot from the USB drive.
1. Go to the Boot or Boot Order section.
2. Find your USB drive in the list of boot devices.
3. Move the USB drive to the top of the list.
4. Save the changes and exit BIOS (usually by pressing F10).
5. After the restart, the computer should boot directly from the USB.
Step 4. Start Windows 11 Installation
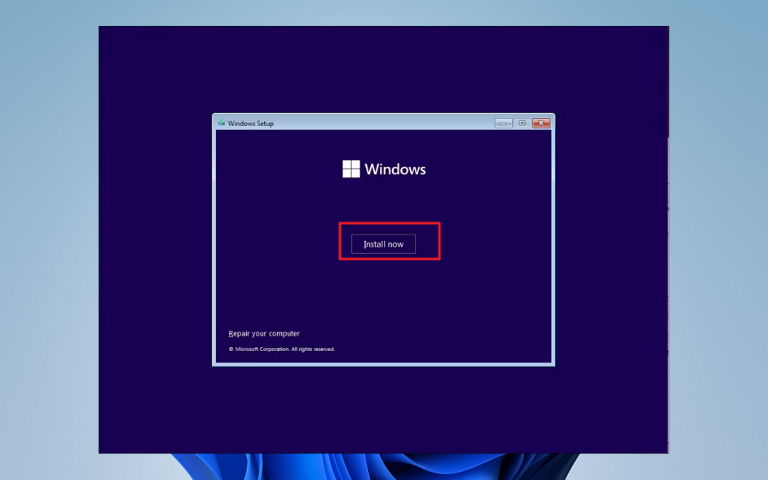
When the Windows setup screen appeared, I followed these steps:
1. Select Language, Time, and Keyboard, then click Next.
2. Click Install now.
3. Enter your product key. If you don’t have one, click “I don’t have a product key“.
4. Select the operating system you want to install (mine is Windows 11 Pro), then click Next.
5. Accept the Microsoft License Terms and click Next.
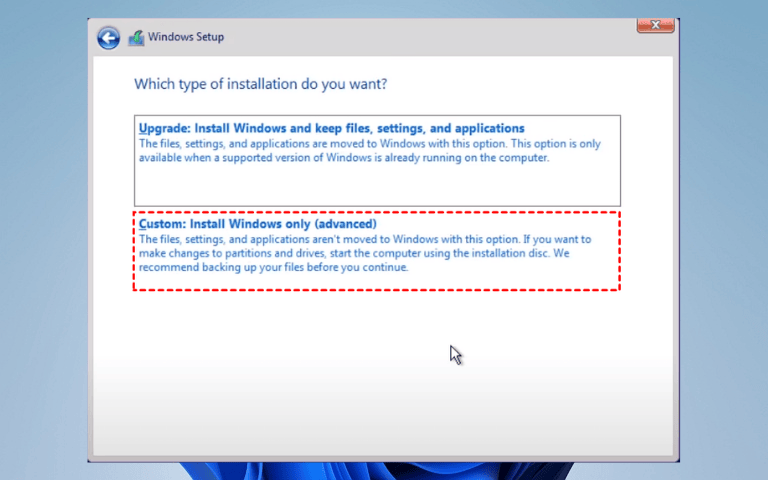
6. When asked for an installation type, choose: Custom: Install Windows only (advanced).
7. Select the system drive (usually Drive 0) to install Windows 11.
8. Click Next to begin the installation.
7. The computer will copy files and restart several times.
💡Important: Choosing the wrong drive can erase your files. If you’re unsure, double-check before continuing.
Step 5. Complete the Windows 11 Setup
After installation, the PC restarted and showed the Windows 11 setup screen. I just followed the on-screen instructions:
1. Choose region and keyboard layout
2. Connect to Wi-Fi
3. Sign in with a Microsoft account
4. Adjust privacy settings
5. Within about an hour, the system was fully reinstalled and running like new.
How to Reinstall Windows 11 Without Entering BIOS
In some cases, you don’t actually need to enter the BIOS at all. I’ve used this method when the system was unstable but still showed signs of life. If your PC can reach the Advanced Startup screen, you can reinstall Windows 11 directly from the recovery environment.
This approach is usually easier and less intimidating, especially if you’re not comfortable changing BIOS settings.
Here is how to reinstall Windows 11 from Recovery Mode:
1. Turn on your PC.
2. As soon as Windows starts loading, hold the power button to force it off.
3. Repeat this process two or three times.
4. Windows should automatically enter the Recovery Environment.
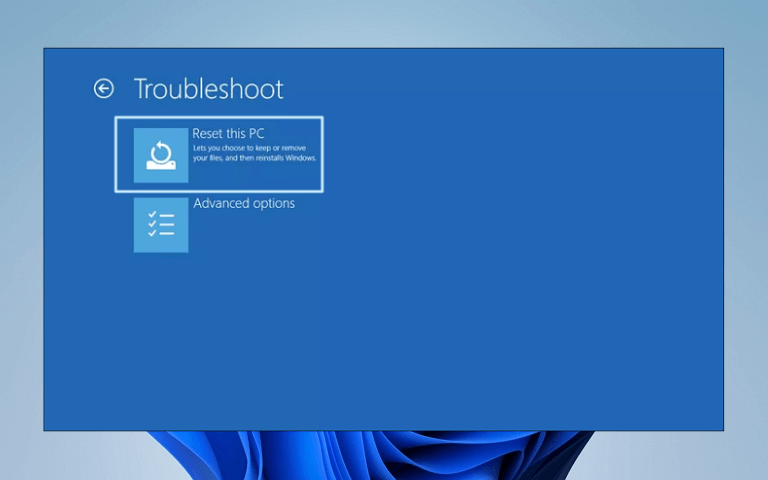
Once you see the recovery screen:
1. Select Troubleshoot.
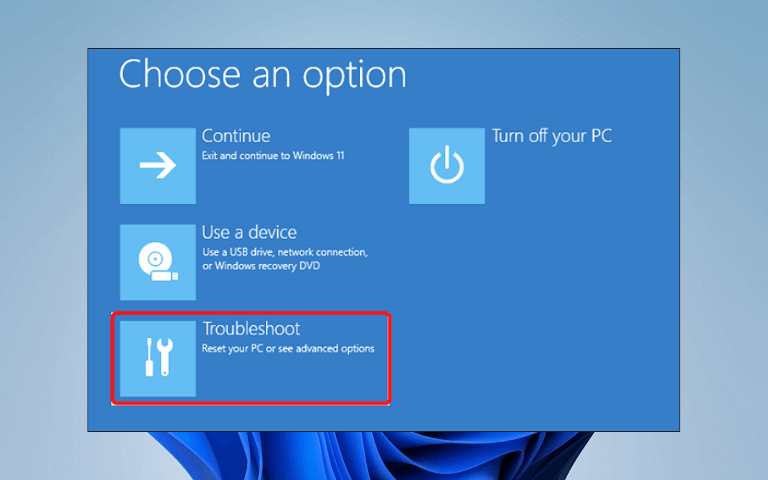
2. Click Reset this PC.
3. Choose one of the following options:
- Keep my files – reinstalls Windows but keeps personal files.
- Remove everything – perform a full clean reinstall.
4. Follow the on-screen instructions to complete the process.
💡In my experience, this method is much faster because you don’t need another computer or a USB drive. But it only works if the recovery environment is still accessible. If your PC won’t reach this screen at all, reinstalling Windows 11 from the BIOS using a bootable USB drive is the more reliable option.
What If You Can’t Enter BIOS?
When I first tried to access the BIOS, I ran into the frustrating situation where my PC wouldn’t respond to the usual keys. This is more common than you might think, and it doesn’t mean something is seriously wrong with your computer. There are a few reasons this can happen—and a few ways to work around it.
Common Reasons You Can’t Enter BIOS
- Fast Boot or Quick Boot is enabled
Some PCs skip the key detection phase if Fast Boot is on, making it hard to enter the BIOS. - Wrong key for your brand
Different manufacturers use different keys (F2, F12, Delete, Esc, or even a special Novo button on Lenovo laptops). - Wireless keyboard issues
Wireless or Bluetooth keyboards may not register key presses early enough during the boot process. - Timing or repeated presses
Pressing too early or too late can sometimes miss the BIOS entry window.
How I Finally Got Into BIOS
- Try a wired keyboard if you are using a wireless one. It usually works reliably.
- Test different keys for your brand:
- Dell: F2
- HP: Esc / F10
- Lenovo: F2 / Novo button
- ASUS: Del / F2
- Acer: F2 / Del
- Press the key repeatedly immediately after powering on, rather than holding it down.
- If Fast Boot is the issue, some laptops have a dedicated BIOS or recovery button (often a small pinhole or button near the power button).
Even if it takes a few tries, these steps usually allow you to enter the BIOS without risking your computer. Once you’re in, you can proceed with the Windows 11 reinstall as planned.
Common Problems During Windows 11 Reinstallation
When I reinstalled Windows 11, I ran into a few issues that weren’t mentioned in some of the guides I had read. Knowing what can go wrong beforehand can save a lot of frustration, so here’s what I encountered and how I solved it.
USB Not Showing in BIOS
Sometimes the BIOS doesn’t recognize the bootable USB at all. In my case, it was because I had plugged it into a front USB port instead of a rear one.
Fixes:
- Use a rear USB port.
- Make sure the USB is properly formatted and bootable.
- Try recreating the bootable USB if it still doesn’t appear.
No Drives Found During Installation
During setup, Windows might display the message “We couldn’t find any drives”. This usually happens if the storage driver isn’t recognized.
Fixes:
- Check the BIOS to ensure the drive is detected.
- If using an NVMe SSD, download and load the appropriate driver during installation.
- Confirm SATA mode is compatible (AHCI is usually safe).
PC Keeps Booting Into Old System
After installation, I sometimes found my PC booted back into the old Windows instead of the new one.
Fixes:
- Remove the USB drive after installation completes.
- Double-check the BIOS boot order to set the new Windows installation as the first option.
H3: Installation Takes Longer Than Expected
Depending on your hardware, the reinstall can take longer than the advertised 30–60 minutes. My first install on an HDD laptop took over an hour.
Tips:
- Be patient and let the process run uninterrupted.
- Keep your laptop plugged in to avoid power interruptions.
By anticipating these problems, I was able to complete the reinstall without panic—and each problem has a simple workaround if you know what to check.
How Long Does It Take to Reinstall Windows 11?
One of the questions I had before starting the reinstall was how much time I would actually need. In my experience, the total time depends on a few factors, but generally, it’s not as long as it feels when you’re staring at a blank screen.
Typical Time Frame
For most PCs, a full reinstall takes 30 to 60 minutes from start to finish. This includes:
- Copying installation files from the USB
- Restarting multiple times during setup
- Configuring initial settings like region, language, and account
What Affects the Speed
- Storage type: Installing on an SSD is much faster than on an HDD.
- PC performance: Faster CPUs and more RAM speed up the process.
- Internet connection: Needed only if updates are downloaded during installation or you sign in with a Microsoft account.
When I reinstalled on a laptop with an SSD, the whole process, from booting from the USB to reaching the Windows desktop, took about 35 minutes. On an older HDD system, it took closer to an hour.
The key takeaway: don’t rush it. Interrupting the process can cause errors, so make sure your PC is plugged in and let Windows do its thing.
Final Tips Before You Reinstall Windows 11
Before I finally hit “Install” during my Windows 11 reinstall, I learned a few lessons the hard way. These small precautions can save a lot of stress and prevent common mistakes.
- Back up important files if possible.
Even if you plan a clean reinstall, it’s worth copying anything critical to an external drive or cloud storage. Once the installation starts, anything on the system drive is gone. - Keep your PC plugged in.
Reinstalling Windows can take 30–60 minutes, sometimes longer on older hardware. A sudden power loss during installation can cause serious issues. - Double-check the drive selection.
Make sure you’re installing Windows on the correct drive. Accidentally selecting the wrong one can wipe out other partitions or external drives. - Be patient during restarts.
Your PC will restart several times. Don’t panic if it seems to pause on a black screen—this is normal. - Have your Microsoft account info ready.
If you sign in with a Microsoft account, having your password handy speeds up setup and ensures you can access your apps and settings later.
Following these tips helped me avoid any major problems and made the reinstall process much smoother. Taking a few extra minutes to prepare is always better than dealing with mistakes later.