Affiliate Disclosure: This post may include affiliate links. If you click and make a purchase, I may earn a small commission at no extra cost to you.
Sometimes, formatting your SSD or simply deleting the data isn’t enough. You may want to be doubly sure that that data is not recoverable by any means. Secure erasing an SSD is the process of physically clearing or overwriting the physical data blocks so that no software can reverse engineer and recover it.
SSDs store the data in the NAND Flash memory chips. Each memory cell may have one to four bits of data, depending on its design. Now, these cells are prone to damage over time, especially with the write operations. So, to optimize its life and performance, SSDs don’t clear these cells physically as you delete your files from your system. Instead, they are marked as “unused”. Now, the controller and the firmware of your SSD will decide to run TRIM and Garbage Collection to wipe out those cells. Until then, your data remains intact and can be easily recovered using a data recovery program.
Secure erasure means we actively overwrite those individual cells so they permanently lose their states. This way, there is no way to recover that information. We can also choose to sanitize drives, which erase the user data along with the overprovisioning data, mapping tables, and every block on the NAND flash. Now, there are several ways to perform a secure erase. In most cases, users would choose to write everything with 0s everywhere.
Best SSD Secure SSD Software
We use secure erase software, which we’ll discuss in this article. All of these secure erase software will be free. However, some may require paid plans to use advanced erasure standards. I will also explain how to verify that a drive is adequately secured, erased, or not using a HeX editor in the end.
One last thing.
If you are using an NVMe SSD, the protocol itself offers you an open-source way to erase and sanitize your drives securely. It will happen solely on the command line. You can read more about it here. We will use only the GUI-based software to make things easier for you. Additionally, some users may have SATA SSDs. So, let’s get started with our article.
Manufacturer-specific software
If you are using an SSD from one of the manufacturers listed below, you can use their dedicated software to use their secure erase features.
| Manufacturer | Software Name | Secure Erase Functionality | Download Link |
|---|---|---|---|
| Samsung | Samsung Magician | Yes | Samsung Magician |
| Crucial | Storage Executive | Yes (Sanitize Drive) | Crucial Storage Executive |
| Intel | Intel Memory and Storage Tool | Yes | Intel Memory and Storage Tool |
| SanDisk | SanDisk Dashboard | Yes (Secure Erase) | SanDisk Dashboard |
| Kingston | Kingston SSD Manager | Yes | Kingston SSD Manager |
| Western Digital | WD SSD Dashboard | Yes (Secure Erase) | WD Kitfox |
| Seagate | SeaTools | Yes (Instant Secure Erase) | SeaTools |
| ADATA | ADATA SSD ToolBox | Yes | ADATA SSD ToolBox |
| Micron | Storage Executive | Yes | Micron Storage Executive |
This software is built with the necessary algorithms to securely erase its own SSDs properly. However, you can always try third-party software if you are unsure. So, let’s get started with one by one.
Free programs are good, but not good enough.
Most free programs we discuss here are great, but they can sometimes fail to clean your drive properly. Secure Erase and Sanitize sound similar, but they come from different standards, and they don’t do the same job. Secure Erase is the old baseline. Sanitize is the newer, stricter, more thorough standard. Most of this free software doesn’t come with a sanitize function.
Basically, Secure Erase is an ATA command designed for SATA drives. Sanitize is a newer family of commands in ATA and NVMe. It aims to eliminate leftover data everywhere, including spare blocks, remapped blocks, and any area the controller typically hides. If you want to
Official software is great to use if it comes with both secure erase and sanitize features. However, if you expect free software that does both, you might not find any one-shot solution right away.
1. Eraser (Open-Source)
| Pros | Cons |
|---|---|
| Fully Free and Open-Source | Not meant for SSD sanitization |
| Its file-level wipe is precise | Sanitize and Secure-Erase features depend on drive firmware support. |
| It supports many overwrite patterns, from one-pass random to DoD and Gutmann | It does not issue firmware-level secure-erase |
| It has a scheduler, which is handy when you want automatic cleanup of sensitive files | It lacks verification reports, certificates, or strong auditing features |
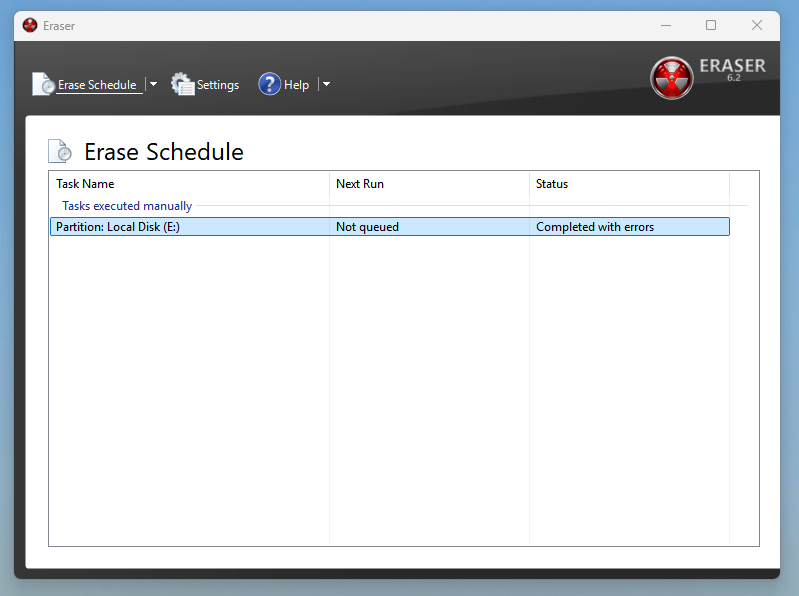
Eraser is the simplest yet most effective secure-erase software I have ever used. It is an open-source program with multiple erase methods with different pass levels. You can run various erasures at once and even schedule them.
It includes 1-pass overwrite (Pseudorandom Data), 1-pass overwrite (All Zeros), 3-pass DoD 5220.22-M (Short variant), 35-pass Gutmann Method, and various other erase methods. The user interface is simple and easy to understand, even for beginners. You can integrate it into Windows Explorer and securely erase folders and files. It allows you to empty your recycle bin, specifically and securely.
Sadly, it doesn’t have sanitizing features. Overwriting doesn’t reach remapped blocks, so a wiped file on an SSD may still have old fragments in hidden NAND areas.
How do you perform a secure erase with Eraser?
- Download Eraser from the official website and install it on your computer. It is available only for Windows.
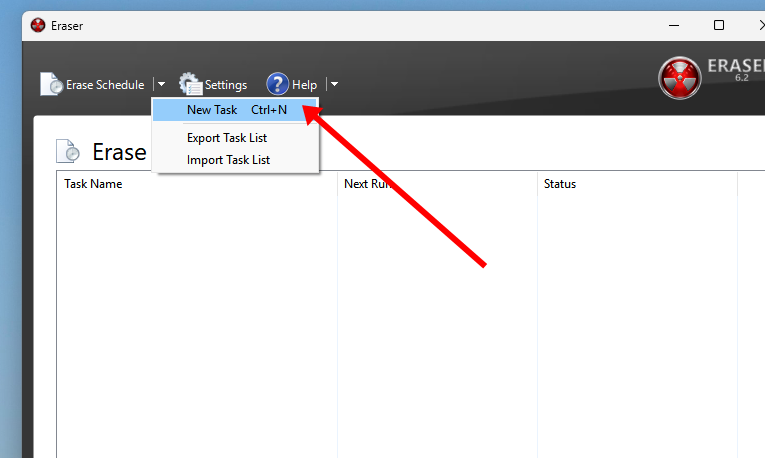
- Open the program and click the dropdown next to Erase Schedule in the top left. Click New Task.
- In the next tab, give your task a name and choose the task type. Please choose whether you will run it manually, run it immediately, or run it at restart. You can also select recurring erasures. For simple, one-time erasure, keep it set to Run Manually.
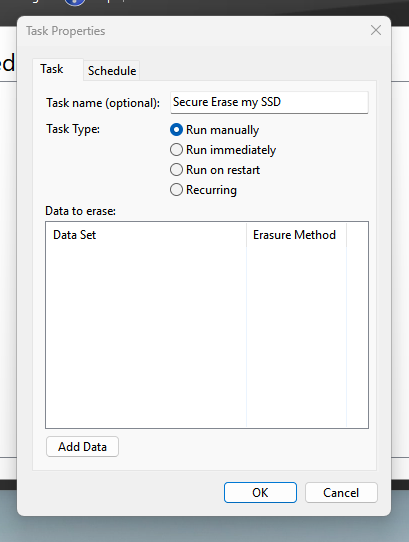
- Click the Add Data button and choose your target type from file, folder, recycle bin, unused disk space, secure move, or a drive.
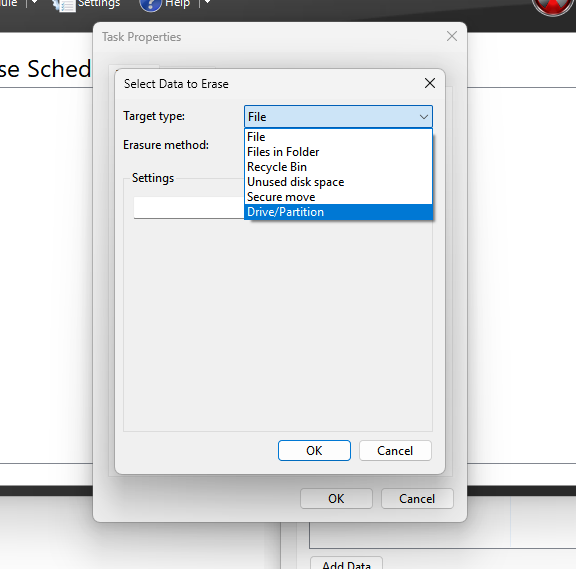
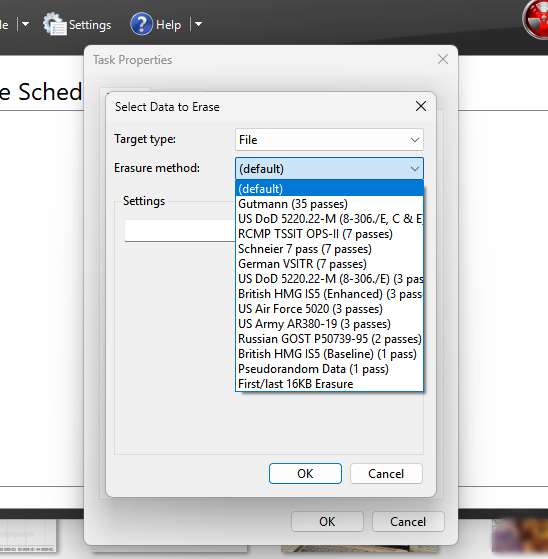
- In the following dropdown, choose the erase method. The ones on the top, like the Gutmann, have the higher erase passes, which will take more time and add to the total writes of your SSD and wear it. The ones on the bottom are the simplest, fastest, and generally enough for most people with personal data.
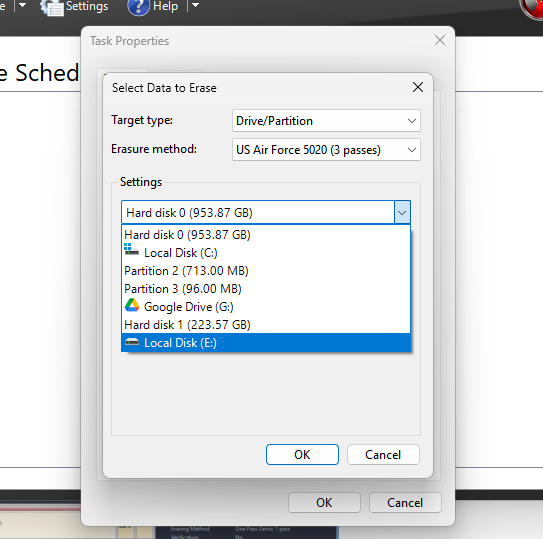
- Depending on your target type, select the disk, folder, or files to proceed.
- If you have chosen the recurring erasure method, you can set a schedule, otherwise, just save the task and go back to the main page.
- You can then run the task and wait for the secure erase to finish.
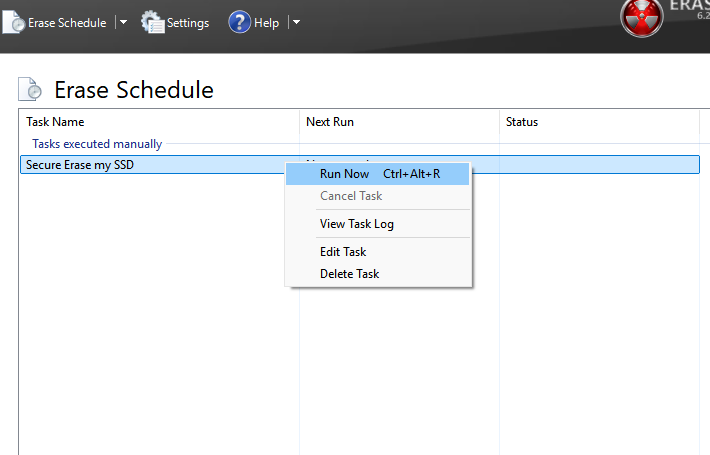
Once the erasure is finished, you can check the task logs and close the program.
2. Kill Disk (Free/Paid)
| Pros | Cons |
|---|---|
| Drive-level secure-erase commands for both SATA and NVMe SSDs | The free version only offers One-Pass Zeros erasure |
| Keyphrase confirmation | Sanitize and Secure-Erase features depend on drive firmware support. |
| Generate detailed logs and certificates of erasure | Slower when you fall back to overwrite mode on SSDs |
| Supports batch operations in the enterprise edition | |
| The free version only offers One-Pass zero erasure |
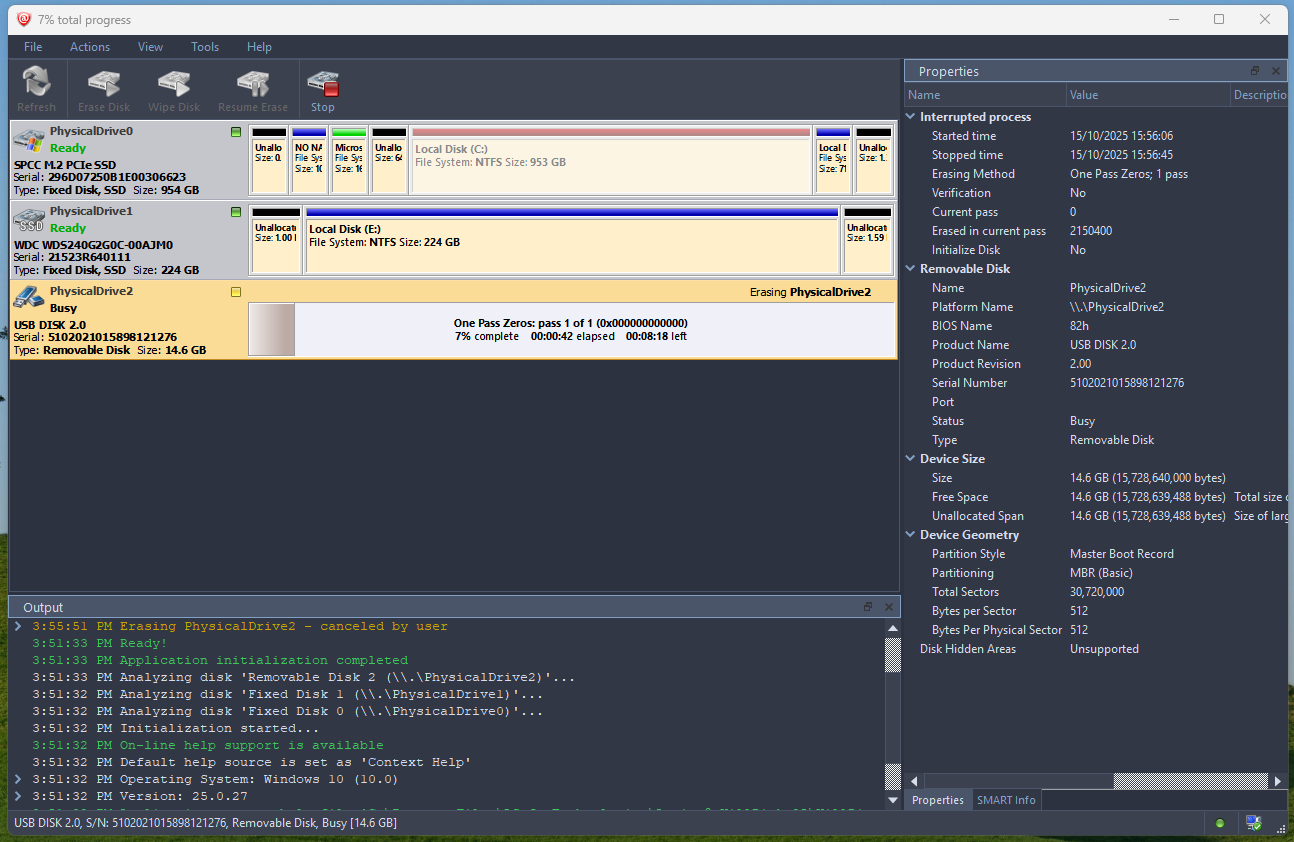
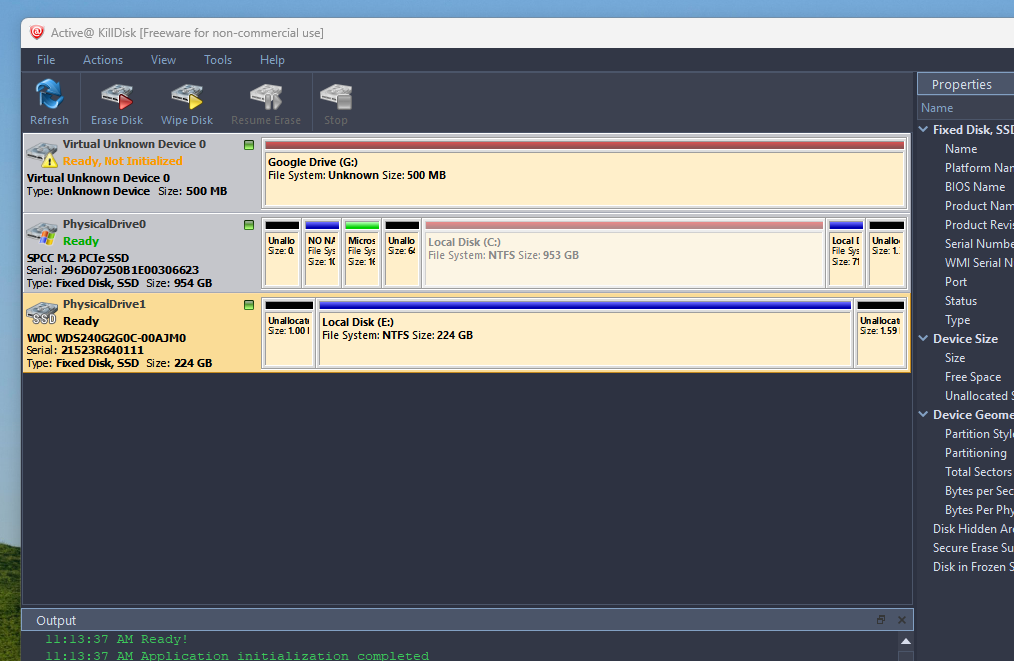
Active@ Kill Disk is a popular free and paid disk erasure tool that supports SSDs, HDDs, and USB drives. It comes with an easy interface and straightforward options. However, whenever I have used it, it does a 100% erasure without any errors. It has the sanitize feature if you opt for the paid version. Also, it has to be done through the KillDisk boot USB. The personal License can be purchased for $49.95.
The paid versions can trigger SSD firmware-level secure erases, support multiple erase standards, verify results, and generate reports. It’s aimed at people who want something more serious than a basic “format,” but not as heavy as full enterprise tools.
The free version is limited to the One-Pass Zeros. The free version doesn’t offer verification options as well. It is available for Windows, Mac, and Linux.
How do you perform a secure erase with KillDisk?
- Download KillDisk from the official website and install it on your computer.
- Open the program and select the drive you want to erase.
2. Once the drive is selected, click the Erase Disk button at the top.

- Choose the erase method. As discussed, the free version only has One Pass Zeros (1 pass). For other erase methods, you will have to go for the paid version.
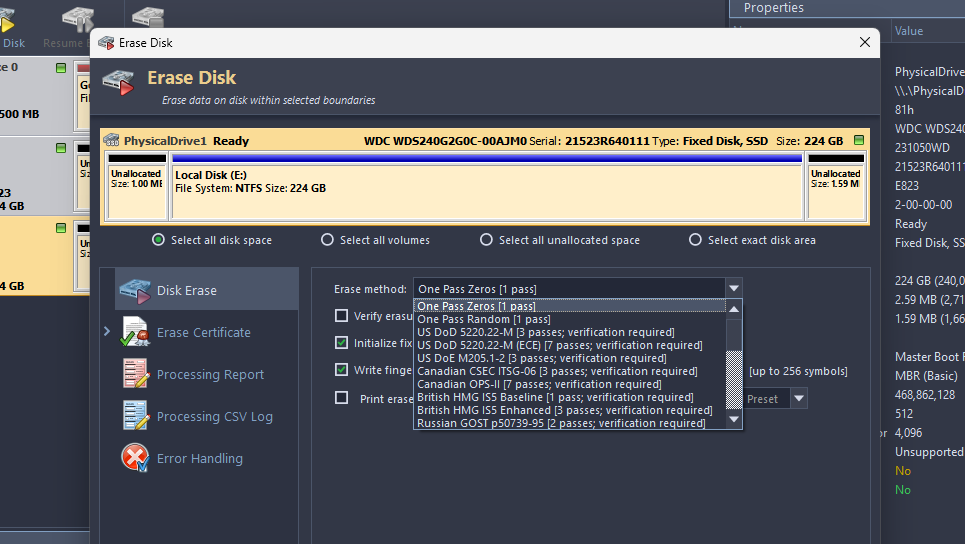
4. Proceed with the erase by clicking start. There are other features for verification and fingerprint writing, but those are all optional.
3. Parted Magic (Best Paid)
| Pros | Cons |
|---|---|
| Fully supports SATA SSD Secure Erase and NVMe Format/Sanitize commands | Not free (one-time purchase) |
| Runs outside the OS, avoiding driver/locking issues | Requires creating and booting from USB |
| Includes multiple storage utilities beyond secure erase | Interface can feel technical for beginners |
| Consistent success triggering firmware-level erasure | NVMe sanitize times vary depending on drive model |
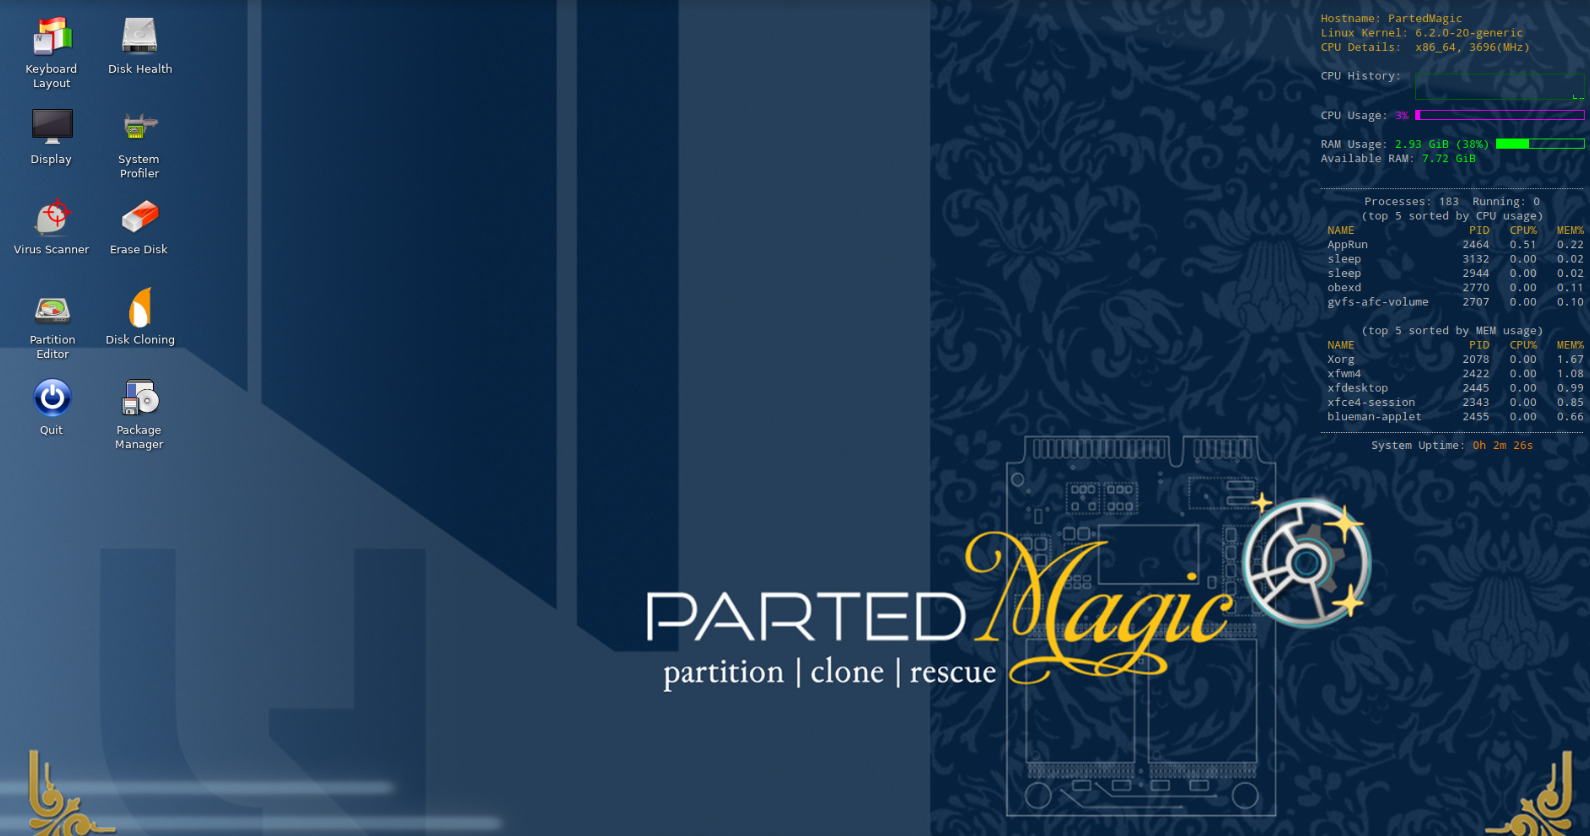
Parted Magic is one of the most reliable tools for performing a true, firmware-level secure erase on SSDs. Because it runs as a Linux-based boot environment, it avoids the complications of Windows locking the drive or interfering with ATA commands. It runs almost like an OS on your computer, and you will have to install and run it like one. In most cases, it can send the proper Secure Erase (for SATA) or NVMe Format/Sanitize commands that reset an SSD to a factory-fresh state, including remapped blocks that overwrite-based tools can’t reach.
The tool is a paid download with a one-time cost, but it tends to work with a much wider range of drives than Windows-based utilities. The pricing starts from $59 but the single version can be purchased for $59. It also includes shortcuts for waking a “frozen” SSD (a state where Secure Erase is blocked) and has a straightforward SSD-Erase utility inside the boot menu. Beyond erasure, you get extras like disk cloning, partitioning, benchmarking, memory testing, and file-system tools, making it useful as a general tech toolkit.
How do you perform a secure erase with Parted Magic?
- Purchase Parted Magic from the official site and download the ISO.
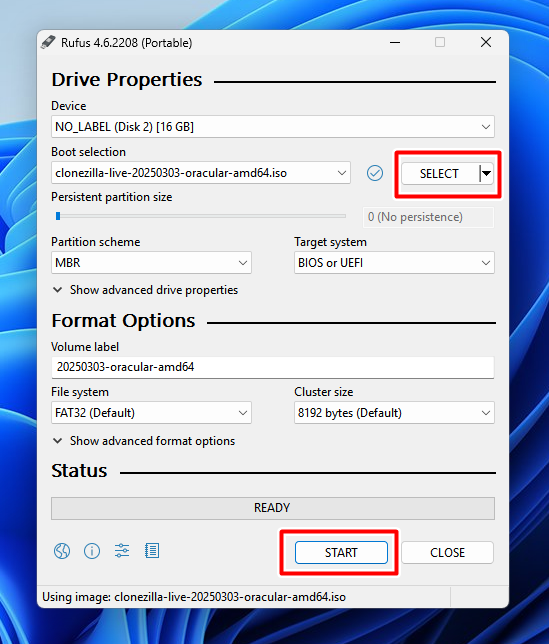
- Use tools like Rufus or Ventoy to write the ISO to a USB drive.
- Boot your system from this USB and enter the Parted Magic desktop.

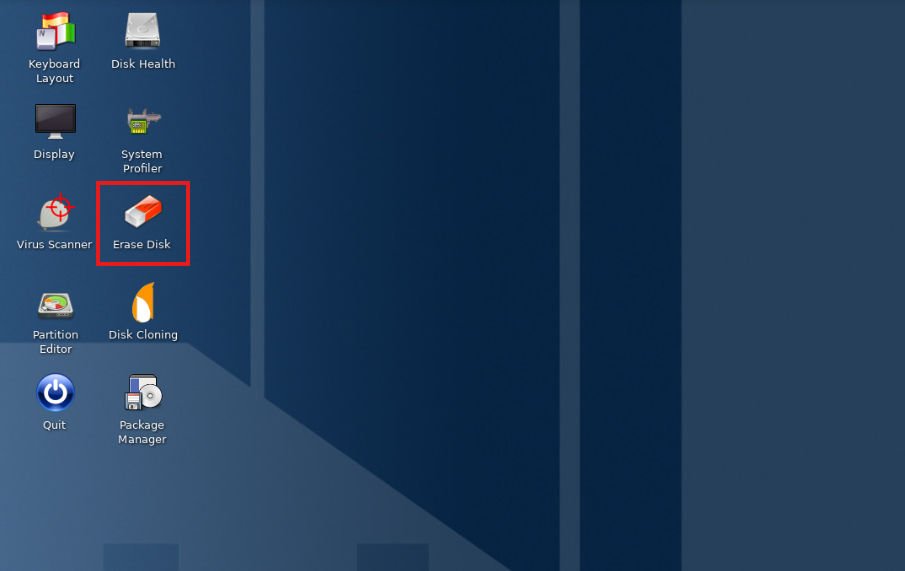
- Open the Erase Disk utility from the main menu.
- Choose Internal: Secure Erase (SATA) or NVMe: Format/Sanitize, depending on your drive type.
- Select your SSD. If the drive is “frozen,” follow the on-screen instructions—often suspending the system briefly unlocks it.
- Confirm the action. For SATA drives, the secure erase typically finishes in seconds. NVMe sanitize commands may take longer depending on the drive.
- When the process completes, shut down the system and remove the USB drive.
4. EaseUS BitWiper (User-Friendly but paid)
EaseUS BitWiper is perhaps the easiest to use among all these software. But, again, the free version offers the 1-pass zeros method. All other advanced secure erase methods are paid.
How to use EaseUS BitWiper?
- Download the software from the official EaseUS website.
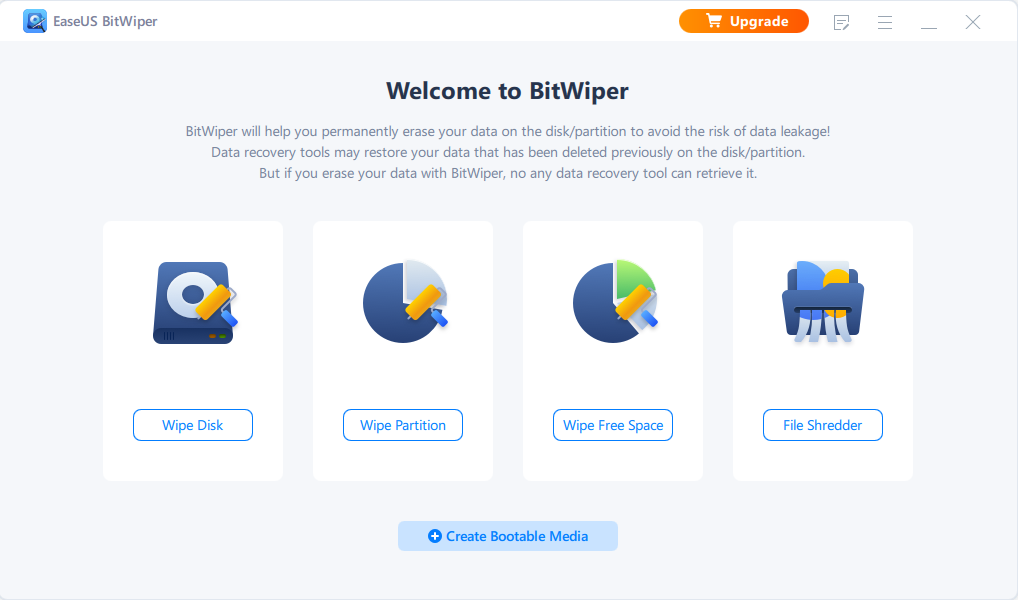
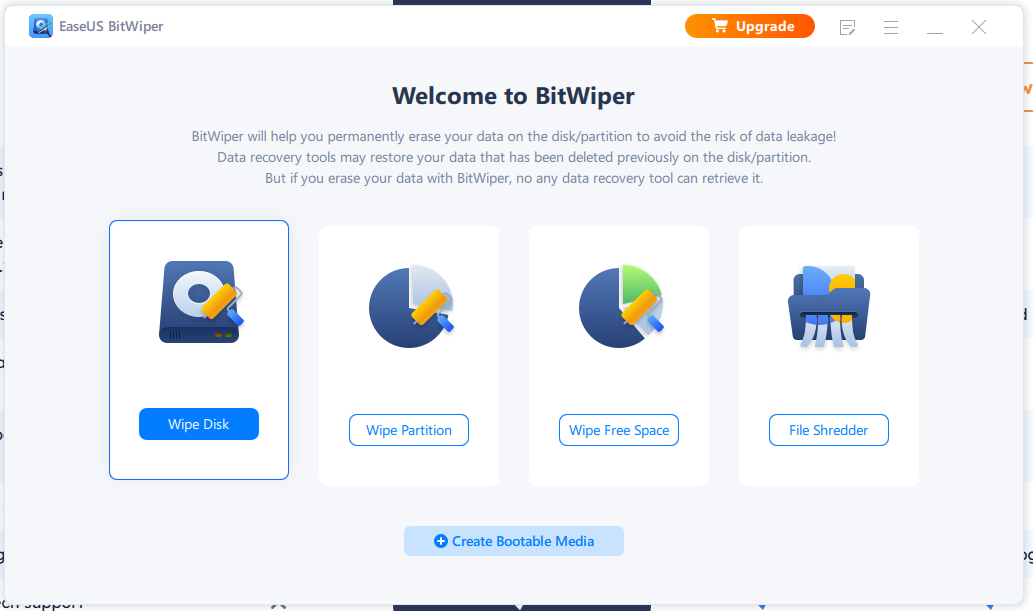
- In the main menu, select the option Wipe Disk
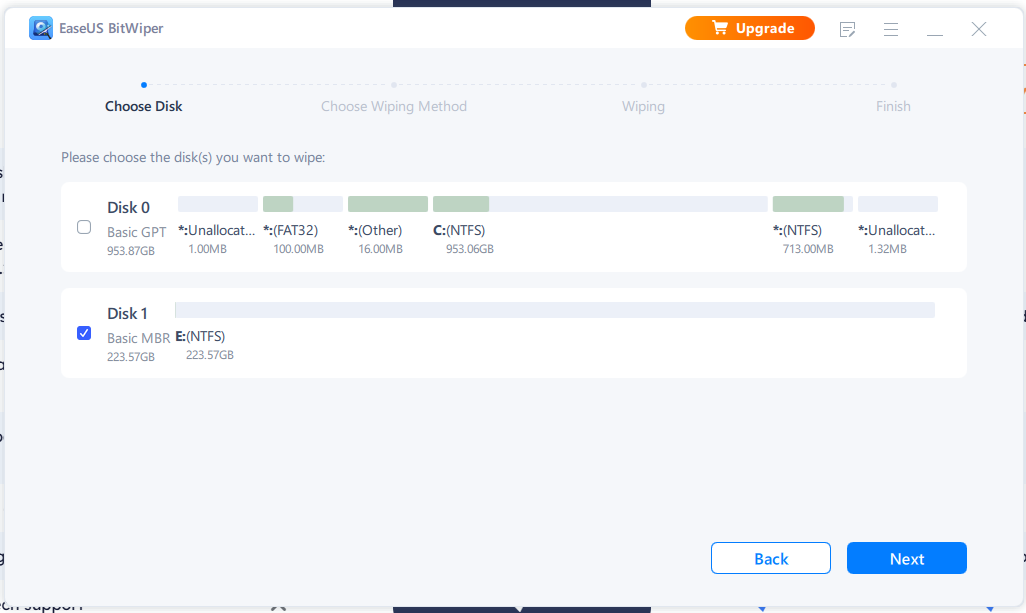
- Choose the drive you want to secure erase.
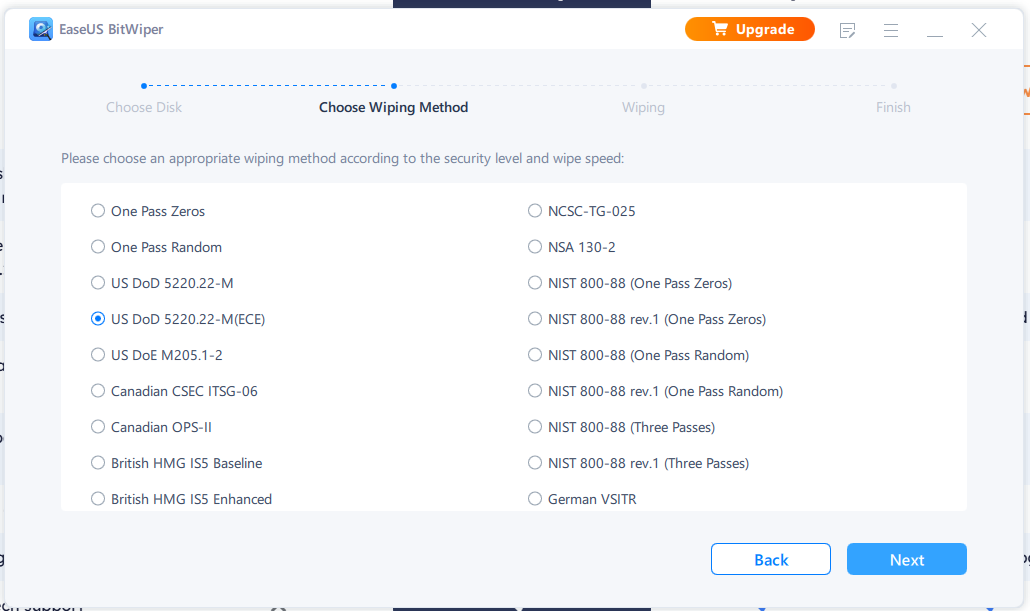
- Next, choose the erase method. If you have the free version, you can only select the One Pass Zeros method. For other advanced secure-erase methods, you will need to upgrade to the paid version.
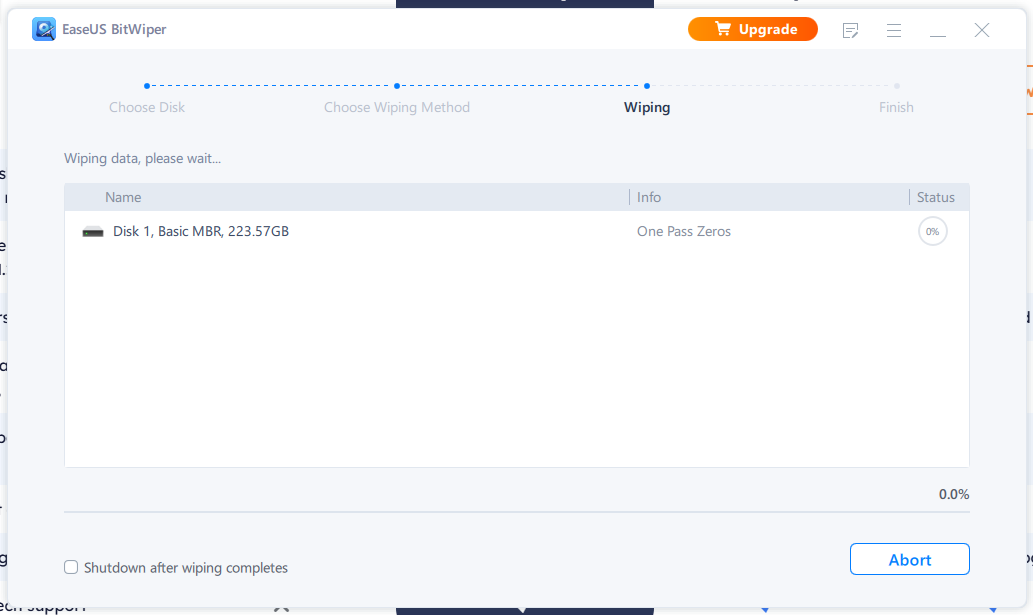
- Proceed further and wait for the erasure to complete.
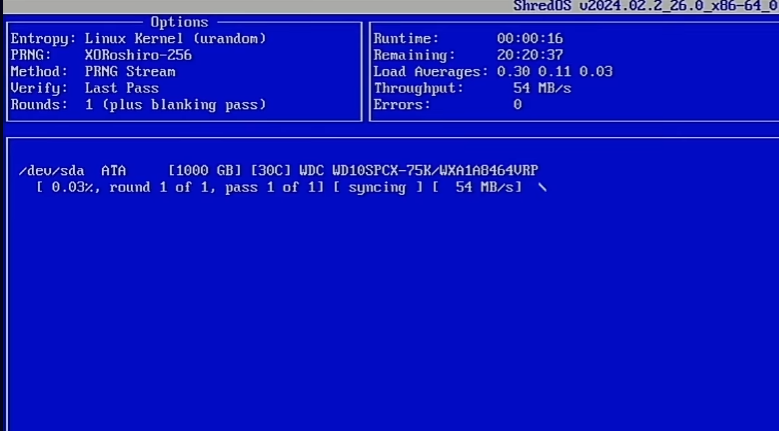
5. ShredOS (Free / Open-Source)
ShredOS is a dedicated Linux Distro for all Intel and compatible 64-bit & 32-bit processors. It is a tiny, boot-and-go Linux environment built with a single mischievous purpose: wiping storage devices clean without ceremony. It boots fast, skips the usual distro frills, and drops you straight into nwipe, a maintained fork of the classic DBAN erasure tool.
It handles modern hardware well and runs happily from a USB stick on both BIOS and UEFI systems. Because it’s based on Linux, it inherits robust driver support, yet it keeps an almost monastic focus on one task: overwriting drives until no data remains. It comes with several critical pre-installed packages, including smartmontools, hdparm, hexedit, and nvme-cli. You can check all the features and workflows here. For most users, this will be a complex process. So, make sure to understand what you are doing before you click anything.
| Pros | Cons |
|---|---|
| Extremely lightweight and fast to boot | Can’t perform firmware-level secure erase |
| Simple, dedicated interface via nwipe | No GUI, Only Terminal-based |
| Runs on a wide range of hardware (BIOS + UEFI) | Complex for beginners |
| Free and open-source |
How to perform a secure erase with ShredOS?
- Download the ShredOS ISO file first.
- Insert a flash drive into your computer.

- Use Ventoy to create a bootable USB.
- Enter the BIOS or UEFI and select the bootable USB drive to boot from it.
5. Choose ShredOS from Ventoy’s first page.

6. Select the target drive.
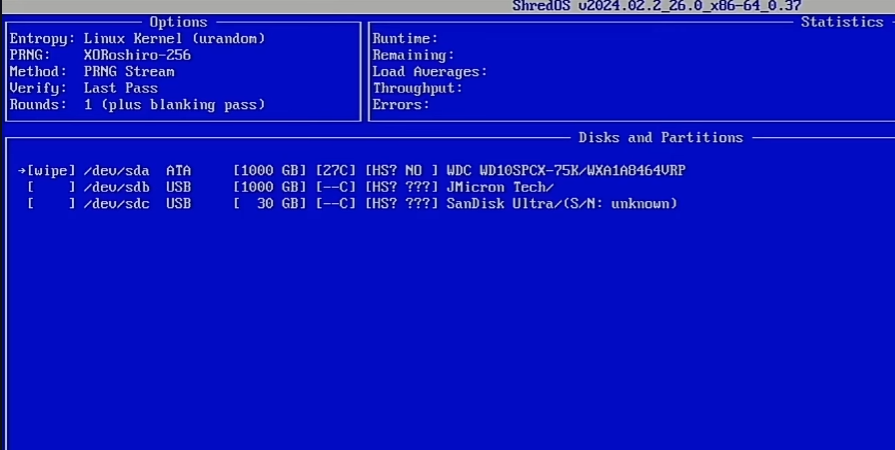
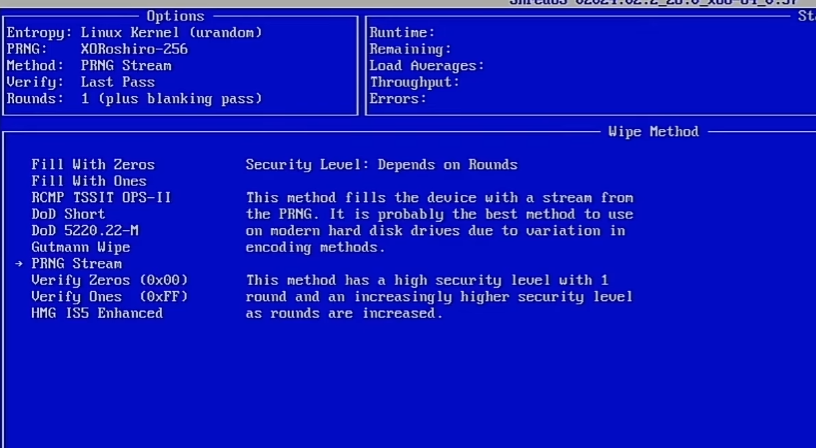
7. Choose the erase method. Some options are Fill with Zeros, DoD Short, Guttmann Wipe, etc.
8. Wait for the erase process to complete.
Frequently Asked Questions about SSD Secure Erase
How are SATA and NVMe Secure Erasures different?
SATA SSDs use the older ATA Secure Erase command, which simply instructs the controller to reset and wipe the NAND.
NVMe SSDs use Format/Sanitize commands, which offer cleaner, faster, and more explicit firmware-level erase modes designed for modern flash controllers.
Does overwriting an SSD with zeros securely erase it?
No. Wear-leveling means overwriting can miss blocks; only controller-level secure erase or sanitize is reliable.
Is ATA Secure Erase safe for all SATA SSDs?
It’s safe when run on a direct SATA connection, but USB adapters often block or break the command.
What’s the difference between Secure Erase and Sanitize on SSDs?
Secure Erase resets the flash translation layer, while Sanitize goes further by clearing all user-accessible and hidden blocks.
Does secure erasing reduce SSD lifespan?
It causes negligible wear because it’s handled internally by the controller rather than writing over the entire drive.
Is software like ShredOS, Parted Magic, or SystemRescue necessary?
They aren’t required, but they simplify issuing erase commands and reduce the chance of user error.
Can you recover data after a proper secure erase or sanitize?
No. Once the controller resets the FTL or destroys encryption keys, recovery is effectively impossible.