Using NVMe externally is very easy. They can become a great alternative to expensive external storage devices. So, if you have an NVMe SSD lying around, you can use it as an external drive for your laptop, camera, desktop, smartphone, or tablet. Some people even buy new drives to cut the cost of purchasing external SSDs. The setup we are going to discuss today functions similarly to an external drive.
However, keep in mind that you won’t achieve the full NVMe speed by using it externally. The speed will get bottlenecked by the USB interface by which you will connect your drive.
All you need is an NVMe drive and an M.2 NVMe enclosure that supports NVMe. In this way, you can utilize an NVMe SSD without requiring an M.2 slot on your laptop. That’s it. Let’s see how you can do it.
Setup (NVMe and Enclosure)
I have had a WD Green SN350 lying on my desk. Although it is considered a low-end drive in the market, it is perfect for our setup. I purchased it for the same purpose some months ago.

I have two enclosures at my home because I have been using this setup for many years for raw storage. The one I am using is from a brand called Uni. I found it quite impressive in terms of both its appearance and performance. Here is another excellent M.2 NVMe + SATA SSD Enclosure for you. Both of these are tool-free.
Note: The enclosure must support M.2 NVMe drives or both M.2 NVMe and M.2 SATA drives. Only the SATA enclosure will not support NVMe SSD.

Step 1: Opening up the enclosure
There are two types of enclosures. One is Tool-Free, and the second one requires a screwdriver. The Orico enclosure in the image requires a screwdriver. So, make sure to choose wisely.

Step 2: Install the SSD
Some enclosures will come with thermal pads, which you can use if you want to use your SSD for extended periods or permanently. I do not use the heat pads. But, for your information, it just goes above the main side of your drive. Do not peel the branding label on your drive.

Step 3: Close the Enclosure and connect the cable
Close the enclosure depending on its type. If it has a screw, tighten the screw; otherwise, use the appropriate method. Now, you are ready to install

Setup and Performance on Desktop
Depending on the type of connector cable that comes with your enclosure, choose the appropriate port on your computer. In my case, the cable is Type-C to Type-C, and my system has just one Type-C port on the back. So, I am installing it there and running a benchmark test for you.
Note: Ensure your USB and Thunderbolt drivers are up to date for optimal performance.

CrystalDiskMark Benchmark Scores
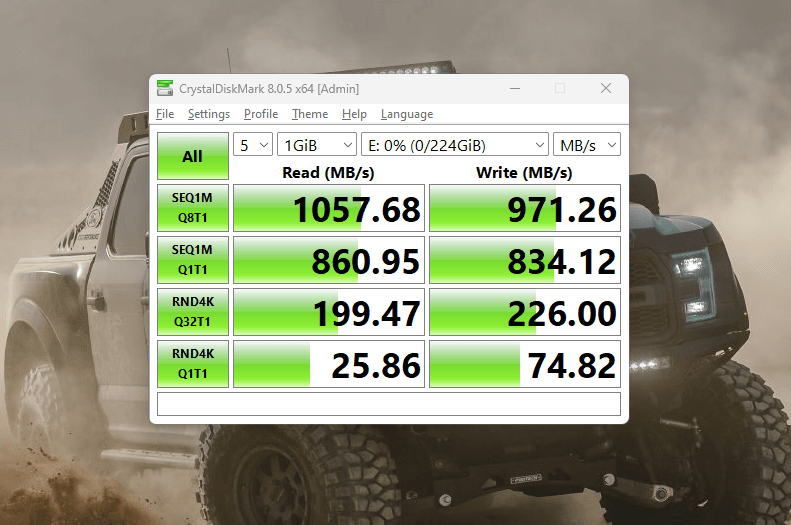
The drive was reaching almost 1GB/s in sequential speed. The random performance is also pretty good. This is enough to replace any of the popular external storage drives out there.
Setup and Performance on a Smartphone
Because I have got the Type-C variant of this NVMe enclosure, I can easily connect it to my smartphone as well. This is perfect for moving a large amount of data between devices. Also, backing up my smartphone has become pretty easy.


Benefits of using NVMe externally using an enclosure
The most significant benefit of using an NVMe SSD externally via an enclosure is that it saves you from spending around $ 20 to $30 extra for the same amount of storage capacity. You can get a decent 1TB NVMe SSD for just $50 to $80. Add $5 to 10$ for the enclosure. You do not have to go for a very high-end one for this setup. However, a 1TB external NVMe can easily cost around $100. Therefore, it is a cost-effective setup.
Drawbacks of using NVMe externally in an enclosure
The biggest drawback is the poor build quality and inadequate heat management that I have personally experienced with enclosures. If you attempt to write a large file to your drive with the enclosure, it will heat up quickly and sometimes bottleneck the speed.
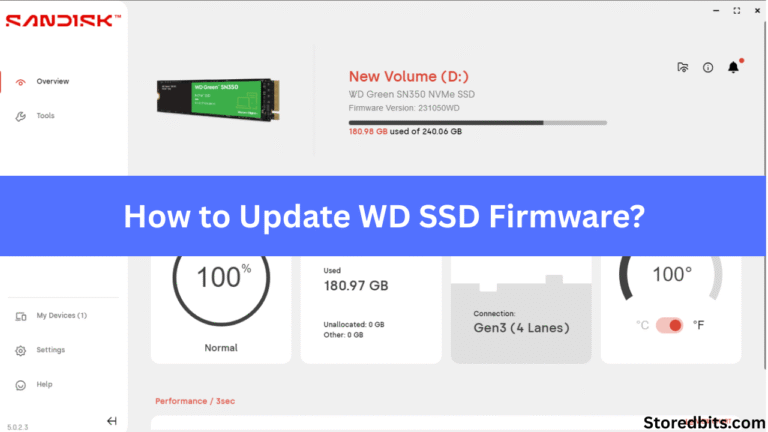
Another serious issue is that official SSD software, such as WD Dashboard and Crucial Storage Executive, fails to detect their own drives. For instance, consider the WD Dashboard itself. I have opened the WD Dashboard, and the software recognizes both drives; however, I am unable to use features like temperature graphs, speed data, firmware updates, SMART data, and encryption if available.

This is the case with most of the drives. Encryption becomes the most significant issue here. If you are storing critical data, you can’t keep it without encryption. So, keep this thing in mind.
The speed of your NVMe drive will be significantly higher than what you get with this setup. Additionally, some inexpensive enclosures are known to have a faulty power supply input to the drives. This can result in drive failures and permanent data loss.
Conclusion
I would not recommend this setup for tasks that require serious storage for critical data. This is ideal for quick data transfer between locations. If you want software encryption, you probably won’t be able to use it. However, it is a good option for those who are very tight on budget and cannot afford a proper external SSD. You get the same performance with both. So, it could be a good option for your general tasks.
I hope this helps.



heel