Affiliate Disclosure: This post may include affiliate links. If you click and make a purchase, I may earn a small commission at no extra cost to you.
File History is a very useful feature on Windows systems that automatically backs up copies of your files on an external drive or network location. File History is primarily used to back up personal files from the user folders, like Pictures, Music, Documents, Videos, etc. However, we can change these folders to back up other items as well.
The best feature of File History is that it keeps multiple versions of your files over time. So, unlike the backup, you can not just recover the latest version of the file but choose from multiple backed-up versions. This is helpful if you accidentally overwrite a document and want to make some changes to it later on. Just like the normal external Windows backup, you can set backup scheduling so that your files are in sync with the backup.
The restoration of files is pretty easy using the File History menu. However, file history can’t be used to create a System Image backup. So, if your system fails, you’ll have to first re-install Windows to recover the files from the File History backup. You can choose to back up the files externally or internally. However, in the event of overall system failure, the internal backup would also be lost. If you want to learn how to set up the Windows File History backup on your computer, this article is for you.

What is the File History Tool in Windows?
File History is an interesting feature that becomes noticeable when files in specific directories are changed. When changed, it saves the backup to an external drive. It runs the backup periodically and saves the backup files. It is not set by default, and we need to manually enable it and change the settings if we want.
File History is not a replacement for the System Image backup that we have discussed in this article. For example, if the hard drive or SSD fails, it’s the system image backup that can be used to restore the system. File History gives you the most current version of the file that you have changed or changed by mistake.
With the help of file history, you get to see the different versions of the file and restore them as per your choice. The backups are generally used to restore from a single point when that backup was created.
The methods of enabling File History are different in Windows 10 and 11, and that is why I have given you the steps for both operating systems. So, let’s see how you can enable File History on your computer.
How to Enable File History in Windows 11?
Follow these steps to enable File History and customize the settings.
1. Connect an external drive or a Flash drive to your computer
It is good to format your drive once it is connected to the system. Also, choose the right amount of storage space depending on the size of the files you are going to save in the file history. In my case, I am using a 16GB Flash drive which is a standard drive size.

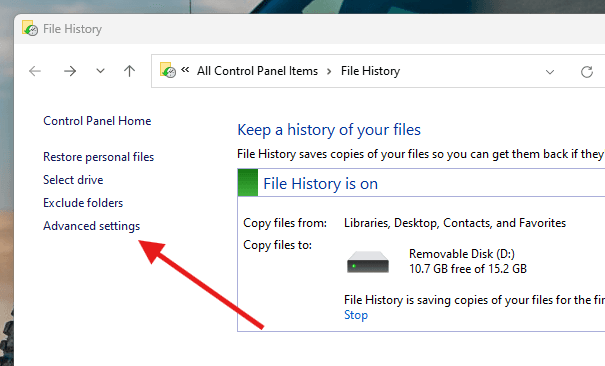
2. Open the File History Menu from the Control Panel
Search for Control Panel in the Windows Start menu and open it. You can also search for the File History in the search but if you don’t find it, it is always in the control panel.

3. Exclude Folders if you want
By default, the File History tool will keep the file history of all the folders in the Library, i.e., Music, Photos, Videos, etc. However, if you want, you can exclude and add the folders to File history. To exclude the folder, the option will be available on the left side of the File History menu.


4. Add New Folders in the File History
For example, if you want to add the Desktop to the File History, you can do it through Windows File Explorer. Just open up Explorer and locate the desktop folder. Right-click it and click Show More Options. Then, click Include in Library. You can create a new library for the desktop or add it to another one.


5. Change version frequency and saving schedule
Now, these settings are very important and you should change them with proper care. Click on the advanced settings option on the left side to access the scheduling settings.
The first option, which is labeled ‘Save copies of files,’ refers to the time interval between each new file version saved by the File History tool. Every 10 minutes is the most frequent time interval for storing the new version of your files. This would add multiple versions of your files in a very short time and can fill up your drive. However, you can adjust when the older versions should be deleted from the drive to save space. By default, it will save the file version indefinitely, but for that, you need a significant amount of storage space.

If you are using a low-space drive or a flash drive for File History, it is recommended to use the ‘Until Space is Needed’ option to conserve space while keeping everything up to date. If you have added many folders with a lot of data to the File History, the drive can fill up quickly, and once it is full, the new version may no longer be stored.
How to Enable File History in Windows 10?
In Windows 10, File History has a bit simpler interface because it is available in the Windows settings. To find the File history, just search for Backup in the Windows search bar. Make sure the external drive is connected to your computer.
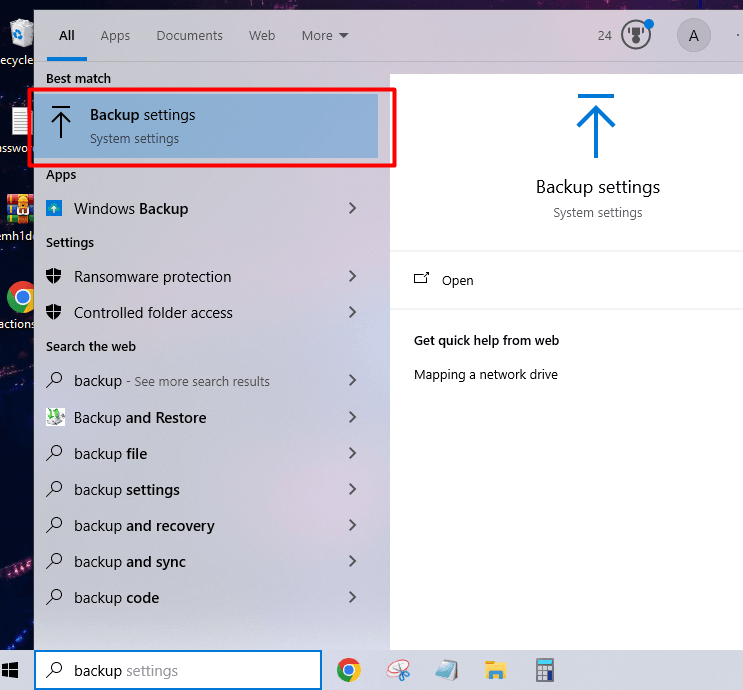
In the Backup menu, click Add a Drive under the option Back up using File History. The system will automatically detect any external drive connected to it and ask you to choose your desired one. Just click on it and you are ready to go.

Once you have selected your drive, you’ll be asked to add your desired folders to file history and change the frequency as we did in the Windows 11 tutorial above. Just change these settings and click Backup Now. You can come back here to add new folders or delete them. Also, you can change the backup frequency.

How to Restore Previous Versions of Your Files?
If you have enabled File History for a specific folder, you can easily review and restore its backed-up versions through the File Explorer itself. First, right-click the folder and open its properties. In Windows 11, you must first click “Show More options.“

A new properties menu will open with different tabs. Click the Previous Versions tab. There, you will find the saved versions of your files, along with the time they were saved. Click on your desired version and select ‘Restore’ or ‘View’ to access or retrieve the previous content of the folder.


So just to be sure that I have the correct understanding: in the Advanced Settings there is “Keep saved versions”. If I choose the “forever” option, then does it mean that the backup will keep not only the most recent version of my files but also all the previous versions as well and forever?
Thank you
Yes, that’s right. If you set “Keep saved versions” to “Forever”, File History won’t just keep the latest copy of your files. It will retain all the versions it has saved over time, without automatically deleting older ones. This means every time File History runs, it captures changes to your files and keeps those snapshots and you’ll be able to roll back to any earlier version, no matter how old, as long as it’s still on the backup drive.
Thank you very much for getting back to me.
I have been doing some research, and I realized that to get rid of the old file versions, I need to use the “Clean up versions” in the Advanced Settings, but I got an error message:
“Could not clean up File History data. Element not found”
How can I fix that?
How do I get rid of the old versions?
Yes this happens sometimes and it is mostly related to the corruption in the saved history files. For me, manually deleting the history files worked and fixed the issue. If you don’t know the location of these files, you can go to Control Panel > File History. In my case, I store them on an external drive and I just format the whole drive. But, you can selectively delete the older versions. After that, I would advise you to disable file history and re-configure it again. This should help. Otherwise, I am here to help. Thanks.
Thank you once again.
Yes, I am thinking the same thing. Simply delete the backup and try again.
Why did you format your external drive? I will not be able to do it as I have other stuff saved on it too.
I have 2 Western Digital external drives. My Passport and My Book. I see that I could do a system image backup using Acronis on My Book. Is system image something that you recommend or not? What are the pros and cons?
I do have a lot of data. Almost 2 TB, and my 2 TB hard drive is getting full. In the future, I would love to keep my data on 2 separate external drives as it is really difficult to find 2 TB computers. So I would like to use one of my external drives for accessing and changing data (documents, videos, pictures, etc.). However, the issue is that I need a second copy of my data. Is there a way to do so with two external drives? A way to synchronize them as I make changes in the data? Can the second external drive receive backups from the first drive? Kind of like between a C drive and an external drive?
Thank you
I formatted my external drive because I was using it only for File History backups, so wiping it completely was the simplest way to remove corrupted history data. Since you also store personal files on your drive, formatting wouldn’t be a good option in your case. Instead, you can manually delete the “FileHistory” folder on the drive (you’ll find it under FileHistory\[YourUserName]\) and then reconfigure File History from scratch. That way, you won’t affect your other files.
Regarding system image backups, a system image is a complete snapshot of your Windows installation, including programs and files. Image file is generally compressed so it will save you some space. You can know more about it in this article.
The issue with system images is that they’re less flexible if you only want to recover individual files. They’re best for disaster recovery, not everyday file versioning.
For your situation, since you have almost 2 TB of personal data, a system image might not be the most efficient approach. Instead, I’d recommend using a file synchronization/backup tool. With two external drives, you can set up one as your “working” drive and the other as a mirror/backup. There are several tools (like FreeFileSync, SyncBack, or Acronis itself) that can automatically synchronize changes from Drive A to Drive B. That way, every time you add, change, or delete files on the first external drive, the second one can be updated to match, giving you a second copy of your data without having to manage it manually.
This setup is closer to what you described (like how File History or a C drive backup works), and it will keep your files safe without filling up space with endless versions you don’t need.
Thank you so much Anshul for all the thoughtful responses. It is greatly appreciated and thank you for your patience.
So I think I will focus first on backing up my data and later clone/image. Important things first! Also, by backing up my data first on my 2 external drives, I will be able to delete the data from my computer so then it might be easier to do the image/clone.
I see that there is also System Image Backup in the File History at the bottom. Do you know anything about it? Is it any good?
Ok now back to back-ups 🙂
In addition to File History, I see Backups & Restore. How well does it work and how does it compare to File History?
You had mentioned 3 programs to sync 2 external backups. Which one do you like best/recommend? Do they work 100%? Someone told me before in a store that they are not 100%. Sometimes they can mess up your files. Is it true?
I did not know that Acronis was doing the sync, too.
Thank you!
For the external backup, I prefer the Windows Backup and I have discussed it completely in this article. But, it is good for creating an image with some options for scheduled backups. But, it is more suitable for disaster recovery rather than day-to-day backups. For your situation with two external drives, the most reliable approach is to use a sync tool: I’d recommend FreeFileSync in “mirror” mode, since it’s free, user-friendly, and will automatically keep your second drive as an up-to-date copy of the first without risking accidental overwrites. If you can pay for it, I like the EaseUS Todo Backup Home for its simplicity. This way you’ll have one drive to work from and another as a dependable backup, which is safer and more efficient than relying only on system images.
Great Thank you. We are almost there LOL
So just to get sure that I understand it correctly: I will be using Windows File History to back up and then I will use the FreeFileSync to sync the 2 backups?
I might have read somewhere that you need to plug in the external drive (that you do the backup into) directly into the computer and not the hub? Also that you should unplug all other external drives? Are these 2 statements true?
Later on, I will want to do an image/clone on the same drive that I will have one of the backups on. Can I do so without partitioning the drive?
You are right. It is generaly recommended to plug external drives directly but it isn’t strictly required. Also, there is no need to unplug all other external drives. It isn’t recommended to store backup and image/clone files on the same drive because a clone or image file may overwrite the target disk entirely. So, partitioning is the safe way.