Video Bitrate Calculator: Optimize Bitrate for Any Video Project
Plan your video projects with precision using this easy-to-use bitrate calculator. Adjust settings like resolution, frame rate, codec, motion complexity, and duration to instantly estimate the required bitrates, file size, codec efficiency, etc.
Video Bitrate Calculator
Calculate optimal bitrates for your video projects
Recommended Bitrates
Bitrate in videos refers to the amount of data processed per unit of time during video playback or streaming. It is usually measured in Kbps or Mbps. A higher bitrate means a better video quality because more data is used to represent the image. Lower bitrate is equal to lower quality, but it reduces the file size and bandwidth usage.
About This Tool
Our calculator instantly provides you with the recommended bitrates. So, whether you are a graphic designer, video editor, videographer, filmmaker, or content creator, this tool can be highly helpful to you.
It will ask you to add the inputs, such as your video resolution, frame rate, video codec, motion complexity, and video length, which are all adjustable. Within seconds, you’ll see the recommended bitrates in three levels: Low, Recommended, and High. This way, you can choose the right bitrate while exporting your video.
No matter if you’re making videos for YouTube, social media, a client, or a personal project, our calculator is here to save you time and money. It’s quick and easy to make sure your videos straightforwardly achieve your goals rather than hit and miss.
How Does the Tool Work?
For reference, here are a few things that reveal how this tool functions:
- Collects your inputs: You choose your resolution, frame rate, codec, motion level, and video duration.
- Calculates bitrate: The tool takes the standard video data and predicts how many kilobits per second (kbps) your video should use to reach each quality level.
- Shows three quality levels: Low, recommended, and high quality. This will help you pick the best one.
Everything completely depends on the inputs you have added to the tool to calculate the bitrate. So, before adding the inputs, please be very careful and write the correct inputs to get the accurate bitrate and recommended bitrates.
How to Use the Dropdowns and Input Fields?
Now, walk with me through how to use each piece of this tool, step by step.
1. Resolution
Resolution is the first drop-down menu you will see.
Resolution indicates how many pixels your video image is made up of. More pixels add up to sharper detail — and also, more data, which means a higher bitrate, and a bigger file.
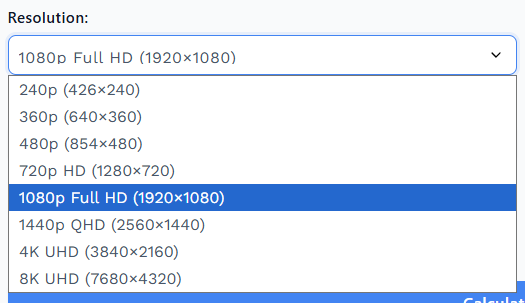
The options are:
- 240 P (426 x 240): Very low quality. Handy for previews or slow connections.
- 360 P (640 x 360): Low quality and saves data.
- 480 P: Standard Definition (SD). Good for small web videos.
- 720 P: High Definition (HD). Looks clear on most devices.
- 1080 P: Full HD. Most used for YouTube and streaming in general.
- 1440 P (QHD): Very high detail. Great for pro projects or larger screens.
- 4K UHD: Ultra HD. Supersharp but creates much bigger files.
- 8K UHD: Extremely detailed. Used for high-level projects.
If you select a higher resolution, the device simply pumps out a higher bitrate required to keep your video looking good.
2. Frame Rate (FPS)
Next is Frame Rate, which is expressed in frames per second (FPS).
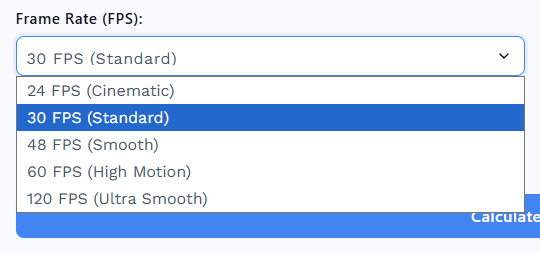
This is how many separate images the video you capture presents per second. More frames equal smoother motion, but also greater demand for data.
You can pick:
- 24 FPS: Slightly less smooth.
- 30 FPS: Standard for television and online video in most cases. Looks quite smooth.
- 48 FPS: Smooth. Sometimes used for high-motion content.
- 60 FPS: Very smooth. Popular in gaming or sports.
- 120 FPS: Ultra smooth. For slow-motion or high-end shots.
Selecting a higher FPS causes the estimator to assume a higher bitrate to keep your video clear.
Video Codec
In this step, you will choose the video codec. A codec is a protocol that determines how your video is compressed and stored. This impacts your final file size and ease in playing the files on various devices.
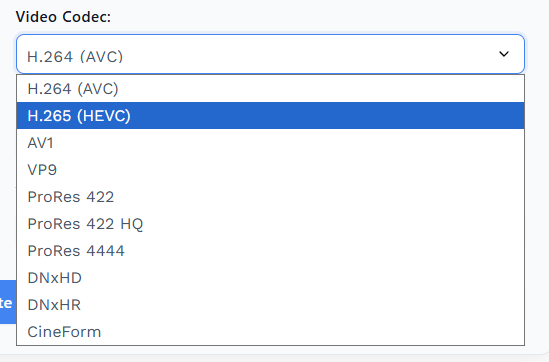
Here are the menu selections available in our tool:
- H.264 (AVC): It is indeed the most common codec in use nowadays. It is nearly universally supported by devices, players, and websites (including YouTube and Vimeo). It produces files of good quality and a reasonable size.
- H.265 (HEVC): This is a newer version. It retains the same video quality while typically resulting in a file that’s 40-50 percent smaller than H.264. But some older gadgets may not be compatible with this.
- AV1: This is an open-source codec of the new generation. It can often produce even smaller files than H.265 with high quality. But it requires newer players or browsers to function properly while playing the video.
- VP9: This codec is mainly used by YouTube to stream 4K and higher quality videos. It has a smaller file size than H.264, and performs well on many modern platforms.
- ProRes 422: It is an Apple video format that maintains picture quality without inflating file size. It’s awesome for editing and is used a lot in TV shows.
- ProRes 422 HQ: ProRes 422 HQ is ProRes 422 but with higher quality. It retains more information in its tiny details, and so is ideal when you need to make a lot of color changes or special effects in detailing. That makes it one of the best choices for pro video work.
- ProRes 4444: ProRes 4444 is a super high-quality format that also stores see-through parts, known as alpha channels. It’s wonderful for fancy graphics and special effects. Editors turn to it when they need the absolute best in color and detail.
- DNxHD: DNxHD is a file-based format specifically designed for editing HD videos. It helps make the picture clear while ensuring that the video is easy to run on computers.
- DNxHR: DNxHR is similar to DNxHD but would work with bigger videos, such as 4k, and is designed to let editors work with large, sharp videos without bogging down. This makes it quite convenient for the new high-definition movies and high-quality projects.
- CineForm: CineForm is a GoPro video format that preserves a high-quality look while remaining simple to edit. It does with super clean videos, and really with RAW too.
Once you select a codec in the tool, it modifies the estimated bitrate and file size for you. This will give you an idea of how much space your video will take up with different codecs.
Motion Complexity
Motion Complexity is the way you tell the tool how much motion or action your video contains, because it directly impacts how much data is necessary to keep your video clear and smooth.

You can choose between these:
- Low (Talking Head): This is for videos with low motion. Common examples include interviews, lectures, or talking selfie-style vlogs. These need less data.
- Medium (Gaming/Vlog): This one is for videos with little or moderate motion, videos like travel videos, most vlogs, and gaming recordings. These require a few more data points to remain distinct.
- High (Sports/Action): This is for videos with tons of quick motion, such as sports, action scenes, or dance. They require much more bitrate, so the video will not be blocky or blurry.
Choosing a proper motion complexity will help keep the video smooth and sharp, no matter the action that may be taking place over the screen.
Video Duration (Minutes)

Enter the length of your video in minutes. For example, if the video is 5 minutes, type 5, and if 90 minutes, type 90. Then it performs the final calculation to give you the video bitrate of your project.
A Quick Example
Think you’re creating a 10-minute vlog:
- Resolution: 1080 P
- Frame rate (FPS): 30
- Video Codec: H.264
- Motion Complexity: Medium
- Video Duration: 10 Minutes
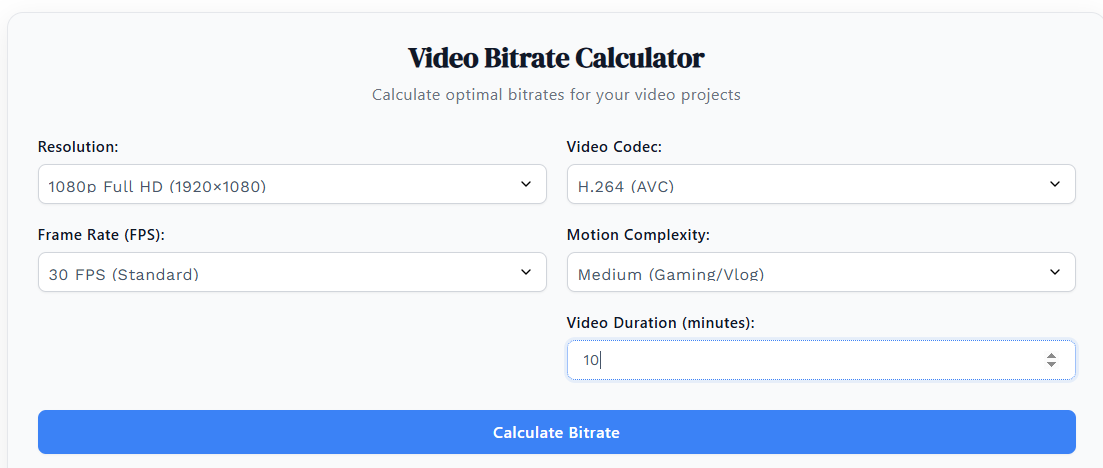
The result will show after clicking on the calculate bitrate button:
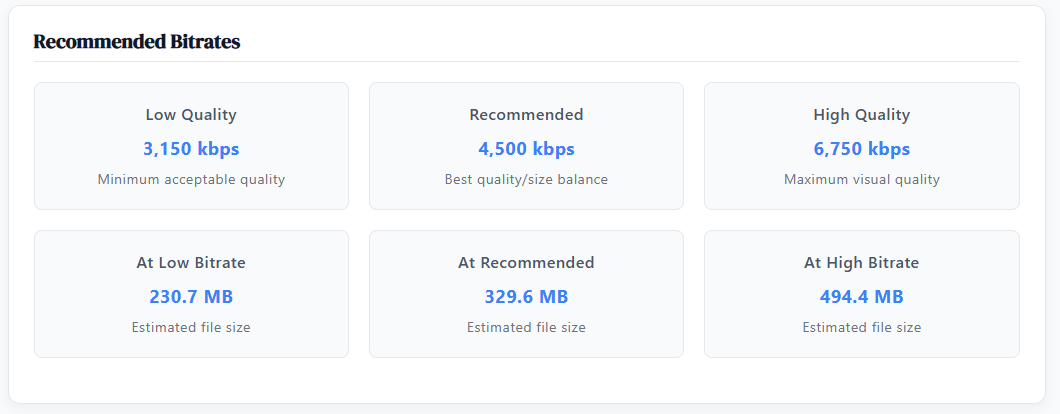
The output appears to give you three options: Low, Recommended, and High quality. You can also check the video size, if you keep the video at low quality, recommended, or high quality.
Key Takeaways
That’s how you can utilise the Video Bitrate Calculator tool. Start by picking your resolution. Then select a frame rate that corresponds to your project. Then choose the codec to maintain high quality while minimizing file size. After that, choose the appropriate motion complexity that suits your type of video. Finally, put your video duration in minutes.
Have any suggestions for improvements or feedback related to the functioning of the tool, just get in touch with us here.