Affiliate Disclosure: This post may include affiliate links. If you click and make a purchase, I may earn a small commission at no extra cost to you.
You turn on your PC expecting it to boot into Windows, only to find PC stuck on BIOS screen. Maybe it keeps looping back to BIOS, says “No Boot Device,” or simply won’t move forward. It’s frustrating, especially when you’re worried about losing files or facing expensive repairs.
The good news? In most cases, this issue is fixable without replacing hardware or reinstalling everything. In this guide, we’ll walk through the real causes behind BIOS startup problems and show you exactly how to fix them, step by step.
TL;DR – Quick Fix
If your PC is stuck on the BIOS screen or keeps booting into BIOS, work through these fixes in order. Most cases are caused by a detection or configuration issue—not a dead motherboard.
1️⃣ Disconnect All External Devices
2️⃣ Reset BIOS to Default Settings
3️⃣ Check If Your Hard Drive Is Detected
4️⃣ Set Correct Boot Priority
5️⃣ Reseat RAM
6️⃣ Remove CMOS Battery
7️⃣ Repair Windows Bootloader (Advanced)
8️⃣ Update BIOS (Advanced & Last Resort)
Start from the top and move down the list. In most cases, the issue is resolved within the first four fixes.
Share this post to help more users repair a PC stuck on the BIOS screen!
Why Is My PC Stuck on BIOS Screen?
When your PC powers on, it doesn’t go straight to Windows. It first runs the BIOS (or UEFI), which performs a hardware check called POST (Power-On Self-Test). After confirming that essential components, like your CPU, RAM, and storage, are working, it hands control over to the operating system.
If your computer is stuck on the BIOS screen, it usually means that the process can’t complete. In other words, the system can’t find a valid boot path or detects something preventing it from moving forward.
In most cases, the cause falls into one of these categories:
1. No Bootable Device Detected
2. Incorrect Boot Priority
3. Corrupted Windows Bootloader
4. Hardware Connection Issues
5. CMOS or Firmware Problems
💡The key is identifying which category your situation falls into. Once you know whether it’s a detection issue, a configuration problem, or a hardware fault, the fix becomes much more straightforward.
Fix 1: Disconnect All External Devices
During startup, your BIOS scans all connected hardware before handing control over to Windows. If an external device, such as a USB drive, external hard disk, docking station, or even a faulty keyboard, is interfering with detection, the system may hang or keep booting back into BIOS.
Disconnecting everything forces the system to boot with only essential internal components.
How to do it properly step by step:
Step 1. Shut down your PC completely. If it’s frozen, hold the power button for 5–10 seconds until it turns off.
Step 2. Unplug all external devices, including:
- USB flash drives
- External hard drives
- Printers and scanners
- Game controllers
- USB hubs or docking stations
- SD cards
Step 3. Leave only the essentials connected:
- Monitor
- Power cable
- Keyboard (preferably wired and plugged directly into the motherboard USB port)
Step 4. Turn the PC back on.
Step 5. Check if the system now proceeds past the BIOS screen and boots into Windows.
✅What to Expect
- If the PC boots normally, one of the disconnected devices was causing the issue. Reconnect devices one at a time to identify the culprit.
- If it’s still stuck, move to the next fix. The problem is likely due to a boot configuration or internal hardware issue.
Fix 2: Reset BIOS to Default Settings
Incorrect BIOS settings are a common reason a PC stuck on BIOS screen. Changes to boot mode (UEFI/Legacy), SATA configuration (AHCI/RAID), overclocking profiles, or Fast Boot options can prevent the system from loading Windows properly.
Resetting BIOS to its default settings restores stable, manufacturer-recommended configurations and often resolves boot conflicts instantly.
How to Reset BIOS from Inside the BIOS Menu:
Step 1. Enter the BIOS setup. Restart your PC and repeatedly press the BIOS key (usually Del, F2, F10, or Esc) as soon as it powers on.
Step 2. Locate the reset option. Look for one of the following options (names vary by motherboard brand):
- Load Optimized Defaults
- Load Setup Defaults
- Restore Default Settings
- Factory Defaults
This option is typically found under the Exit, Save & Exit, or Advanced tab.
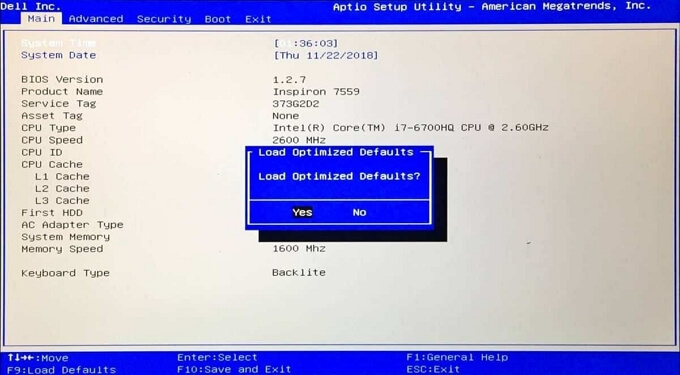
Step 3. Confirm the reset. Select the default option and confirm when prompted.
Step 4. Save changes and exit. Choose Save & Exit (often by pressing F10), then confirm. Your PC will restart automatically.
💡Tip: Resetting the BIOS does not delete your personal files. It only restores firmware configuration settings.
Fix 3: Check If Your Hard Drive Is Detected
If your PC stuck on BIOS screen, one of the most common causes is that the system cannot detect your primary SSD or HDD. Without a recognized boot drive, the BIOS has nothing to load, so it either stays on the BIOS screen or keeps sending you back to it.
How to Check If Your Drive Is Detected:
Step 1. Enter BIOS setup. Restart your PC and press the BIOS key (usually Del, F2, F10, or Esc) during startup.
Step 2. Go to the Storage or Main tab. Look for sections labeled:
- Storage Information
- SATA Configuration
- NVMe Configuration
- Boot Devices
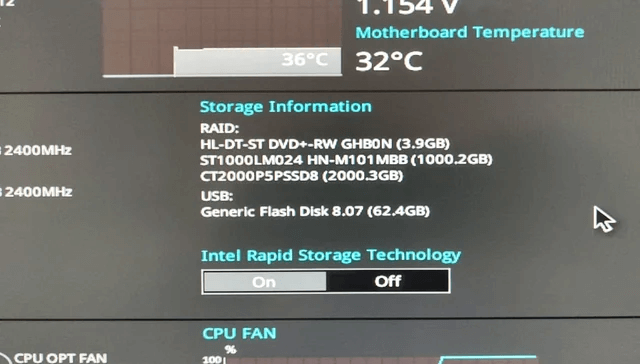
Step 3. Check the drive list. See if your system’s SSD or HDD appears in the list with its model name and capacity.
Step 4. If the drive is missing entirely, power off the PC completely and unplug it.
Step 5. Reseat the drive.
- For SATA drives: Disconnect and firmly reconnect both the SATA data cable and power cable.
- For M.2 SSDs: Unscrew the SSD, remove it gently, then reinsert it at a slight angle and secure it properly.
Step 6. Check cables for damage. If possible, try a different SATA cable or motherboard port.
Step 7. Power on and check BIOS again. If the drive still doesn’t appear, it may be failing.
If the SSD/HDD is detected but Windows doesn’t load:
- The issue is likely related to boot priority (see next fix)
- Or the Windows bootloader may be corrupted
In this case, your data is usually still intact—the system just can’t find the correct way to start it.
💡Confirming drive detection is critical. Once you know whether the BIOS recognizes your storage device, you can quickly narrow down the issue and avoid unnecessary hardware replacement.
Fix 4: Set Correct Boot Priority
Even when your SSD or HDD is detected, the BIOS might be trying to boot from the wrong device. This happens if the boot order has changed—often after a BIOS reset, firmware update, or hardware change.
If the system attempts to boot from a USB drive, secondary disk, or an empty device, it will either return to the BIOS screen or show a “No Boot Device” message. Setting the correct boot priority ensures the system loads Windows from your main drive.
How to Set the Correct Boot Priority (Step-by-Step)
Step 1. Enter BIOS setup. Restart the PC and press the BIOS key (commonly Del, F2, F10, or Esc) during startup.
Step 2. Locate the Boot menu. Navigate to the tab labeled:
- Boot
- Boot Options
- Boot Priority
The location varies by motherboard manufacturer.
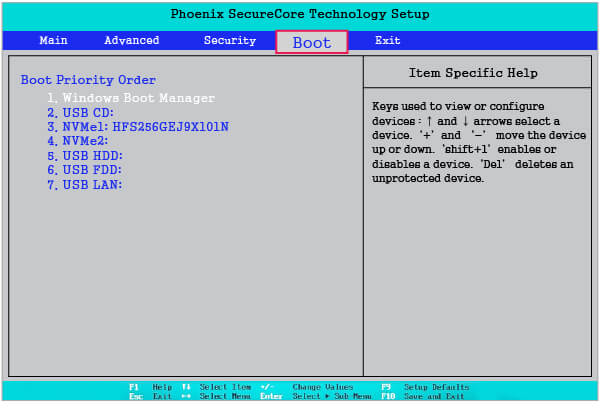
Step 3. Identify your system drive. Look for your SSD or HDD by model name (for example: Samsung 970 EVO, WD Blue, Kingston, etc.). This is the drive where Windows is installed.
Step 4. Set the system drive as the first boot device. Move it to the top of the boot order list. Most BIOS interfaces allow this via the arrow keys or drag-and-drop.
Step 5. Disable unnecessary boot devices (optional). If USB or network boot options are enabled, consider disabling them to prevent interference.
Step 6. Save changes and exit. Press F10 (or the on-screen Save & Exit option), then confirm.
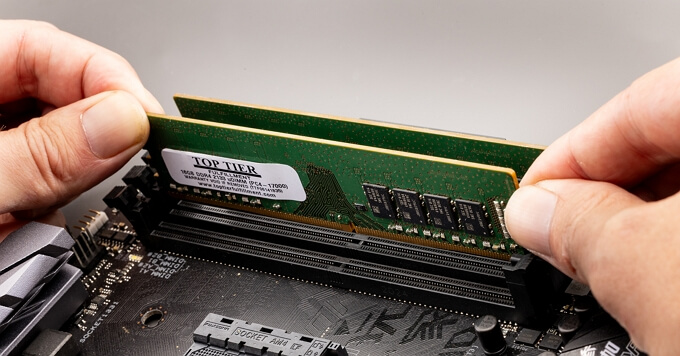
Fix 5: Reseat RAM
RAM (memory) is essential for the system to complete its startup process. If a memory stick is loose, improperly seated, or experiencing contact issues, the motherboard may fail the POST (Power-On Self-Test) and get stuck on the BIOS screen.
This is especially common after moving the PC, cleaning the inside of the case, or installing new hardware.
Reseating the RAM forces a fresh electrical connection and often resolves boot issues without further troubleshooting.
How to Reseat RAM (Step-by-Step):
Step 1. Power off and unplug the PC.
- Shut down the computer completely
- Disconnect the power cable
- If using a laptop, remove the battery if possible
Step 2. Open the case (desktop) or access the RAM compartment (laptop).
- Use a screwdriver if necessary
- Work on a non-static surface
Step 3. Locate the RAM sticks. They are long, thin modules seated in slots on the motherboard.
Step 4. Release the RAM clips.
- Gently push the retention clips outward
- The RAM stick should pop up slightly
Step 5. Remove the RAM module. Hold it by the edges (avoid touching the gold contacts)
Step 6. Reinsert the RAM firmly.
- Align the notch on the module with the slot
- Press down evenly until both retention clips click into place
Step 7. If multiple sticks are installed, test one at a time.
- Install one stick
- Boot the PC
- If it works, add the second stick and test again
Step 8. Close the case and power on the PC.
Fix 6: Remove CMOS Battery
The CMOS battery powers the motherboard’s small memory chip that stores BIOS settings—things like boot order, system time, and configuration preferences. If these settings become corrupted or misconfigured, the PC may fail to complete startup and get stuck on the BIOS screen.
Removing the CMOS battery resets BIOS settings to factory defaults. This is more thorough than a software reset and often resolves persistent configuration problems.
How to Remove the CMOS Battery (Step-by-Step)
Step 1. Power off the PC and unplug it.
- Shut down the system completely
- Disconnect the power cable
- For laptops, remove the main battery if accessible
Step 2. Open the case (desktop) or access the motherboard.
- Use a screwdriver if necessary
- Work in a static-free environment
Step 3. Locate the CMOS battery.
- It is a small, round, silver battery (commonly CR2032)
- Usually found on the motherboard
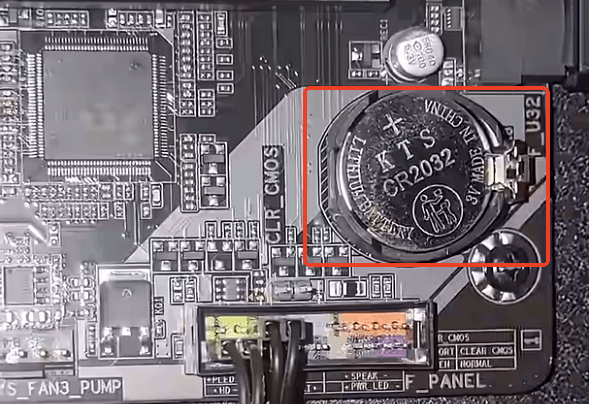
Step 4. Remove the battery gently.
- Use a plastic tool or your fingernail
- Avoid damaging the battery socket
Step 5. Wait 5–10 minutes.
This allows residual power to clear BIOS settings.
Step 6. Reinsert the battery.
- Ensure it is oriented the same way as before
- Press it firmly into place
Step 7. Reassemble and power on the PC.
Fix 7: Repair Windows Bootloader
If your SSD or HDD is detected in BIOS but Windows still won’t load, the problem may be a corrupted or missing bootloader. The bootloader is a small system component that tells the PC how to start Windows.
Power failures, forced shutdowns, or disk errors can damage it. Repairing the bootloader restores startup functionality without affecting your personal files.
This fix requires a Windows installation USB drive.
How to Repair the Windows Bootloader (Step-by-Step):
Step 1. Create a Windows installation USB (if you don‘t have one).
- Use Microsoft’s Media Creation Tool
- Create a bootable USB with Windows installation files
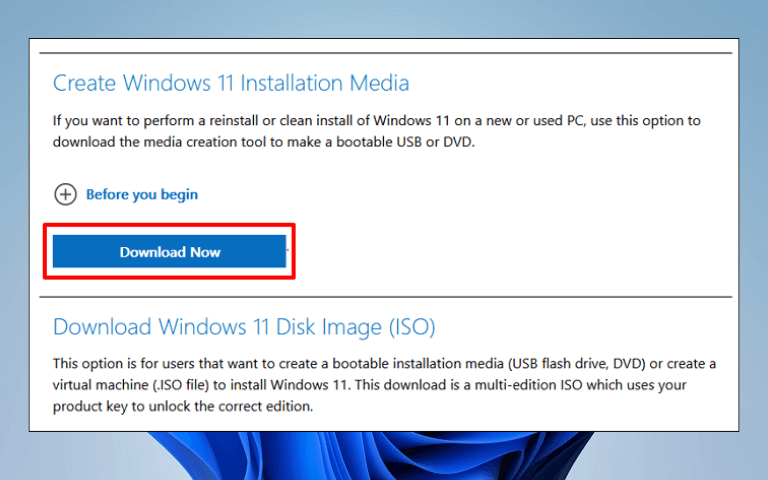
💡You may want to read: How to Create Windows 11 Bootable USB Installation Media
Step 2. Boot from the USB drive.
- Insert the USB
- Restart the PC
- Enter BIOS and set USB as the first boot device
- Save and restart
Step 3. Choose “Repair your computer.” When the Windows setup screen appears, select: Repair your computer (not Install)
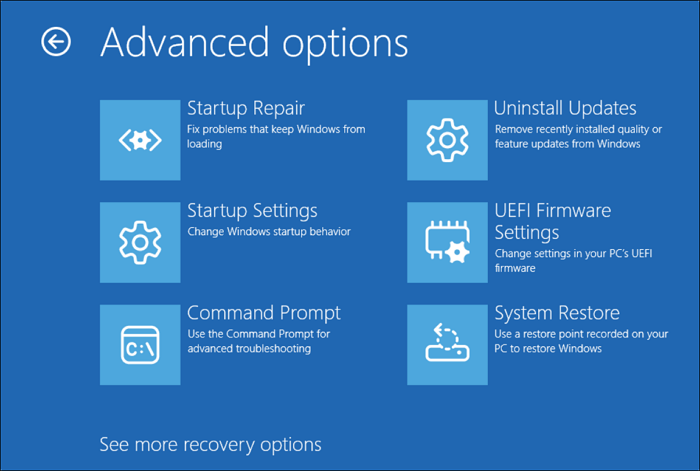
Step 4. Open Troubleshoot → Advanced Options → Command Prompt.
This opens a terminal where we can repair boot records.
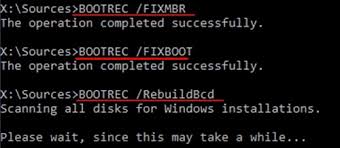
Step 5. Run boot repair commands (one by one).
Type the following commands and press Enter after each:
bootrec /fixmbr
bootrec /fixboot
bootrec /rebuildbcd
- fixmbr repairs the master boot record
- fixboot writes a new boot sector
- rebuildbcd scans for Windows installations and rebuilds the boot configuration
Step 6. Restart the PC. Remove the USB drive and boot normally.
Fix 8: Update BIOS (Advanced)
BIOS firmware controls how the motherboard communicates with hardware. If the firmware contains bugs, compatibility issues, or corrupted settings, it can prevent the system from completing startup and leave it stuck on the BIOS screen.
Updating the BIOS installs the latest firmware from the motherboard manufacturer, which may fix stability problems and improve hardware compatibility.
This is an advanced procedure. An interrupted or incorrect BIOS update can render the motherboard unusable. Follow instructions carefully, and update the BIOS only if other fixes have failed.
How to Updateb BIOS (Step-by-Step):
Step 1. Identify your motherboard model.
- On desktops, check the motherboard itself
- In BIOS (if accessible), look for system information
- Use system documentation or manufacturer utilities
Example model: ASUS PRIME B550M-A
Step 2. Visit the manufacturer’s support website.
Download BIOS updates only from the official support page.
Search for:
- ASUS Support
- MSI Support
- Gigabyte Support
- ASRock Support
Enter your motherboard model and navigate to the Downloads or BIOS section.
Step 3. Download the latest stable BIOS version.
- Avoid beta or experimental firmware unless required
- Read the release notes for boot-related fixes
- Download the file to your computer
Step 4. Prepare a USB drive (FAT32 formatted).
- Use a blank USB drive
- Format it as FAT32
- Copy the BIOS update file to the drive
- Follow manufacturer instructions (some require renaming files)
Step 5. Enter BIOS and use the built-in update utility.
Most modern motherboards include a firmware update tool such as:
- EZ Flash (ASUS)
- M-Flash (MSI)
- Q-Flash (Gigabyte)
Steps generally include:
- Open the update utility
- Select the BIOS file on the USB drive
- Begin the update process
Step 6. Do not interrupt the update.
- Keep the PC powered on
- Do not press buttons or remove the USB
- Wait until the process completes and the system restarts
Will I Lose My Data?
In most cases, being stuck on the BIOS screen does not mean your personal files are gone. The BIOS simply handles hardware initialization and boot configuration—it does not control the data stored on your SSD or hard drive.
If the drive is detected in BIOS (even if Windows won’t load), your data is usually still intact. The problem is typically related to boot settings or the Windows bootloader, both of which can be repaired without deleting files.
Data risk increases only in specific situations, such as:
- The drive is not detected in the BIOS at all
- The drive makes clicking or grinding noises (possible hardware failure)
- The drive shows as unallocated or corrupted
- The system reports severe disk errors
Even in these cases, data recovery may still be possible. Avoid repeatedly powering the drive on and off if you suspect hardware failure, as this can worsen the condition.
For most users, the fixes in this guide restore normal startup without affecting personal files. Start with configuration and boot repairs before considering hardware replacement or reinstallation.
💡You may want to read: 6 Backup Methods Ranked from Worst to Best
When Is It a Motherboard Failure?
A motherboard failure is less common than configuration or storage issues, but it can happen. If the motherboard cannot complete the POST process or communicate with essential hardware, the PC will remain stuck on the BIOS screen—or fail to power on properly.
Before assuming the worst, make sure you’ve worked through the previous fixes. Many symptoms that appear to be motherboard failures are actually caused by RAM, storage, or BIOS settings.
Signs It May Be a Motherboard Problem
- The PC cannot enter BIOS at all (no response to BIOS keys)
- No drives or hardware are detected, even after reseating connections
- The system powers on but shows no display or POST messages
- Random restarts occur during startup
- There are no beep codes or diagnostic indicators
- Other hardware (RAM, storage) works in a different system
If multiple symptoms appear together, motherboard diagnostics become more likely.
Common Causes of Motherboard Failure
Motherboards can fail due to:
- Electrical surges or power instability
- Physical damage or component wear
- Manufacturing defects (rare but possible)
- Overheating
- Corrosion or moisture exposure
Power-related damage is a frequent culprit, especially after storms or unstable electricity.
Can It Be Repaired?
Minor issues—such as damaged connectors or BIOS chip problems—may be repairable by professionals. However, most motherboard failures require replacement.
Professional diagnostics can confirm whether repair is possible or cost-effective.
Don’t Jump to Conclusions
Before diagnosing a motherboard failure:
- Verify that RAM is properly seated
- Confirm storage devices are detected
Reset BIOS settings - Test with minimal hardware attached
If the system still fails to progress past BIOS after these steps, hardware diagnostics are warranted.
Motherboard failure is not the most common cause of BIOS startup problems, but recognizing the warning signs helps you decide when professional assistance is necessary.