Affiliate Disclosure: This post may include affiliate links. If you click and make a purchase, I may earn a small commission at no extra cost to you.
If you’re searching for how to update Gigabyte BIOS, this guide walks you through a safe method, explains the risks, provides a preparation checklist, and outlines recovery options if something goes wrong. Updating your motherboard firmware can unlock CPU compatibility, improve system stability, fix bugs, and patch security vulnerabilities.
Before we begin, a quick introduction: Gigabyte is a hardware manufacturer best known for its motherboards, which are widely used in gaming PCs, workstations, and custom builds, and most modern models include built-in BIOS update utilities such as Q-Flash.
Why Update Gigabyte BIOS?
Updating BIOS can provide:
- CPU Compatibility. If you upgrade to a newer processor and the system won’t boot, your motherboard may require a newer BIOS version to support that CPU.
- Memory Stability Improvements. BIOS updates often include updated memory training algorithms and compatibility enhancements for high-frequency RAM.
- Bug Fixes and System Stability. Random crashes, boot loops, or hardware detection issues may be resolved through firmware updates.
- Security Patches. Firmware-level vulnerabilities are occasionally patched via BIOS releases.
- Windows 11 Support. Enabling TPM and Secure Boot may require a BIOS update on older boards.
That said, BIOS updates are not routine maintenance tasks. If your system is completely stable and you are not upgrading hardware, updating may not be necessary.
Steps to Update Gigabyte’s Motherboard BIOS
Before you begin: BIOS flashing is a firmware-level update, if done incorrectly it can prevent your system from booting. Read each step carefully and do not interrupt the process once started.
Step 1. Prepare Your System and Tools
What you’ll need:
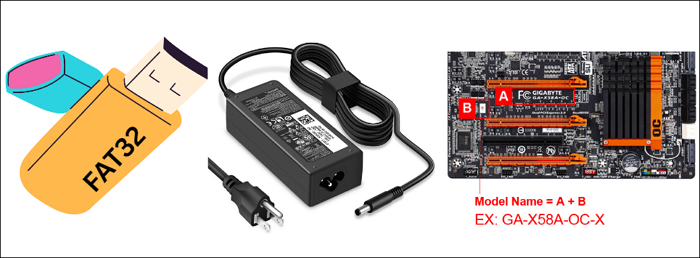
- A USB flash drive formatted to FAT32
- A stable power connection (avoid outages)
- Your Gigabyte motherboard model name and revision
Steps:
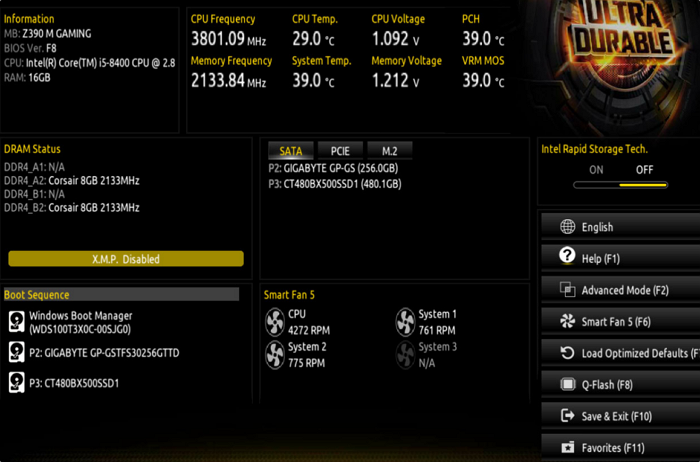
- Check your current BIOS version – Restart your PC and press Del repeatedly during boot to enter BIOS, then note the BIOS version shown on the main screen. Alternatively, in Windows, press Win + R, type msinfo32, and view BIOS Version/Date.
- Identify your exact motherboard model and revision – The motherboard model is usually printed on the PCB. You can also find it in System Information.
- Ensure your USB drive is FAT32 formatted – Right-click the drive > Format > choose FAT32 > Start. This step is required so the BIOS utility can read the file.
- Close all programs and save work.
Step 2. Download the Most Recent BIOS File
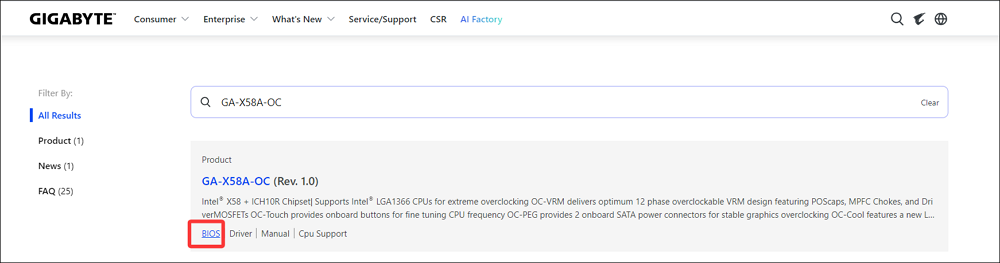
- Visit the official Gigabyte page and search for your motherboard model.
- Navigate to the BIOS option.
- Download the latest BIOS version that matches your exact model and revision.
Avoid early alpha/beta releases unless you have a specific reason. On Reddit, users confirm you do not need older releases, because the newest BIOS contains all prior updates, so grabbing the latest version is fine.
Step 3. Prepare the BIOS File on USB
- Extract the downloaded BIOS ZIP file. You’ll typically see a single file with a version-like name.
- Copy that BIOS file to the root of your FAT32 USB drive (don’t place it inside folders).
Some users report that certain USB drives aren’t properly recognized. If your board doesn’t see the file, try a different USB stick or a USB 2.0 port.
Step 4. Enter BIOS and Launch Q-Flash
- Shut down your PC completely.
- Power on and start tapping Del/F8/F2 during the boot process to enter the BIOS.
- Once in BIOS, look for the Q-Flash utility. It may be visible on the main screen or in a menu. Alternatively, pressing F8 within BIOS also launches it.
If you cannot boot into BIOS, this guide can help you out: PC won’t boot to BIOS
Step 5. Select and Start the BIOS Update
- In Q-Flash, choose Update BIOS or Update BIOS from Drive.
- Select your USB drive from the list.
- Choose the BIOS file you copied earlier.
- Confirm that you want to update (the utility will usually ask you to verify before beginning).
- The update screen will show progress, and this takes a few minutes, and the system may reboot automatically when done.
Important: Do not turn off the computer, interrupt power, or remove the USB drive during the flash. Sudden power loss can corrupt the BIOS.
Step 6. After the Update Completes
Your system should restart automatically once Q-Flash finishes. Then enter BIOS again (press Del during boot), and confirm the new BIOS version is displayed.
Reconfigure any important BIOS settings you use (e.g., memory XMP, boot order, Secure Boot) as updating often resets settings to defaults.
👍Tips and Real-World User Notes
- USB drive compatibility: Some users noted that not all USB sticks work the same. If the BIOS doesn’t detect your file, try another USB or a USB 2.0 port instead.
- No need to rename BIOS file: For standard Q-Flash updates, most Gigabyte boards detect the correct file name as long as it’s extracted and placed at the root.
- Avoid updating if unnecessary: If your system is stable and you aren’t adding new hardware, leaving the BIOS as-is avoids risk.
What If Gigabyte BIOS Update Fails?
Although rare, failures can happen.
Scenario 1: PC Won’t Boot After Update
Try Clearing CMOS
- Turn off PC
- Remove CMOS battery for 5–10 minutes
- Reinstall and restart
Scenario 2: Black Screen After Update
If your board supports Dual BIOS, it may automatically recover. Some higher-end Gigabyte boards include backup BIOS chips that restore firmware automatically.
Scenario 3: Power Loss During Update
This is the worst-case scenario. If your board supports Q-Flash Plus, reflash BIOS using Q-Flash Plus. If not, you may require BIOS chip reprogramming, professional repair, or motherboard replacement.
Should You Always Update Gigabyte BIOS?
The short answer: No.
Update BIOS only if:
- Installing new CPU
- Experiencing compatibility issues
- Fixing specific documented bugs
- Required for security updates
Do NOT update BIOS if:
- System is stable
- No hardware changes planned
- No known issues affecting your build
BIOS updates are not like regular software updates. They modify firmware at the hardware level.
Final Thoughts
BIOS updates can solve compatibility and stability issues, but they should be performed carefully and only when necessary. With proper preparation and correct file selection, updating your Gigabyte motherboard firmware is straightforward and safe. If you’re upgrading hardware or troubleshooting boot problems, a properly executed BIOS update may be exactly what your system needs.
Updating Gigabyte BIOS via Q-Flash is a straightforward and reliable method when done with proper preparation. Follow these steps exactly, and you’ll upgrade your firmware safely, even if you’re new to BIOS flashing.


![How to Buy and Upgrade Laptop RAM? [Detailed Guide]](https://storedbits.com/wp-content/uploads/2024/10/push-the-ram-stick.jpg)