Affiliate Disclosure: This post may include affiliate links. If you click and make a purchase, I may earn a small commission at no extra cost to you.
Just installed Windows 11 and already feeling it’s cluttered? Preinstalled apps, background services, Widgets, and startup programs can slow down performance and make your system feel bloated. If you’re searching for how to debloat Windows 11, you likely want a faster, cleaner PC, without breaking important system features.
In this guide, you’ll learn safe, practical ways to remove bloatware, disable unwanted features, and optimize Windows 11 performance, whether you’re a beginner or an advanced user.
Risks and Precautions Before Debloating Windows 11
Before you debloat Windows 11, it’s important to understand the potential risks. Removing the wrong components can cause system instability or unexpected issues.
⚠️Possible Risks
- Windows Update failures: Removing certain services or system apps may break future updates.
- System instability: Aggressive scripts can disable dependencies required by core features.
- Missing functionality: Apps like Microsoft Store, Windows Security, or Search may stop working properly.
- Difficult recovery: Some changes are not easily reversible without reinstalling Windows.
- Compatibility issues: Certain games, drivers, or enterprise tools may rely on default Windows components.
⚙️Important Precautions
- Create a system restore point before making changes.
- Consider a full system image backup for maximum safety.
- Avoid running unknown or unverified scripts.
- Start with manual removal methods before using advanced tools.
- Test changes gradually instead of applying aggressive “one-click” debloat options.
Windows 11 Debloat Chris Titus Tool
Chris Titus Windows 11 Debloat is a set of open-source PowerShell scripts that allow users to uninstall unnecessary apps such as Xbox, OneDrive, Cortana, Teams, and Clipchamp, while also disabling redundant background services and advertisement features. This can significantly improve system startup speed and overall performance.
Unlike traditional software, this Windows 11 debloater is not an installer. It requires running the PowerShell scripts with administrator privileges, and users can selectively choose which apps to keep or remove for a highly customized Windows 11 experience. Additional features include enabling the classic context menu, disabling Widgets, and hiding suggested content, making the system cleaner and more responsive.
⚠️Risk Notice: Before running the scripts, it is strongly recommended to create a system restore point or a full system image backup to avoid accidentally removing critical components or affecting Windows updates. Users unfamiliar with PowerShell should proceed cautiously and follow the official GitHub instructions carefully.
Steps to Use Chris Titus Windows 11 Debloat:
Step 1. Before debloating your windows 11 PC, please backup your system first.
Step 2. Download the latest version from Chris Titus’ official GitHub repository.
Step 3. Right-click Start icon and click Windows PowerShell (Admin) option.
Step 4. Run Set-ExecutionPolicy RemoteSigned to set execution policy. Allows the script to run safely.
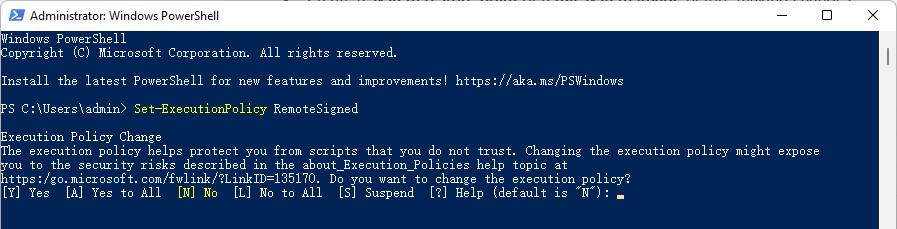
Step 5. Then, type Windows 11 debloat script iwr -useb chrisitus.com/win | iex and hit Enter to open the Chris Titus Tech Windows Utility.
Step 6. Switch to the Tweaks tab and choose the Desktop (standard) preset, and click Run Tweaks to optimize your system.
Step 7. Once finished, restart your computer to apply your changes.
Windows 11 25H2 Debloat via Built-in Tool
With the release of Windows 11 25H2, Microsoft introduced a new built-in method to remove certain preinstalled Microsoft Store apps using Group Policy, without relying on third-party scripts. These preinstalled app (often referred to by users as bloatware) previously required manual removal through PowerShell or other command-line tools. By integrating this functionality directly into Group Policy with a graphical interface, Windows 11 25H2 significantly simplifies the debloating process for advanced users and IT administrators.
The new policy, “Remove default Microsoft Store packages from the system,” allows administrators to uninstall selected preinstalled Microsoft Store apps through Group Policy. Only the apps you choose will be removed, while others remain untouched. The policy is disabled by default. Removable apps may include Clipchamp, Windows Media Player, Windows Terminal, Notepad, and other inbox Store-based apps. When enabled, Windows creates related registry entries under the designated policy path.
Guide on how to enable remove bloatware in Windows 11 25H2 via Group Policy:
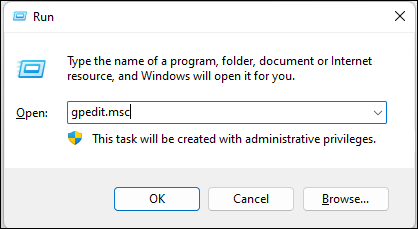
Step 1. Press Win + R to open the “Run” dialog box, then type gpedit.msc.
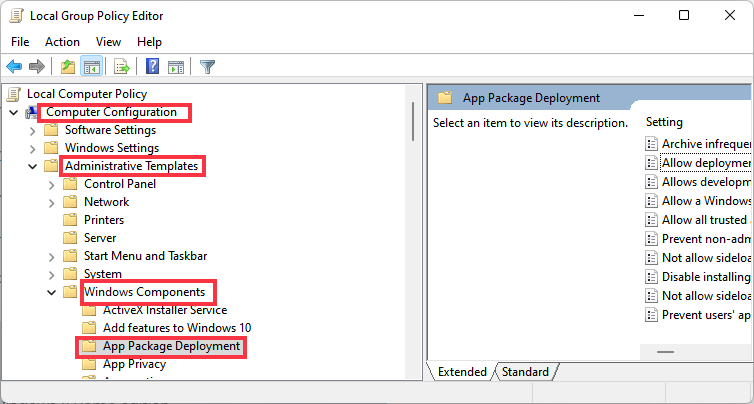
Step 2. Navite to Computer Configuration > Administrative Templates > Windows Components > App Package Deployment > Remove default Microsoft Store packages from the system. Then right-click on it and choose Edit.
Step 3. Check the Enabled option and press OK button to apply the settings.
Important Notes:
- Windows 11 Pro or higher required, not available in Windows 11 Home edition.
- Core system components cannot be removed through this method.
- You must manually activate and configure it.
How to Debloat Windows 11 via Settings
Before running any third-party debloat script or “one-click” optimization tool, it’s important to understand the potential risks. Many experienced users strongly advise against blindly executing unknown scripts. While these tools may promise aggressive system cleanup, they can sometimes remove essential components, break system stability, interfere with Windows Updates, or disable core features. In some cases, the damage may not be immediately visible and could cause issues months later.
If you are unsure what a script modifies, it’s safer to rely on Windows’ built-in tools instead of automated debloat utilities.
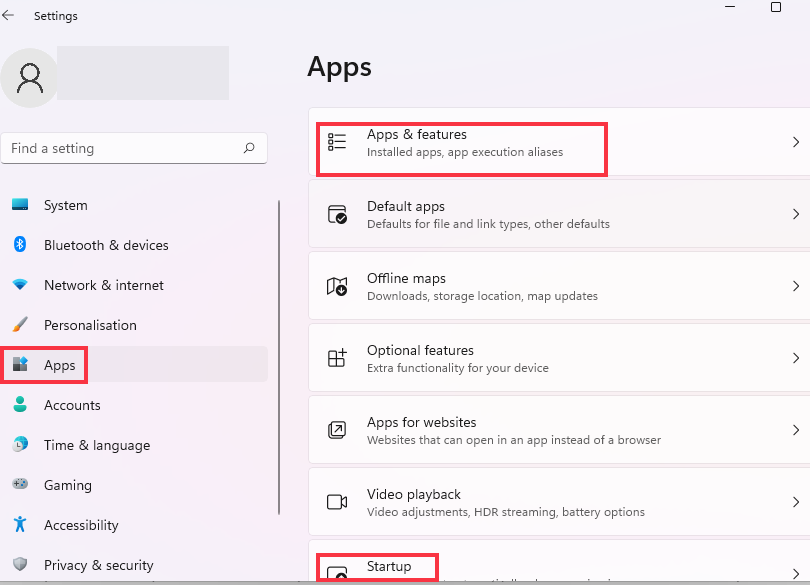
- Open Settings > Apps > Installed Apps.
- Locate unnecessary preinstalled applications.
- Click the three-dot menu and select Uninstall (if available).
- Review Startup apps and disable unnecessary programs.
- Adjust privacy, background app, and notification settings manually.
Using built-in tools ensures you only remove supported apps and significantly reduces the risk of system instability or update failures.
Debloat Windows 11 During Installation
If you want a truly clean Windows 11 system, the most effective approach is to debloat before the system even finishes installing. Instead of removing apps after setup, you can use an autounattend.xml answer file to customize Windows during installation.
This method allows you to automatically remove certain preinstalled Microsoft Store apps, disable unnecessary features, and apply system preferences without running post-install scripts. Many advanced users prefer this approach because it avoids leftover registry entries, background services, and partially removed components.
With a properly configured autounattend.xml, you can:
- Remove bloatware like OneDrive, Cortana, Clipchamp, and other inbox apps
- Disable Widgets
- Prevent Bing integration in Search
- Enable classic context menus
- Show full file extensions by default
- Apply privacy-focused default settings
The result is a significantly cleaner Windows 11 installation from day one.
Basic Steps to Use autounattend.xml to debloat Windows 11:
Step 1. Create a bootable Windows 11 USB drive.
Step 2. Generate or customize an autounattend.xml file using Windows System Image Manager (WSIM) or trusted templates.
Step 3. Place the autounattend.xml file in the root directory of the USB drive.
Step 4. Boot from the USB and install Windows normally.
Step 5. Windows will automatically apply the predefined configuration during setup.
Important Considerations
This method is best suited for advanced users or IT administrators.
- Incorrect configuration can lock certain settings or disable features unintentionally.
- Some changes may require modifying or removing the answer file and reinstalling Windows to fully reverse them.
- Always test on a secondary device or virtual machine before deploying on your main system.
Conclusion
If you need to remove bloatware on Windows 11, choose the method that fits your experience level. Advanced users can use trusted scripts or one-click debloat tools for faster cleanup, but backups are strongly recommended.
For maximum safety, uninstall unwanted apps through Settings Apps to avoid system issues. If you’re using Windows 11 25H2, you can also remove supported Store apps directly via Group Policy for a more controlled debloat approach.