Affiliate Disclosure: This post may include affiliate links. If you click and make a purchase, I may earn a small commission at no extra cost to you.
So, your computer isn’t able to detect your USB Flash drive. Well, this isn’t an uncommon problem. Our computers can suddenly refuse to recognize external flash drives, and there can be many reasons for it, both on software and hardware levels. However, this issue is easily fixable as long as your USB drive isn’t bricked. By the way, I have an article if you are interested to know how the flash drives work.
In modern systems, USB drives connect to the CPU via the south-bridge, which is a part of the motherboard chipset. So, there are many layers of hardware and software, and any small issue in drivers, hardware, or settings of software conflicts can result in your computer not detecting the USB flash drive.
If your flash drive isn’t showing in one computer, it is worth trying and check it in another computer if possible. If not, I am going to give you multiple steps, from basic to complex, to fix the problem. So, without any further delay’s let’s get started.
1. The Basic Steps
Basic steps include trying a different USB port, trying a different computer, checking for physical damage, etc. Some USB drives come with switches to turn them on or off. If everything looks fine and the drive is still not detected, let’s proceed to the next steps. Try restarting your computer as well.
2. Update USB driver
Method 1: Automatic Driver Update
You can first try to update the USB drive through the Device Manager using these steps.
- Press Windows Key + X and click Device Manager.
- Inside the Device Manager menu, expand “Universal Serial Bus controllers” or “Disk drives” (if the USB is detected but not working).


In my case, I see my drive connected in the disk drives section but not in File Explorer. So, I will try to update the driver.
- Right-click your USB device → Select “Update driver.” Choose the automatic method to see if any driver update is available.
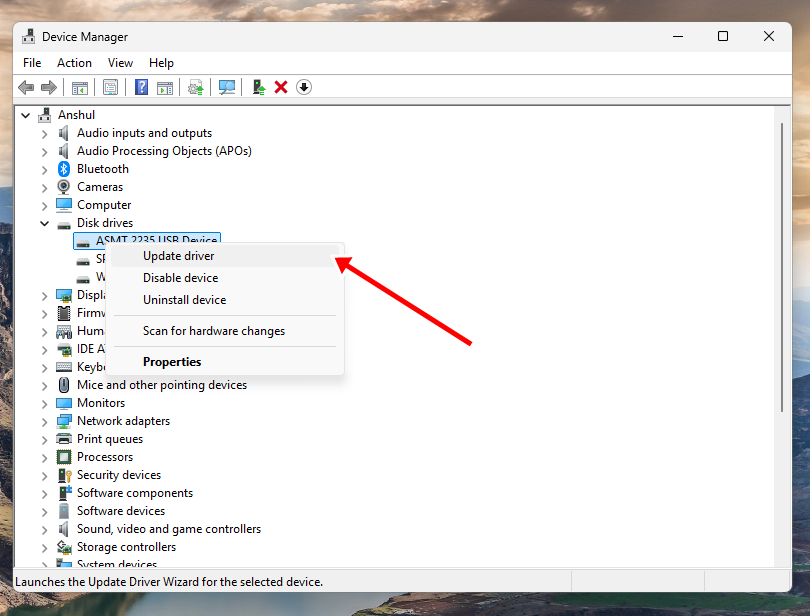

If the update is available, it will happen automatically, and if not, proceed to the next step.
Method 2: Manual Driver Update
This one is a little tricky, but it works most of the time. We are going to install the driver manually from the official website of the motherboard or laptop. Let’s see how you can do that.
Step 1: Find and download your motherboard’s USB driver
Just do a simple Google search with (Motherboard Name) + “drivers”. Find the official support page. Now, you can either download the USB driver or Chipset driver from the official page. Make sure you are downloading it for the exact same model. You can find your product and its drivers from the official support pages of major laptop and motherboard manufacturers.
| Brand | Support Page Link |
|---|---|
| Dell | Dell Drivers & Downloads |
| HP | HP Customer Support |
| Lenovo | Lenovo Drivers & Software |
| ASUS | ASUS Download Center |
| Acer | Acer Drivers & Manuals |
| MSI | MSI Support & Downloads |
| Razer | Razer Drivers & Firmware |
| Samsung | Samsung PC Support |
| Toshiba/Dynabook | Dynabook (Toshiba) Support |
| Microsoft Surface | Microsoft Drivers & Firmware |
For motherboards, you can find the drive from these official links.
| Brand | Support Page Link |
|---|---|
| ASUS | ASUS Support |
| MSI | MSI Support |
| Gigabyte | Gigabyte Support |
| ASRock | ASRock Support |
| EVGA | EVGA Support |
| Biostar | Biostar Support |
Step 2: Install the driver
My computer’s motherboard is MSI Pro Z690-A. So, I’ll just locate it on the support page and then find the USB or chipset driver. Let’s download it and install it.


Once the installation is done, reconnect your USB drive and see if it works. If the computer still refuses to detect it, let’s proceed to the next step.
3. Look for Hidden devices
Sometimes, the Device manager hides some devices if they are faulty or of no use. In those files, you can find your USB drive, which might be disabled, or the driver might be outdated. Let’s see how you can find your drive if it is hidden.
- Open Command Prompt as an Administrator and enter the commands one by one:
set devmgr_show_nonpresent_devices=1
start devmgmt.msc

- After entering the second command, the disk management menu will open automatically. Now, go to the View tab and click Show hidden items.

- Now, locate your drive in the Disk Devices or USB section. If you find it, update the driver of that as we did above.

4. Check Disk Management (Windows)
Most people aren’t aware that sometimes they have to mount their drive in order to use it. Especially in Windows computers, if your drive isn’t detected, it is worth checking it in the disk management menu. Here is how you do it.
- Press
Win + X→ Select “Disk Management.”
- Look for your USB drive (it might appear as “Unallocated” or “No Media”).

If it shows up with no drive letter, unallocated space, or raw format, you’ll have to create a new volume in order to run it. Here is a short video on how you do it.
Even after following these steps, if you are not able to see your drive, let’s jump to the next step.
In case you are trying to use an external hard drive through USB, format the drive in exFAT file format instead of NTFS. Also, if the drive is appearing in the disk management menu but is offline, right-click on it and make it online.

5. Check for Power Management Issues
In some cases, if you have enabled the power saver mode of some kind on your computer, with some specific settings, your system may save some power by not recognizing the external drives. Yes, it is literally a setting in Windows settings that you should definitely check for. Here is how you can do it.
- Open Device Manager (
Win + X→ “Device Manager”). - Expand “Universal Serial Bus controllers.”
- Right-click each “USB Root Hub” → “Properties” → Go to the Power Management tab.
- Uncheck “Allow the computer to turn off this device to save power.”


Now, connect your drive again to check if it is working.
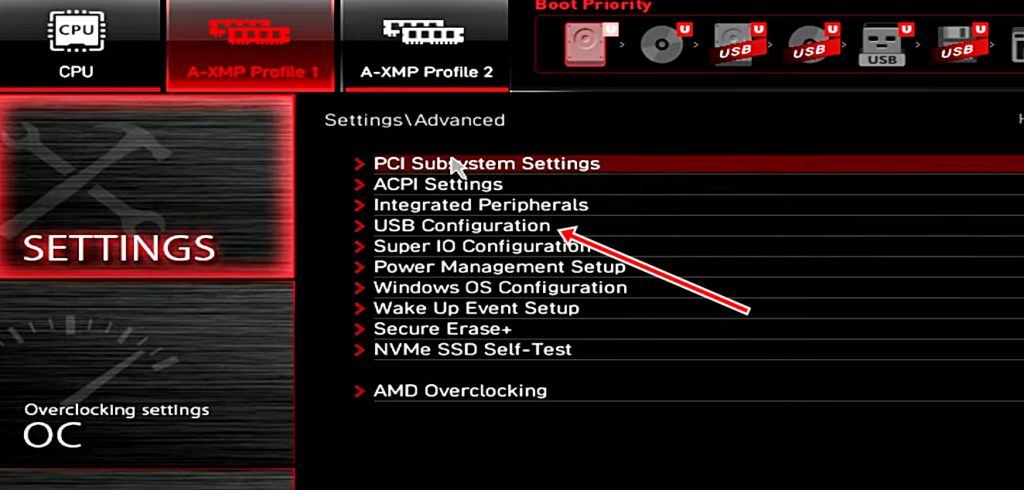
6. Check BIOS/UEFI Settings
Restart your PC and enter the BIOS using a special key like Esc, Del, F11, or F12. There, you can enable or disable USB settings in the USB configurations menu. Some older BIOS menus may not have these features, but in modern computers, you’ll find a dedicated section like this.
7. Run diskpart to refresh USB detection
If your drive isn’t appearing in the system, the diskpart command can help you with it. Let’s see how you can utilize it.
- Run the command prompt as an administrator.
- Type diskpart and hit enter
- Now, type list disk and hit enter
- If your drive appears in the list of disks but isn’t appearing in the file explorer, select your disk by entering select disk (disk letter).
- Now type clean and hit Enter
- After that, enter these commands one by one to create the partition and format it.
- create partition primary
- format fs=ntfs quick
- assign
- exit
Here is a video guide on how to do it.
8. Check your drive on DiskGenius
In many cases, I have found that DiskGenius can detect the drive and even fix the problem using simple steps. You can download DiskGenius’s free version to see if this works for you.
See, I am comparing the drive detection in the Windows Disk Management menu and DiskGenius side by side.

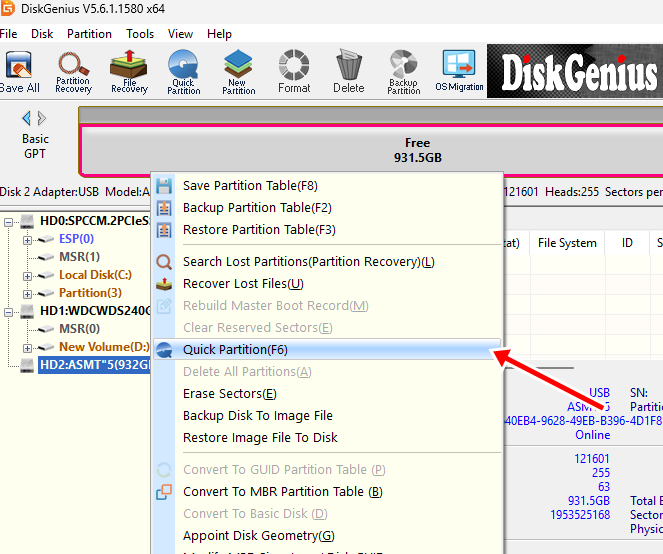
DiskGenius is able to detect my 1TB USB hard drive, while the Windows Disk Manager has no idea that something is connected to the computer. Now, how do I make my system recognize this drive? I just create partitions using DiskGenius. Not only can you use DiskGenius, but you can also use other popular partition programs like TestDisk, EaseUS Partition Master, etc, and see if they detect your drive. I am using DiskGenius because I have been using it for years, and it has given me the best results compared to any other partition program.
I just right-clicked the drive and clicked Quick partition. Then I am asked to select the partition settings like table style, i.e., MBR or GPT, etc. Also, in the advanced options, separate volumes are created, which you can clear if you want. You have options to create 3, 4, 5, 6, or custom partitions as per your requirements. You just click Ok, and everything happens on the Go.

Choosing between MBR and GPT partition table style depends on your system. If it is BIOS-based, it is good to choose MBR. If it is a modern computer with UEFI, it is better to go with GPT, just as I did. Here is a little video illustrating the whole process.
Conclusion
I hope you are now able to use your USB drive and that the system is able to detect it. If not, and the drive works on another computer, it might indicate some other hardware or OS related issues. Reinstalling Windows and resetting your computer can help in that way. However, make sure to have a backup before doing these things. In some cases, you may have to get your motherboard checked or replaced.
I hope this helps!