Affiliate Disclosure: This post may include affiliate links. If you click and make a purchase, I may earn a small commission at no extra cost to you.
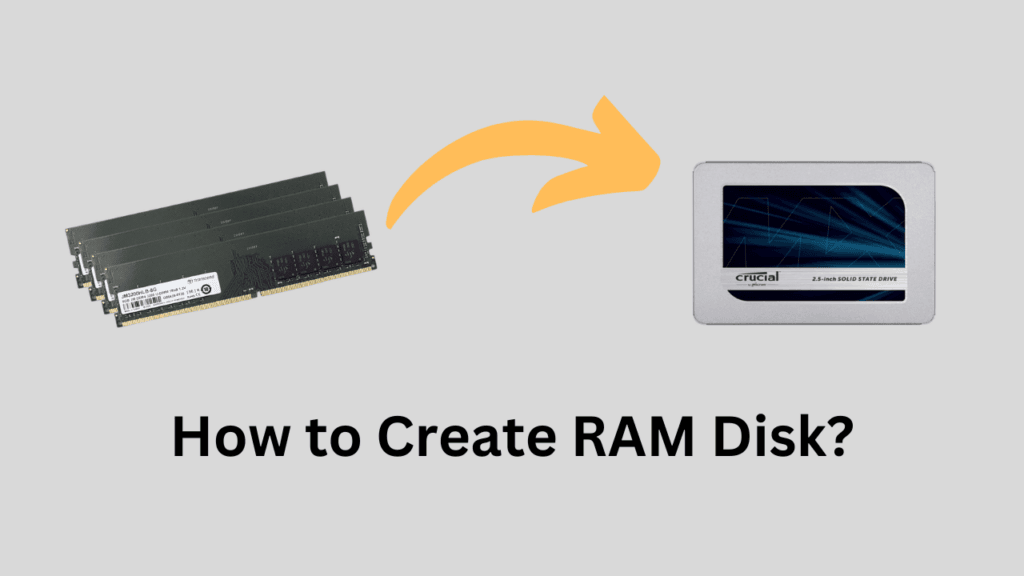
If you notice that your computer generally has some amount of RAM space freely available at all times, even while you are working, you can implement a RAM disk. A RAM disk can be extremely helpful, primarily if you work in a creative field such as video editing, digital art, or 3D modeling. In general, a RAM Disk can be advantageous for any user. For example, if your system has 16 GB of RAM and is always idle, using around 10 GB of RAM during maximum software usage, you can utilize the extra 6 GB to create a virtual disk.
Since RAM is way faster than hard drives and solid-state drives, a RAM disk can give you great benefits in terms of read/write performance. This virtual drive, also known as a RAM disk, can be used for general storage, but it will serve as a high-speed and low-latency storage medium.
Generally, you don’t have direct access or control over your system’s RAM. The operating system and the CPU control the RAM. But there are many RAM Disk software that allow you to use your RAM for reading, writing, and storing data.
Although you are creating a virtual storage drive from your RAM, it can’t be used for permanent storage because RAM is volatile memory. If you have stored some critical data on the RAM disk and your system is turned off, you will lose all your data. So, before a shutdown, all the content of the RAM disk can be stored on your system drive if you choose to.
Let’s discuss the RAM Disk in more detail and explore its implementation.
How to Set Up a RAM Disk Using SoftPerfect RAM Disk?
Earlier, in this article, I have used ImDisk program to create and run a RAM Disk which is not in development now. But, it has been replaced by AIM Toolkit. But, after writing my recent article on RAM Disk software, I have found the SoftPerfect RAM Disk to be the fastest and easiest program. So, we are going to use it here as well.
- Download and install the program from the official website. Then run it.
- Click the Add button at the top to create a RAM Disk.

3. Select the size of your RAM Disk. It shows you the total free memory in your system. But, keep it under limits so that you leave a good chunk for the system. It is in MBs. So, for a 1GB RAM Disk, enter 1000 MB.

- After that, you can choose to select an image file if you want. If you wish to whatever’s on that RAM disk to persist, the tool can periodically save its contents into a regular file on your real storage. When you boot again, the utility can read that image file and restore its contents back into RAM

- Select the Mount options. Give your drive a letter and choose whether it should be created when the system boots or manually. Enable dynamic memory allocation if you have limited memory. This feature frees up the memory from the RAM disk if it is not utilized. Otherwise, if you have created a 1GB RAM Disk, that 1GB is taken from the system permanently.

- Select the file system as per your requirements. You can also create folder or leave it for later.
- In the advanced settings, you can change the volume label and the default allocation size. This is important in some cases. For example:
- If you pick a larger allocation size, reading and writing big files can be a little faster because the filesystem tracks fewer blocks.
- If you pick a smaller allocation size, you waste less space on lots of tiny files.
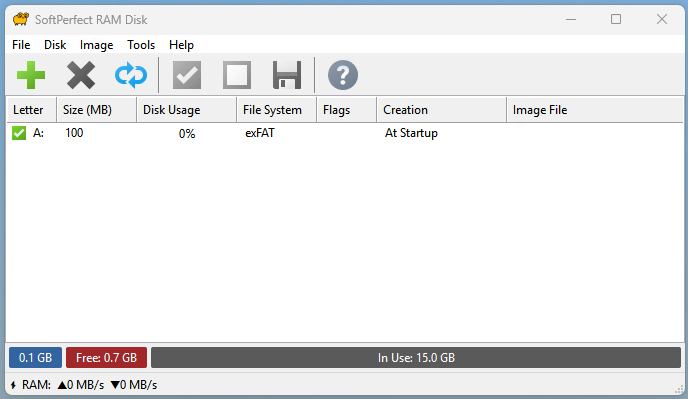
- Once you are finished, proceed to create the RAM Disk, and you can now check it in your File Explorer. The menu itself shows you the usage and size. You can change the settings later on by clicking the properties option.
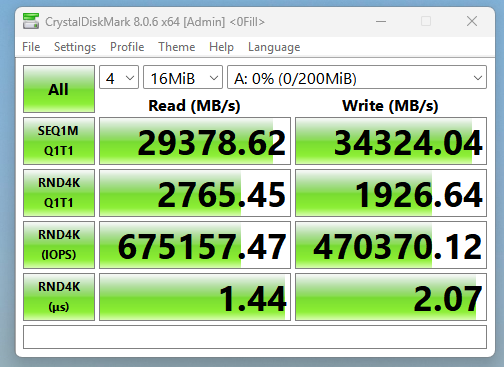
Running the Benchmarks
Let’s see how our RAM Disk performs on CDM tests. Here are the results for the default peak performance CDM profile.

Here are the results for the Real-World performance profile.
Key Benefits of RAM Disk
1. High-Speed Performance:
RAM disk operations are much faster than HDDs or SSDs because they are based on capacitor storage, which is much quicker than the regular permanent storage drives. While the fastest NVMe drives can offer sequential read and write speeds of 10,000 to 12,000 MB/s, modern RAM can operate at speeds up to 30,000 MB/s. This makes RAM disks ideal for tasks that require fast access to data, such as loading large files, databases, video files, or virtual machines.
2. Reduced I/O Latency:
I/O (Input/Output) latency is the delay between a request for data and its retrieval from the storage medium. RAM has extremely low latency compared to SSDs and HDDs. So, the data will be available nearly instantly. This can significantly improve performance for tasks where frequent and rapid data access is crucial, such as file modification, video editing, and software development.
3. No Disk Wear:
SSDs come with a limited number of Read/Write (Program/Erase) cycles before they can become unusable. Hard drives also wear out with time. But RAM has no mechanical parts, and excessive read/write operations aren’t destructive for the RAM cells. Therefore, the RAM disk becomes an ideal solution for short-term storage space that requires high-frequency read/write operations.
4. Improved System Performance:
You get significant benefits in software and tasks that demand heavy and fast disk usage. This includes gaming, video editing, database management, virtual machines, etc. Additionally, a RAM disk can be energy-efficient in most cases because even heavy read/write tasks, which would take a long time on SSDs and HDDs, can be completed within seconds. Especially in random read/write operations, a RAM disk can be very impressive.
Drawbacks Reminder:
As discussed earlier, since RAM is volatile memory, all data in a RAM disk will be lost when the system is powered off unless you have set up an auto-save feature with an image file in the primary memory. It is always important to save important data if it is stored on a RAM disk.
Additionally, setting up a RAM disk can be tricky for some people. We typically use third-party software to make it easier for us, except in Linux, where you have built-in functionality for RAMDisk.
The third drawback is that when you set up the autosave feature with the RAM Disk, it increases the booting and shutdown timings. This is because the data saved on the RAM Disk should first be written the permanent storage before the system shuts down. Depending on your primary storage drive — HDD or SSD —this process could take significantly longer, and until the data is saved, your system will not shut down. The same data will be loaded back to the RAM disk when you turn on your computer. This will increase the booting time as well.
Who should create a RAM Disk?
RAM disks are generally preferred by power users who use resource-intensive applications, such as video editing, databases, 3D modeling, and VFX. High-performance gaming setups can also utilize a RAM Disk. Developers who test applications can utilize a RAM Disk to accelerate file operations. Data analysts, programmers, overclockers, or anyone working with random data more frequently can make use of the RAM Disk. Even if you are a normal user involved in moving heavy or large files often, RAM disks can greatly assist you with this task.
I hope this helps.