Affiliate Disclosure: This post may include affiliate links. If you click and make a purchase, I may earn a small commission at no extra cost to you.
Is your PC refusing to boot into the BIOS? This can be a frustrating experience, especially when you need to change BIOS settings, perform diagnostics, or install a fresh OS. While there are various reasons why a computer may fail to enter BIOS, understanding the causes and following the right steps can help you resolve the issue quickly.
In this article, we’ll walk you through common reasons your PC won’t boot to BIOS, and practical solutions you can apply to get your system back on track.
Why You Can’t Enter BIOS
BIOS (Basic Input/Output System) is the firmware that initializes your PC hardware before the operating system starts. It provides essential settings, such as boot sequence, hardware configuration, and security options.
Why is my PC not booting to BIOS? If your PC isn’t booting into BIOS, it could indicate a hardware or software issue that’s preventing proper initialization. Here are some of the possible reasons:
- Faulty Keyboard: If pressing the correct BIOS key (F2, DEL, ESC, or F10) does nothing, your keyboard may not be detected. Wireless keyboards often initialize too late-try using a wired USB keyboard instead.
- Incorrect Boot Order: If the system attempts to boot from a non-bootable device (such as a USB drive or network), it may appear to skip BIOS or fail during startup.
- Hardware Problems: Faulty RAM, motherboard issues, loose components, or power supply problems can prevent the system from completing POST (Power-On Self-Test), which is required before entering BIOS.
- Corrupted BIOS Firmware: A failed BIOS update, malware infection, or sudden power outage can corrupt the firmware, stopping the system from loading BIOS properly.
- Fast Boot Enabled: Fast Boot or Ultra Fast Boot shortens startup time by skipping certain initialization steps, which can block access to the BIOS screen.
- External Device Interference: A malfunctioning USB device or external drive may disrupt the boot process and prevent BIOS access.
How to Fix a PC Not Booting to BIOS
If your PC won’t boot into BIOS, follow these troubleshooting tips.
Method 1. Try Different Keys
Sometimes the PC actually can enter BIOS, but the wrong key is being pressed, or it’s pressed too late. Different manufacturers use different keys, and timing matters. Before trying advanced fixes, rule out this simple cause first.
Repeatedly tap Del or F2 immediately upon turning on the PC. Other common keys include Esc, F10, or F12. Also, plug in a wired USB keyboard (if you’re using wireless) and try again.
Method 2. Disconnect All External Devices
Peripherals can affect your device’s performance and may prevent it from booting into the BIOS. For example, a connected USB flash drive might cause confusion, leading the system to attempt to boot from the external device. If you can’t access BIOS, you can try removing all non-essential peripherals and keeping only the necessary ones, such as the keyboard and mouse, plugged in.
Method 3. Check Your Monitor and Display Connection
Sometimes the BIOS is loading, but nothing appears on the screen due to a display issue. Always rule this out before assuming motherboard failure.
- Make sure the monitor is powered on.
- Verify the correct input source (HDMI/DisplayPort).
- Try a different display cable.
- If using a dedicated GPU, try connecting the monitor to the motherboard video port (if the CPU supports integrated graphics).
- Restart and test again.
Method 4. Inspect for Hardware Failures
Faulty hardware can prevent your system from posting and entering BIOS. Here’s what you can check:
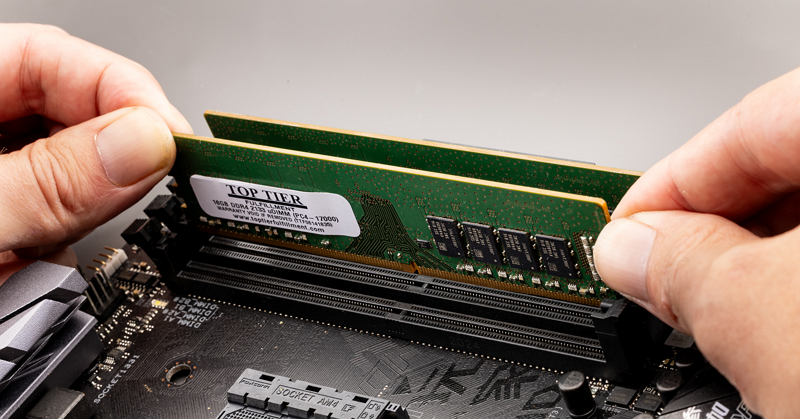
- Check RAM: Try reseating your RAM sticks or testing with a single stick of RAM.
- Check Power Supply: Ensure your power supply is working and that cables are properly connected.
- Test Motherboard: If all else fails, the issue may be with your motherboard, especially if the system isn’t even reaching POST.
Method 5. Clear CMOS to Reset BIOS
If BIOS settings are corrupted or misconfigured, your system may fail to display the BIOS screen. Clearing CMOS resets the firmware to factory defaults.
Step 1. Turn off the PC and unplug the power cable.
Step 2. Open the computer case and locate the round silver CMOS battery on the motherboard. Carefully remove it.
Step 3. Wait 1-5 minutes, reinsert the battery, close the case, and power on the PC.
Note: Some high-end motherboards have a “Clear CMOS” button on the rear I/O panel or on the board itself. Press and hold this for 5-10 seconds while the PC is off and unplugged.
Method 6. Force UEFI via Windows Advanced Startup
If your PC boots straight into Windows but skips the BIOS screen, in this case, you can use Windows Advanced Startup to directly enter UEFI firmware settings.
Step 1. Press Win + I to open Settings.
Step 2. Go to Settings > Recovery > Advanced Startup > Restart Now for Windows 11. (For Windows 10: Go to Settings > Update & Security > Recovery > Advanced Startup > Restart Now.)
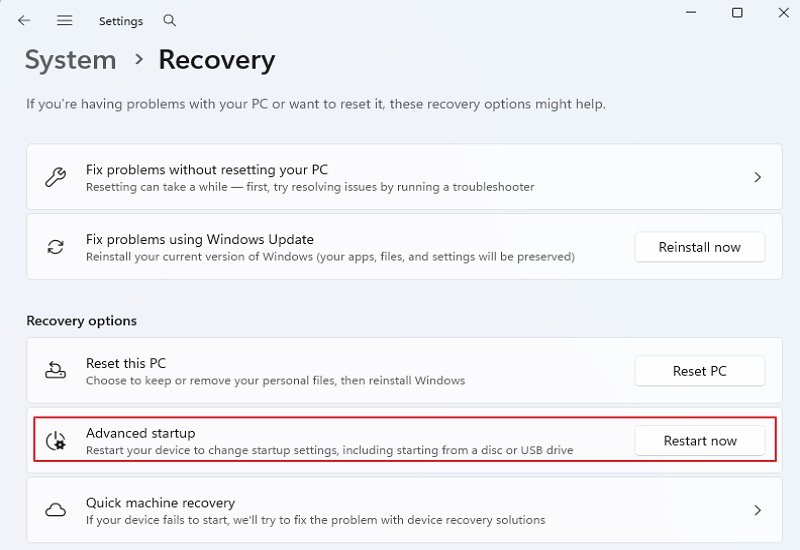
Step 3. Select Troubleshoot > Advanced options > UEFI Firmware Settings.
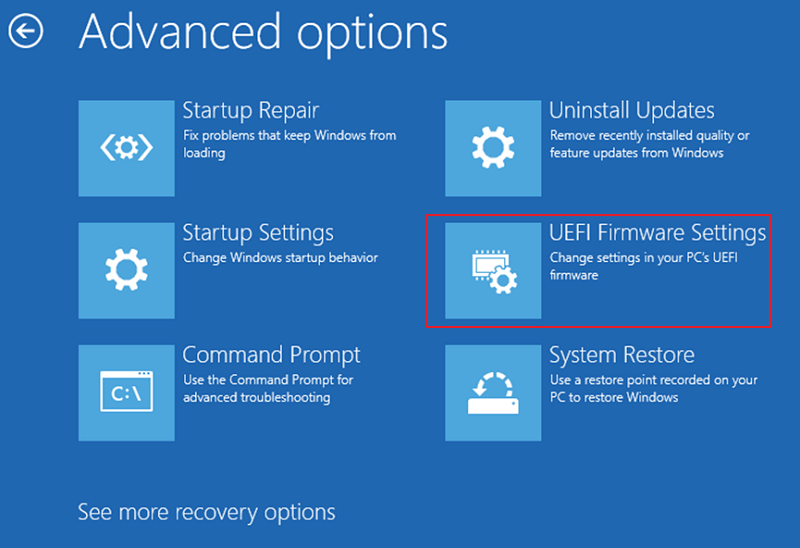
Step 4. Click Restart.
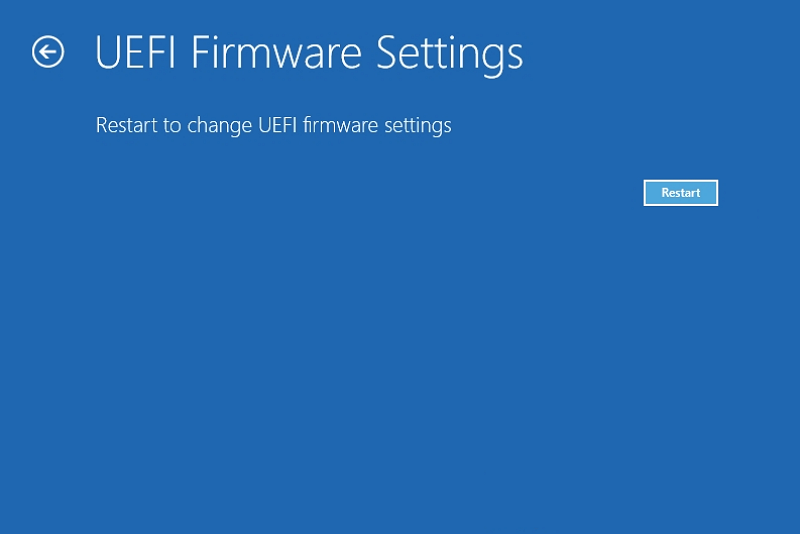
After completing these steps, your PC should now boot directly into BIOS/UEFI.
Method 7. Disable Fast Startup
Fast Startup can shorten boot time by skipping certain initialization steps, including BIOS key detection. Disabling it may restore normal BIOS access.
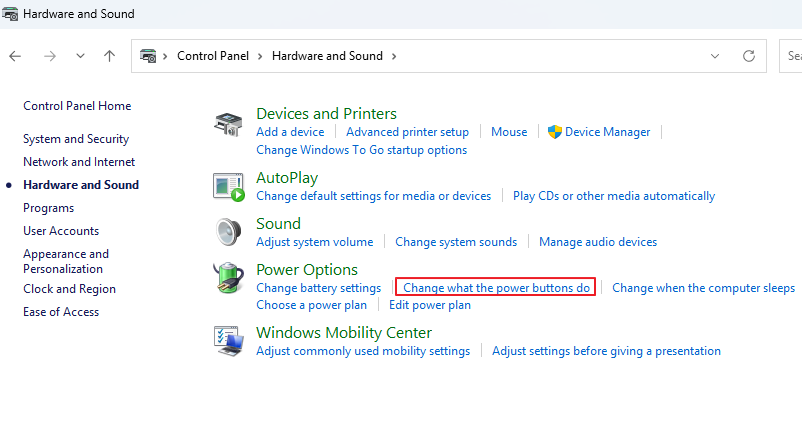
Step 1. Open Control Panel by typing it in the Windows search bar.
Step 2. Ensure “View by” is set to Category, click Hardware and Sound, and then select Power Options. Then, select Change what the power buttons do.
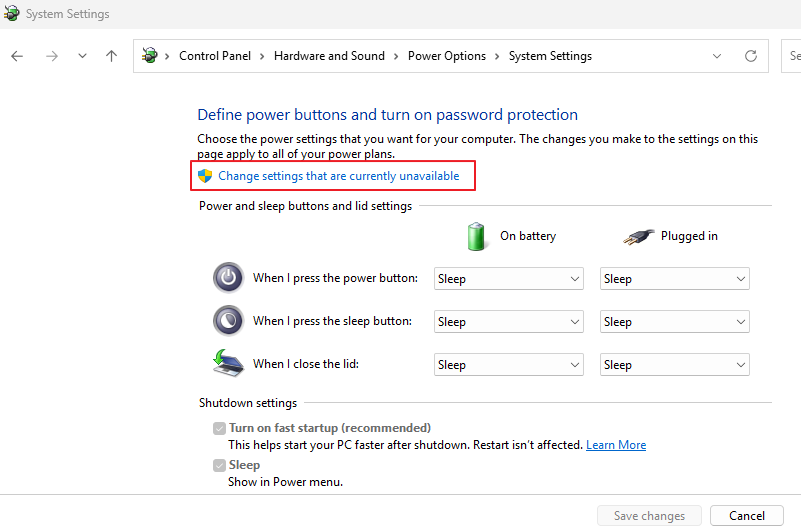
Step 3. Click Change settings that are currently unavailable.
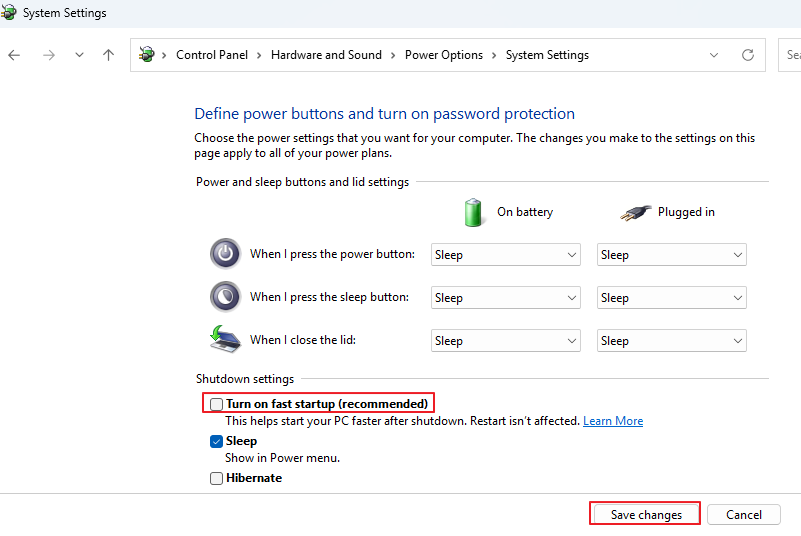
Step 4. Uncheck Turn on fast startup (recommended), and click Save changes.
Step 5. Shut down your PC completely, turn it back on, and try entering the BIOS again.
Method 8. Update or Reflash BIOS
If BIOS firmware is corrupted, the system may fail before displaying the BIOS screen. Updating the BIOS/UEFI is crucial for enhancing system stability, patching security vulnerabilities, and ensuring compatibility with new hardware components like CPUs or RAM. It is highly recommended if you are experiencing issues or installing new hardware.
Most modern motherboards include a built-in flashing tool, such as EZ Flash for ASUS, M-Flash for MSI, Q-Flash for Gigabyte, and Instant Flash for ASRock. Here is how to update BIOS on your PC
Step 1. Identify Your Motherboard Model
- Press Win + R
- Type msinfo32
- Look for: BaseBoard Manufacturer and BaseBoard Product
- Write this information down
Step 2. Download the Correct BIOS File
- Go to your motherboard manufacturer’s official website.
- Search for your exact model.
- Go to the BIOS section.
- Download the latest BIOS version.
- Extract the downloaded file (if zipped).
Step 3. Prepare a USB Drive
- Insert a USB flash drive.
- Format it as FAT32.
- Copy the extracted BIOS file to the root directory of the USB drive.
Step 4. Enter BIOS
- Restart your PC.
- Press DEL/F2 (or your BIOS key).
- Open the built-in BIOS update utility.
Step 5. Start the Update
- Select the BIOS file from your USB drive.
- Confirm the update.
- Wait patiently (DONT turn off the PC).
- The system will automatically reboot after completion.
Warning: Interrupting BIOS flashing can permanently damage the motherboard.
Conclusion
When your PC won’t boot to BIOS, it may seem serious, but most cases can be fixed with systematic troubleshooting, such as checking the keyboard, disconnecting peripherals, resetting CMOS, or inspecting hardware. These issues are often caused by minor configuration errors rather than major failures.
Still, this is a reminder to maintain regular backups. BIOS corruption or hardware failure can happen unexpectedly and put your data at risk. Backing up to an external drive, NAS, or cloud storage ensures your files stay safe, even if your system won’t boot.
With this guide, you should have a clearer understanding of what might be preventing your PC from booting into BIOS and how to fix it. Hopefully, you can resolve the issue quickly and get back to using your computer without hassle.