Affiliate Disclosure: This post may include affiliate links. If you click and make a purchase, I may earn a small commission at no extra cost to you.
RAID stands for Redundant Array of Independent Drives. It is a virtualization technology that creates arrays of multiple drives for enhanced performance, redundancy, and capacity. There are various types of RAID, each with its pros and cons. However, the three main techniques in RAID are striping, mirroring, and parity. Different types of RAID levels come under these three techniques, which we will discuss in detail today.
RAID is primarily used in data centers, servers, Network Attached Storage (NAS), multimedia production, and high-performance computing, among other applications. In consumer environments, it has significant applications in data backups, disaster recovery, and gaming. For various types of applications, different RAID configurations are employed. Some RAID configurations are designed to utilize the combined throughput of different drives, thereby increasing read/write performance or reducing latency. However, the more effective use of RAID is for fault tolerance. In those types of RAID configurations, multiple drives are used to either stripe or mirror the data. In a RAID, two or more drives may hold the same data to ensure no data loss in the event of a drive failure.
Striping and Mirroring are the most essential concepts of RAID. In striping, the data is split or striped into smaller chunks and spread across multiple disks. RAID 0, 5, and 6 fall under the category of striping. Striping helps with parallel processing and read/write performance. In mirroring, copies of the same data are written to two more disks. RAID 1 and RAID 10 are the most common RAID levels that utilize the mirroring technique. These RAID levels are primarily used for redundancy or protection against failure.
This might sound simple to hear, but a lot of engineering goes behind it. In the background, depending on the RAID type, a RAID controller or a complex program is working to share or stripe data, ensuring the RAID performs its intended function.

History of RAID
RAID was founded in 1987 by a team of three computer scientists at the University of California, Berkeley. Their idea was to combine multiple slow drives into a single drive, thereby increasing the total speed and reliability. RAID was known as Redundant Array of Inexpensive Disks. They named their paper “A Case for Redundant Arrays of Inexpensive Disks. You can read this paper here.

The 5th heading of this paper explains the MTTF formula and states, “Without fault tolerance, large arrays of inexpensive disks are too unreliable to be useful“.
They named the 6th heading “A Better Solution: RAID“. In this, they explained mathematically how the groups of drives are going to break into reliability groups. At that time, the RAID system had only two types: RAID 0 (Striping) and RAID 1 (Mirroring). However, RAID 2, 3, and 4 were experimental levels.
RAID actually gained popularity in the 1990s when hard drives became more affordable and storage vendors like Sun Microsystems and IBM began offering RAID solutions to large companies. In the 2000s, NAS became popular and began to reach home and office environments. The RAID 10 (RAID 0 + RAID 1) became extremely popular among businesses at this time. The RAID 1, on the other hand, gained popularity in home systems, helping people protect both their personal and professional files.
As storage became more affordable over time, the distinction of being “inexpensive” became less relevant. RAID was first called “Redundant Array of Independent Disks” in the 1990s. Additionally, as it began to reach the enterprise environment, RAID no longer focused solely on price but also on performance, scalability, and reliability.
Today, we can implement RAID with our home computers, and motherboards are now equipped with well-developed RAID controllers. However, for most users, RAID remains an irrelevant concept due to the faster SSDs for performance and cloud storage for backups.
Implementation of RAID
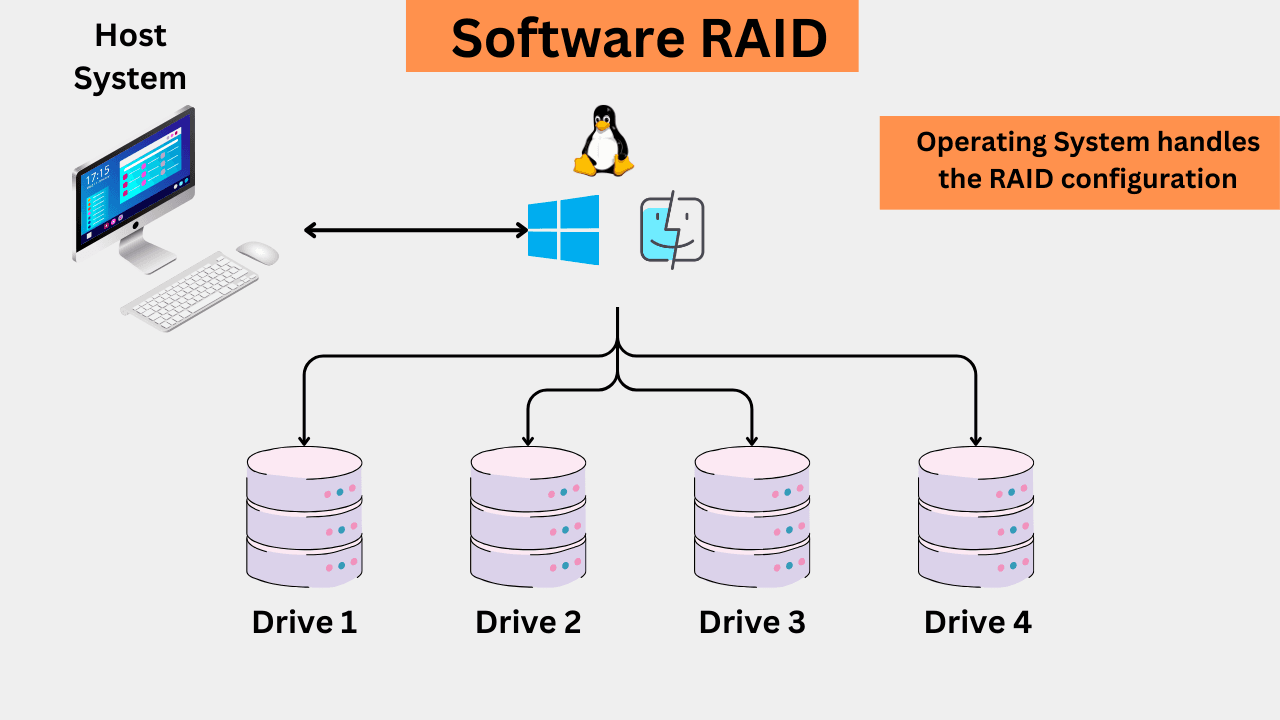
There are two ways you can use RAID on your computer. One is hardware RAID, and the other is software RAID. The first introduction of RAID was, interestingly, the Software RAID. It relied on the operating system to combine drives and implement fault tolerance. The key thing about the software RAID is that it doesn’t have a dedicated RAID controller or RAID card to manage the RAID Array. However, the hardware RAID has dedicated hardware to handle the drive arrays. Let’s discuss more about them.
1. Hardware RAID
Hardware RAID generally offers better performance, scalability, and features, with less or no dependency on the CPU or OS. In some motherboards, a dedicated RAID controller may be present to manage the RAID. On other motherboards, you can install a PCIe RAID card and configure it through the provided connectors. The key quality of the hardware RAID is that it uses its own controller and does not rely on the operating system or the Host CPU for managing the RAID. A hardware RAID will continue to function even if you reinstall the operating system. The RAID configurations are handled primarily by the controller’s BIOS or the firmware during boot-up.
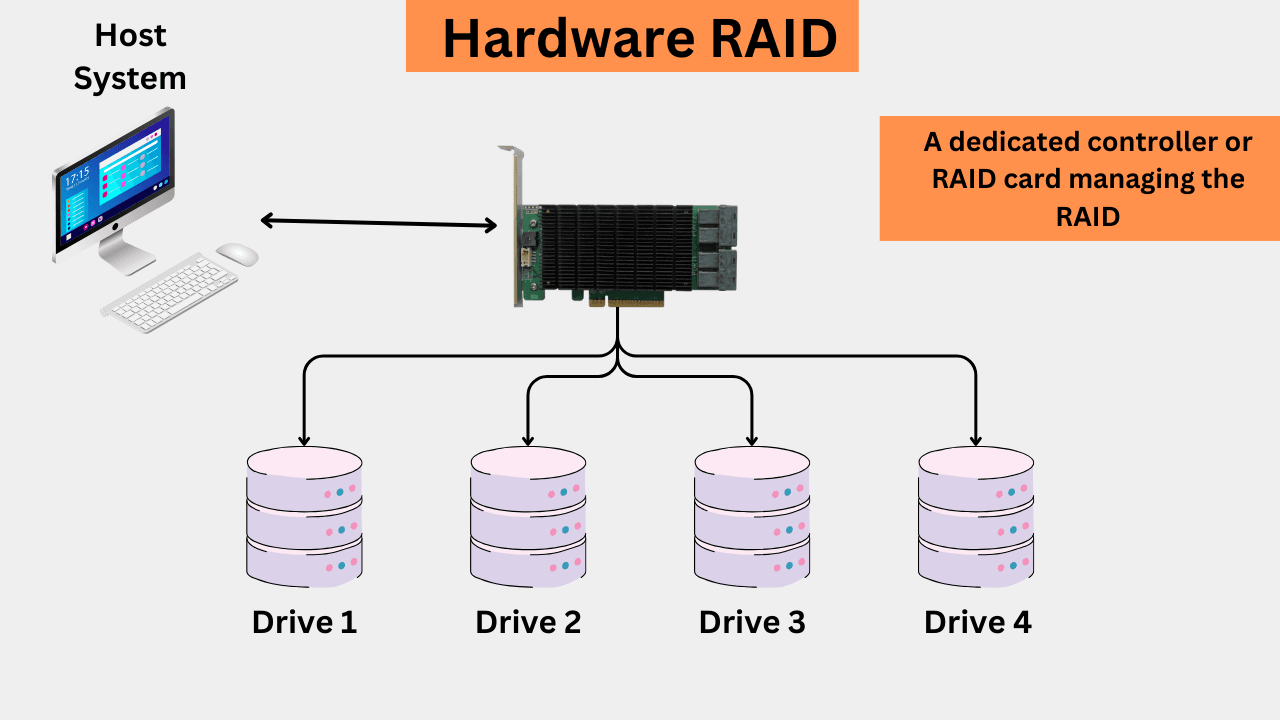
Hardware RAID comes with additional features, such as hot spares (a dedicated backup hard drive kept on standby) and battery-backed cache.
| Pros of Hardware RAID | Cons of Hardware RAID |
|---|---|
| Dedicated RAID controller handles all RAID tasks independently, reducing CPU load. | Can be expensive due to specialized RAID controller hardware. |
| Often includes onboard cache and battery backup to improve performance and data protection. | Proprietary controllers can create vendor lock-in, complicating upgrades or recovery. |
| Provides better performance for RAID arrays, especially with write-intensive workloads. | Requires compatible hardware and drivers, limiting flexibility. |
| Supports a wide range of RAID levels with advanced features (e.g., hot swapping, online RAID level migration). | Hardware failures in the RAID controller can cause complex recovery issues. |
| More reliable and stable since it offloads RAID processing from the CPU. | Can be more complex to configure and manage compared to software RAID. |
A little about the Fake RAIDS
There isn’t just one type of hardware RAID. True hardware RAID uses a dedicated RAID controller with its own onboard cache to manage RAID processing independently of the CPU. However, many consumer and even some server-grade motherboards have RAID functionality integrated directly into the chipset. This type of RAID depends on both the motherboard’s firmware and the system CPU for processing. Commonly found in consumer systems, this setup is known as Fake RAID or Firmware RAID. In fact, most motherboards that advertise dedicated RAID controllers actually use these fake RAID controllers. Because fake RAID relies heavily on the CPU and operating system, it tends to be less reliable and more complex than accurate hardware RAID solutions.
Setting up these RAID arrays through the BIOS/UEFI can be a little complex for some users. Additionally, there is limited support and documentation available. It is hard to move the RAID to other systems in a Fake RAID. Watch this informative video from LevelOneTechs to understand the concept and issues associated with fake RAID systems in consumer devices. The real hardware RAID is that which has its own RAID controller that operates independently of the operating system and the system’s CPU.
2. Software RAID
Software RAID is typically set up, managed, and controlled by the operating system or specialized RAID software. A software RAID can be configured on any system. In the Linux operating system, the mdadm tool is typically used to create, manage, and monitor RAID arrays. In Windows, you have tools such as Windows Storage Spaces and the Disk Management Utility. For example, in Windows, you can create a RAID volume by right-clicking on unallocated space in Disk Management and selecting “New RAID-1 Volume.” In macOS, the software RAID can be configured through the Disk Utility menu. You can select multiple drives there and choose your desired RAID level.
Software RAID supports RAID 0, 1, 5, 6, and 10 (1+0). Along with low performance and CPU overhead, the software RAID has the biggest problem of OS dependency. In the event that the OS fails, accessing the RAID array can be complicated and even impossible without proper recovery tools.
| Pros of Software RAID | Cons of Software RAID |
|---|---|
| No need for dedicated RAID hardware hence cost-effective | Uses CPU resources, which can impact system performance, especially under heavy loads. |
| Highly flexible and portable, working across different hardware platforms. | Performance may be lower compared to hardware RAID, particularly in write-intensive tasks. |
| Easy to configure and manage via the operating system. | May have limited RAID level support depending on the OS or software used. |
| No risk of vendor lock-in — RAID arrays can be moved between systems with compatible software. | Recovery can be complex if the OS or RAID software becomes corrupted or incompatible. |
| Suitable for small-scale or non-critical setups where cost is a priority. | Dependent on OS stability — a system crash can disrupt RAID functionality. |
Types of RAID
There are many types of RAID. Some of them are quite common, such as RAID 1 or 5, but there are also less-utilized variations. Let’s discuss each of them individually.
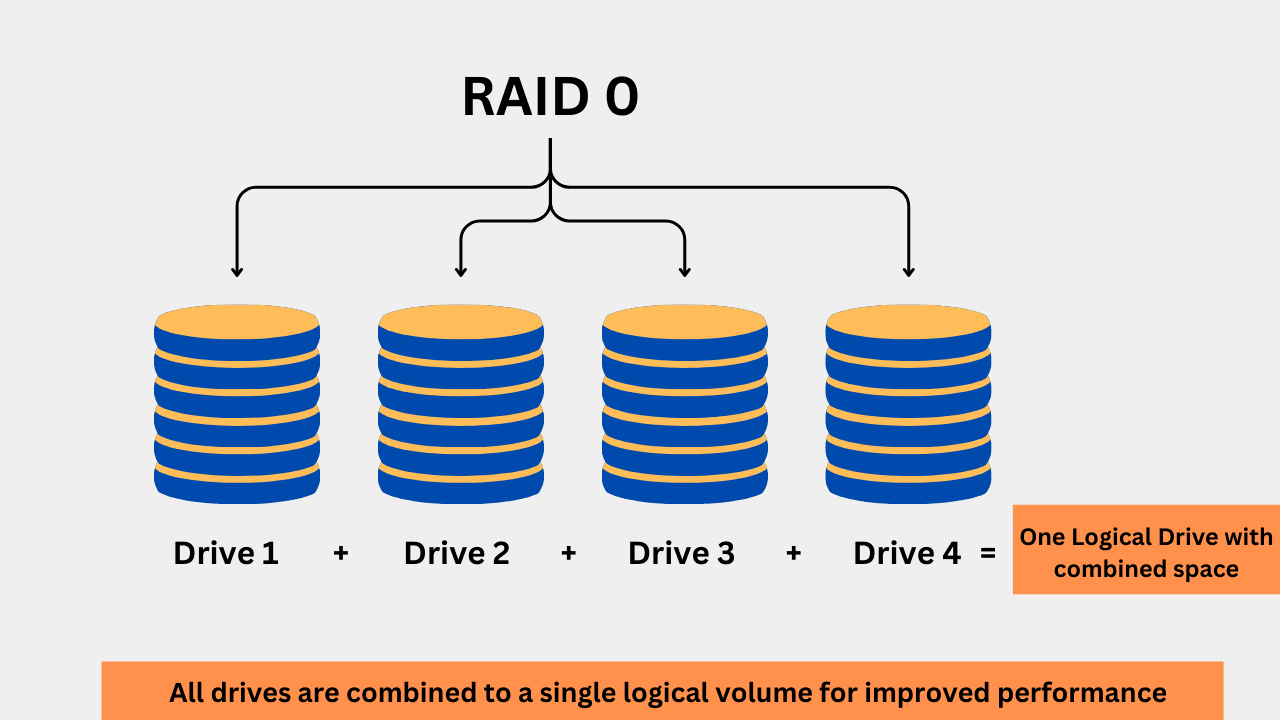
1. RAID 0 (Striping)
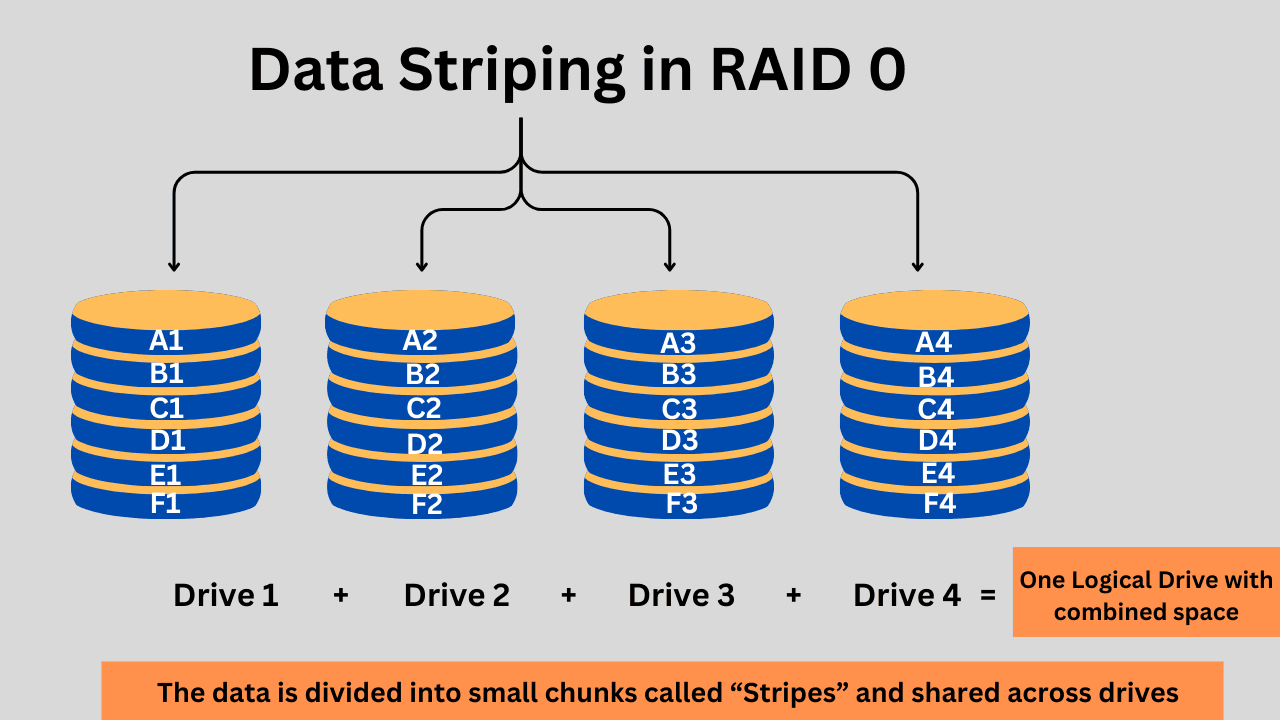
RAID 0 utilizes data striping, which means that data is distributed across multiple drives to enhance performance. This RAID is suitable for applications that require high data read/write speeds, such as video editing, gaming, and file copying. However, because there is no redundancy, a drive failure will always result in data loss. With RAID 0, the RAID controller or software utilizes the benefits of parallel operations.
RAID 0 strips the data into smaller blocks called blocks. These blocks are then written to multiple disks. If you have written data, it could be stored on different drives in the form of strips. The size of these strips may vary from 16KB to 128KB and even more, depending on the performance requirements.
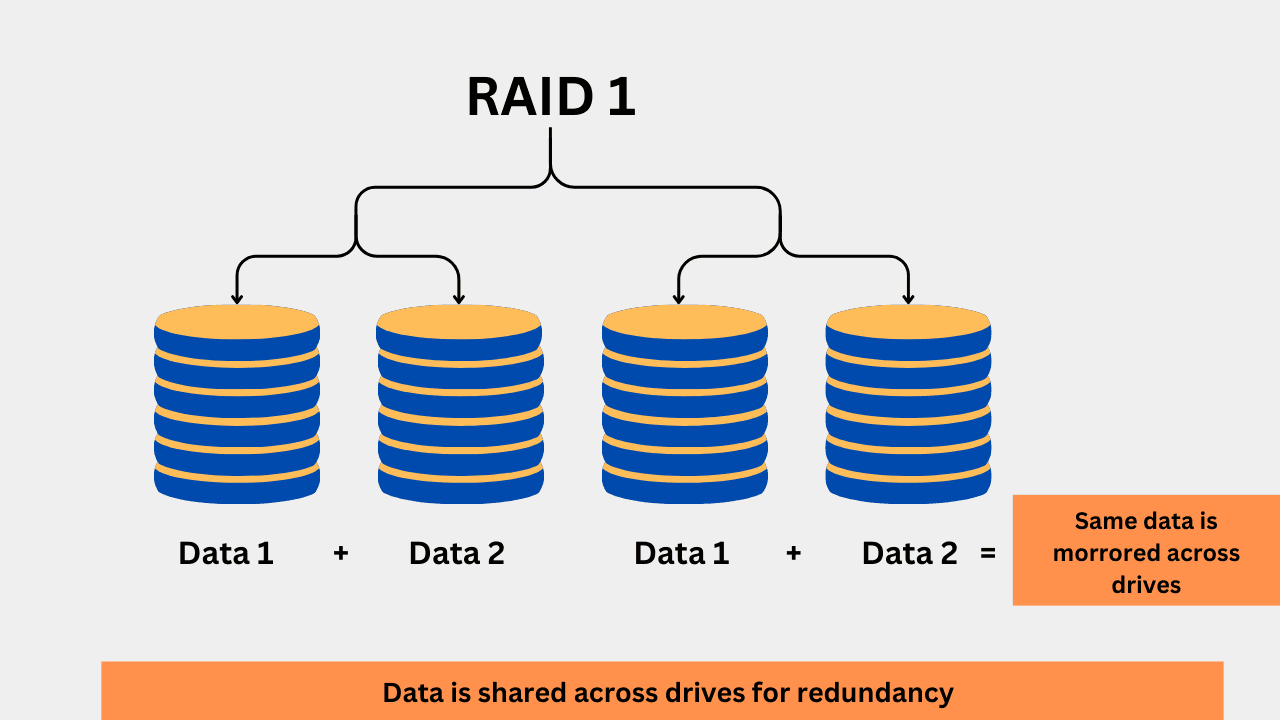
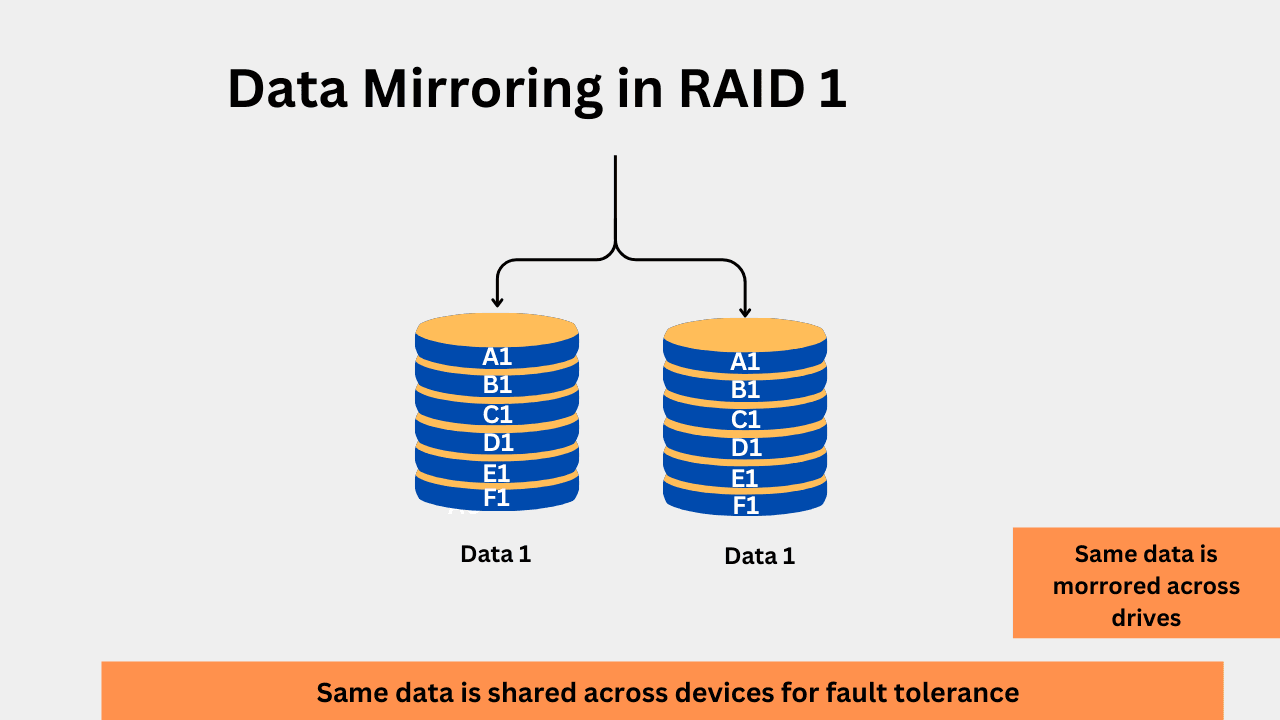
2. RAID 1 (Mirroring)
RAID 1 has redundancy because it mirrors the same data across different drives. By sharing the same data in different drives, the risk of failure is reduced if one drive fails. When the data is written to a drive, it is written to another drive simultaneously. This creates an exact copy, which is like a backup to the main drive. A minimum of 2 drives is required for RAID 1. For example, if you are using four drives of 1TB, two will be used for mirroring, which means you compromise on storage capacity with RAID 1, but gain redundancy in return.
RAID 1 can offer benefits in read performance, but when it comes to writing data, the performance is generally slower due to the simultaneous write operations on two drives. RAID 1 is considered the simplest method to ensure redundancy, requiring no complex technical knowledge. If you are using a RAID controller in a hardware RAID, RAID 1 can utilize error detection to ensure data integrity.
RAID 1 is primarily used in databases, servers, small businesses, home NAS devices, and workstations where data integrity is crucial. Although fault tolerance is limited due to a single point of failure, RAID 1 is suitable for less critical but essential data.
3. RAID 5 (Striping with Parity)
RAID 5 combines data striping with parity for better performance and higher fault tolerance than RAID 1. RAID 5 also utilizes storage space more efficiently. RAID 5 stripes the data across devices, with parity information for redundancy. Parity is a type of error checking that enables data recovery in the event of failure. Parity is created by using the XOR operations on the data blocks. For example, the parity for bits 0 and 1 will be 1. This parity is shared across disks in the RAID 5 to recover data if a single disk fails. RAID 5 requires a minimum of 3 drives. You can calculate the total usable space in RAID 5 using our RAID calculator. The total usable capacity can be calculated using this formula:
Total Usable Capacity = (N-1) x Size of the smallest drive
N is the total number of drives in the array. For example, if you have three 1TB drives, the total usable space would be 2TB, while the 1TB will be utilized for fault tolerance. In RAID 5, the total number of blocks and the parity blocks depend on the total number of drives. A RAID 5 setup with 3 drives would look something like this.
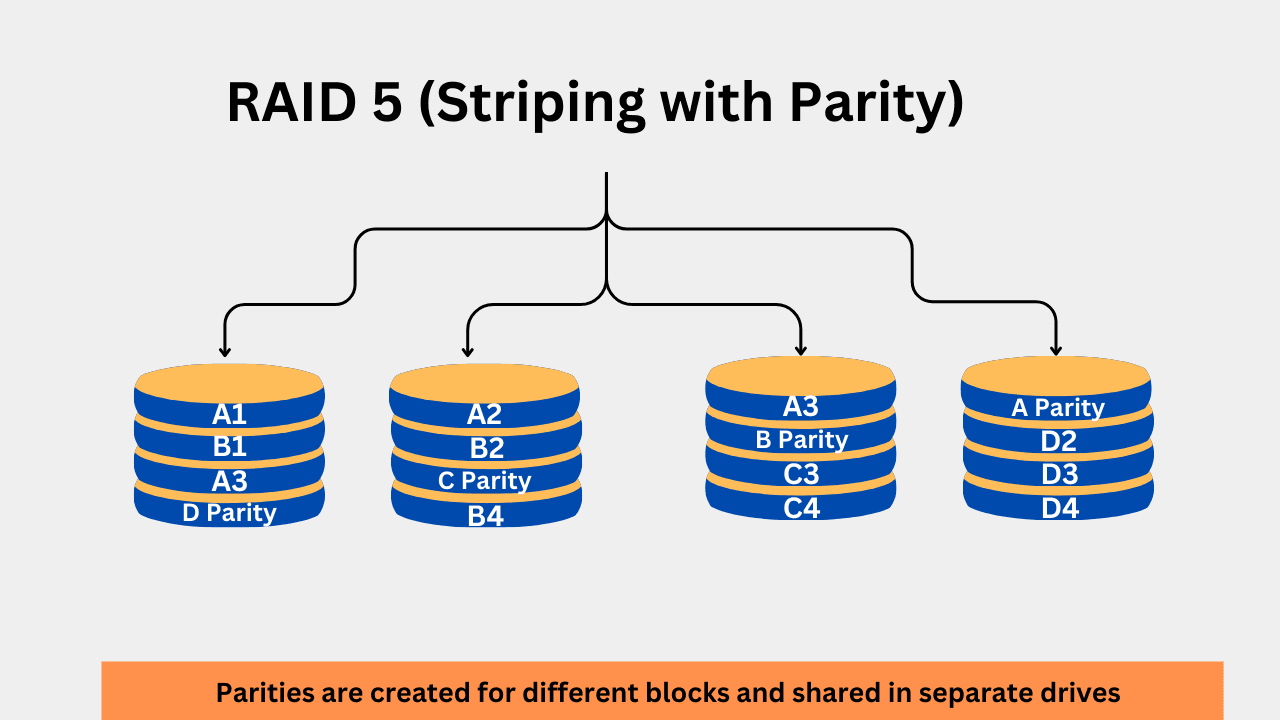
RAID 5 offers good performance along with protection against single-drive faults. Storage density is utilized much more efficiently. For example, if you are using 8 disks for RAID 5, you’ll be able to use the combined storage space of 7 drives while the size equivalent for one drive will be used for parity. The main drawback of RAID 5 is its slow write performance. Additionally, this RAID is complex and requires more rebuilding time in the event of failures.
RAID 5 is widely used in enterprise storage, server environments, and various other applications where high performance, redundancy, and storage efficiency are essential.
Working of RAID 5 and Parity
Let’s consider an example of four drives in a RAID 5 configuration. When the data reaches the RAID 5, it divides the data into three stripes and stores them on the first three disks. The parity of these three stripes is stored on the fourth drive. Now, this parity information can be used to reconstruct the data if one of these four drives fails. In the event of more than one drive failure, the data can’t be reconstructed. Now, let’s see we get three more write requests and we now have 4 blocks filled with data with their 4 parity blocks.
Before understanding the working of parity for redundancy, take note that the data is written and read in the form of stripes. Now, if the controller demands the first stripe of the data, three disks will be read. Now, if any of the one drives fails, its data can be recovered from the parity information, which is stored on a different drive. However, when two drives fail, we can’t reconstruct the data because we have one parity for each disk. In case of a single drive failure, we can easily install a new drive, and the RAID controller would write the same information using the parity information. Also, its own parity would be written to the dedicated drives.
4. RAID 6 (Striping with Dual Parity)
RAID 6 is an advanced level of RAID, offering good performance and fault tolerance of up to two disks. A minimum of 4 Disks are required for RAID 6. The total effective space is reduced as a result. You can calculate the total usable space using this formula:
Usable Capacity = (N−2) × Size of the Smallest Drive
N is the total number of drives in an array.
For the incoming data, it is first striped and shared across drives. If you have four drives in a RAID 6 configuration, the striped data will be written to the first two drives, while the remaining two will store their parity. The first parity will be like the normal RAID 5 parity. However, in RAID 6, there is an additional parity scheme that utilizes different combinations. This means that if two drives fail, the system can recover that data from the other two drives. Both these parities are different and generated using different algorithms.
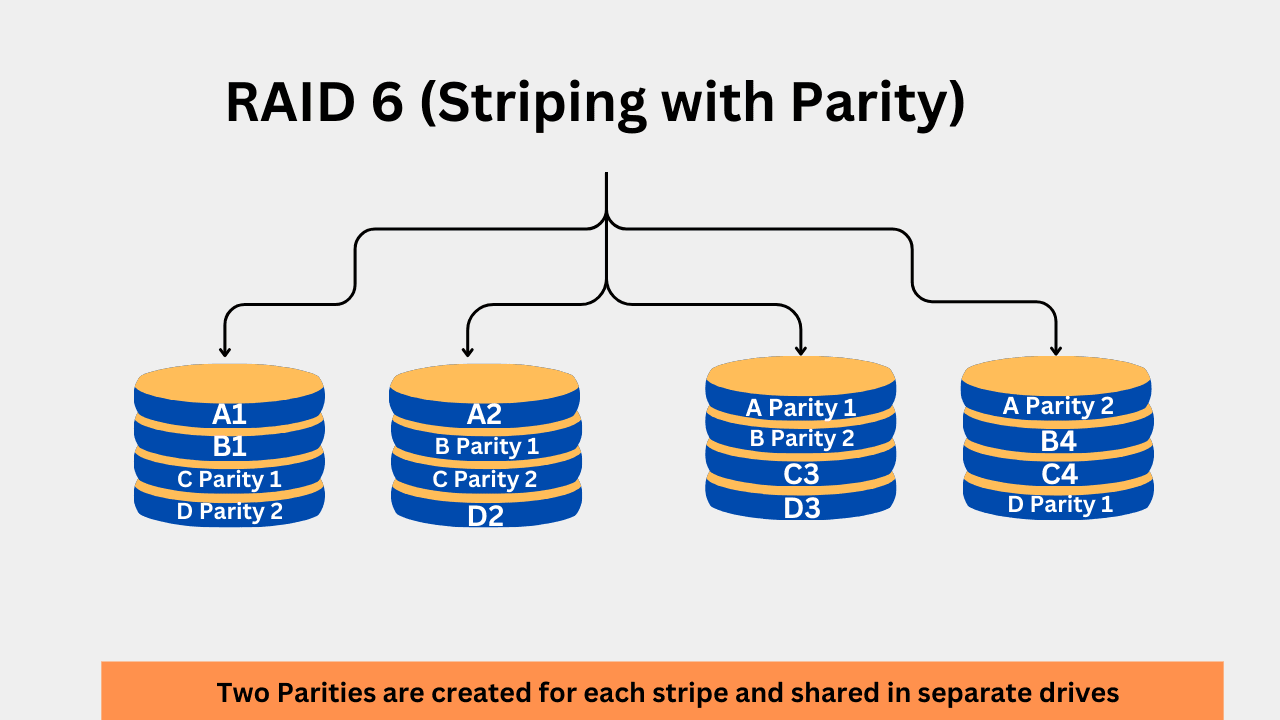
The primary benefits of RAID include higher fault tolerance, enhanced error correction, and improved read speed. The write operations are slower due to the additional steps required for creating two parties. The configuration is much more complex than any other RAID level that we discussed here. Again, because more parities are included for redundancy, it reduces the total storage space required. The rebuild time is longer in the event of failures. Additionally, while the rebuild process is in progress, a new failure can result in data loss.
RAID 6 is suitable for highly critical data storage environments. Servers, large-scale databases, and enterprise file storage systems generally use RAID 6.
5. RAID 10 (1 + 0)
RAID 10 combines the benefits of RAID 1 and RAID 0 by utilizing both mirroring and striping. RAID 10 works by first mirroring the data across pairs of disks and then striping the mirrored data across multiple drive pairs. This increases performance and provides redundancy.
First of all, the incoming data is mirrored to two pairs of disks. Then the striped data is reflected in two drives, which is done normally in the RAID 0. If the RAID 0 strips the data in two blocks (i.e. Block 0 and 2), these two blocks will be mirrored to two different drives. A minimum of 4 drives are required to configure a RAID 10. The usable storage capacity is 50% of the total capacity.
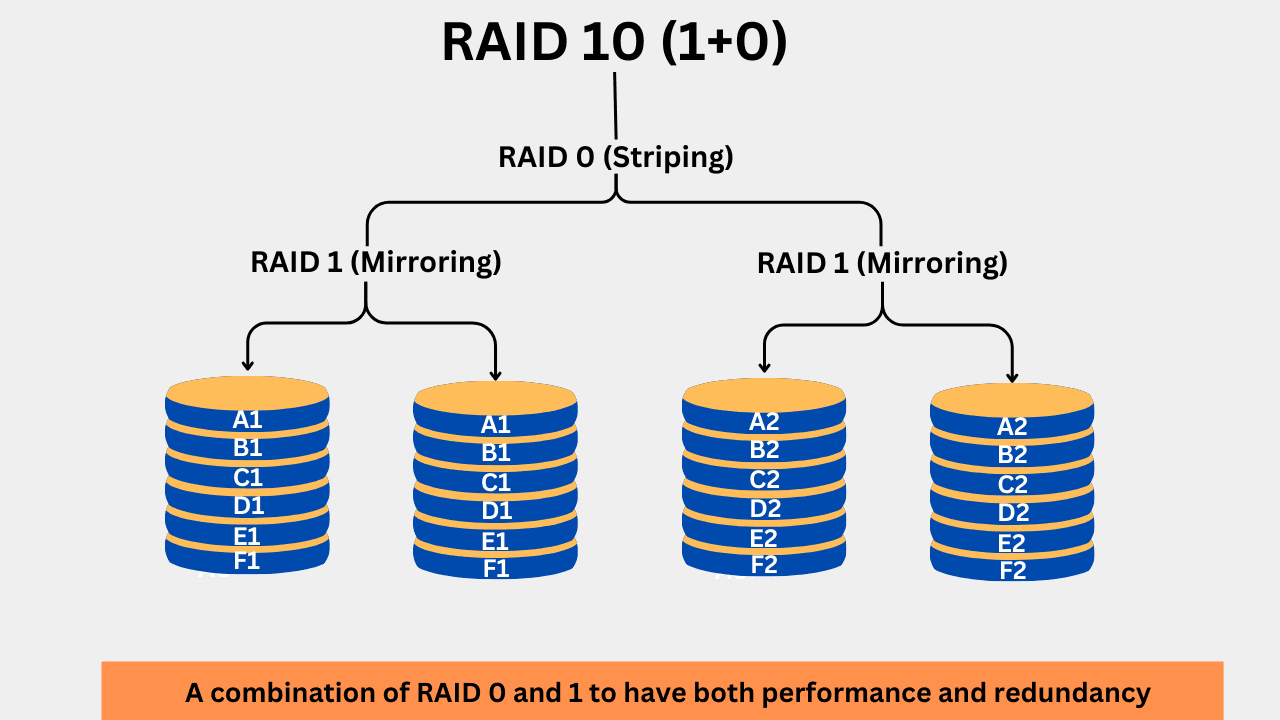
The biggest benefit of RAID 10 is its high performance, especially in write-intensive tasks. The mirroring of data provides fault tolerance for a single drive in a pair. The rebuild time is reduced because the same data is written to the new drive without the need for parity calculations. Higher costs and low storage efficiency are the most significant drawbacks. RAID 10 is widely used where high performance with some redundancy is required, such as in high-speed database servers.
The reverse of RAID 10, i.e., RAID 01, can also be implemented, but it is less fault-tolerant. In RAID 01, the data is first striped across multiple disks and then each striped set is mirrored. The biggest problem with this RAID is if a single disk in the striped set fails, the entire strip is lost.
Some other common RAID levels
There are several other RAID levels, including RAID 2, RAID 3, RAID 4, RAID 50, RAID 60, RAID 7, RAID 1E, RAID DP, and RAID-Z. RAID DP is popular in NetApp storage, while RAID-Z is used in ZFS systems, where data integrity is the primary concern. All other RAID levels are either very old or rarely used.
Conclusion
This is a beginner’s guide to RAID, as there is a lot to discuss about it. A lot of mathematics and engineering go into everything happening in RAID. However, you should have a basic idea of the purpose of RAID. Yes, it is often about redundancy, performance, or both, in some cases. Different RAID levels are there to fulfil those demands, but with their own pros and cons.


![How to Set up External Backup in Windows? [Complete Guide]](https://storedbits.com/wp-content/uploads/2024/10/setup-external-backup-in-windows-768x433.png)