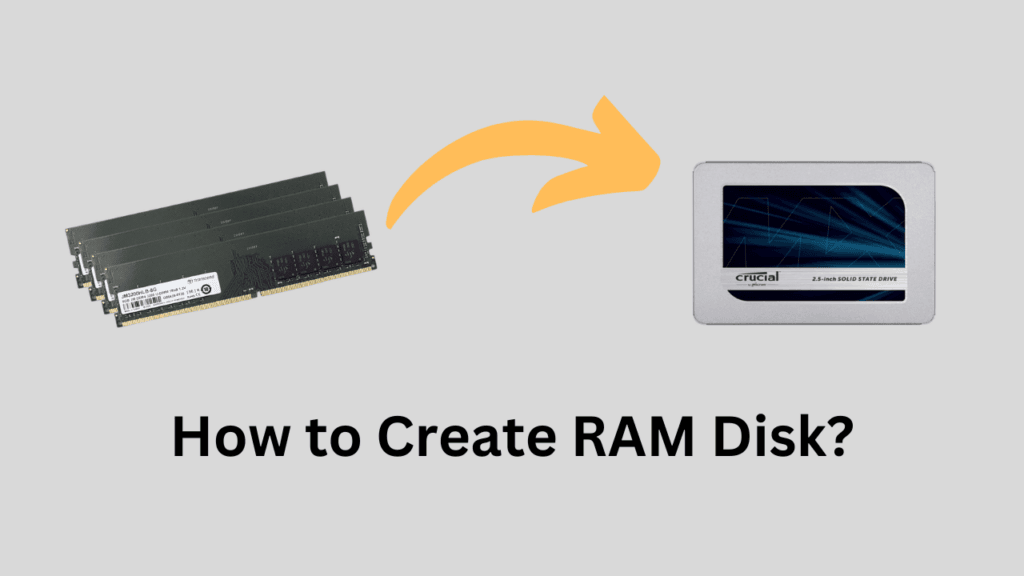
If you notice that your computer generally has some amount of RAM space freely available at all times, even while you are working, you can implement a RAM disk. A RAM disk can be extremely helpful, primarily if you work in a creative field such as video editing, digital art, or 3D modeling. In general, a RAM Disk can be advantageous for any user. For example, if your system has 16 GB of RAM and is always idle, using around 10 GB of RAM during maximum software usage, you can utilize the extra 6 GB to create a virtual disk.
Since RAM is way faster than hard drives and solid-state drives, a RAM disk can give you great benefits in terms of read/write performance. This virtual drive, also known as a RAM disk, can be used for general storage, but it will serve as a high-speed and low-latency storage medium.
Generally, you don’t have direct access or control over your system’s RAM. The operating system and the CPU mainly control RAM. However, with the RAM disk, you can use your RAM for reading, writing, and storing data. However, RAM Disk comes with a significant drawback of volatility. Although you are creating a virtual storage drive from your RAM, it can’t be used for permanent storage. If you have stored some important data on the RAM disk and your system is turned off, you will lose all your data. This is due to the inherent operation of the DRAM.
Let’s discuss the RAM Disk in more detail and explore its implementation.
Key Benefits of RAM Disk
1. High-Speed Performance:
RAM disk operations are much faster than HDDs or SSDs because it is based on capacitor storage, which is much quicker than the regular permanent storage drives. While the fastest NVMe drives can offer sequential read/write speeds in the range of 10,000 to 12,000 MB/s, modern RAM can operate at speeds up to 30,000 MB/s or more. This makes RAM disks ideal for tasks that require fast access to data, such as loading large files, databases, video files, or virtual machines.
2. Reduced I/O Latency:
I/O (Input/Output) latency is the delay between a request for data and its retrieval from the storage medium. RAM has extremely low latency compared to SSDs and HDDs. So, the data will be available nearly instantly. This can significantly improve performance for tasks where frequent and rapid data access is critical, such as modifying files, video editing, and software development.
3. No Disk Wear:
SSDs come with a limited number of Read/Write (Program/Erase) cycles before they can become unusable. Hard drives also wear out with time. But, RAM has no mechanical parts, and excessive read/write operations aren’t destructive for the RAM cells. Therefore, the RAM disk becomes an ideal solution for short-term storage space that requires high-frequency read/write operations.
4. Improved System Performance:
You get major benefits in software and tasks that demand heavy and fast disk usage. This includes gaming, video editing, database management, virtual machines, etc. Also, a RAM disk can be energy efficient in most cases because even heavy read/write tasks, which would take a long time on SSDs and HDDs, will be done within seconds. Especially in random read/write operations, a RAM disk can be very impressive.
Drawbacks Reminder:
Since RAM is volatile memory, all data in a RAM disk will be lost when the system is powered off unless you have set up an auto-save feature with an image file in the primary memory. It is always important to save important data if it is stored on a RAM disk.
Also, setting up a RAM disk is a complex task requiring third-party software because no operating system supports RAM disk natively. So, along with these complex setups, the users are left with less amount of RAM for their applications.
The third drawback is when you set up the autosave feature with the RAM Disk, it increases the booting and shutdown timings. This is because the data saved on the RAM Disk should be first written the permanent storage before the system shuts down. Depending on your primary storage drive i.e. HDD or SSD, this could take a lot longer and until the data is saved, your system will not shut down. The same data will be loaded back to the RAM disk when you turn On your computer. This will increase the booting time as well.
How to Set Up a RAM Disk Using ImDisk?
Creating a RAM Disk in Windows without AutoSave and Auto-Mount
- First, download the ImDisk software from here and install it on your Windows computer. Two other good software are SoftPerfect RAM Disk and AMD Radeon™ RAMDisk. However, I am going to use ImDisk because of its simplicity and effectiveness.
- Once the program is installed, you will see three new programs on your desktop i.e. ImDisk Virtual Drive, ImDisk Configuration, and Mount Image File.
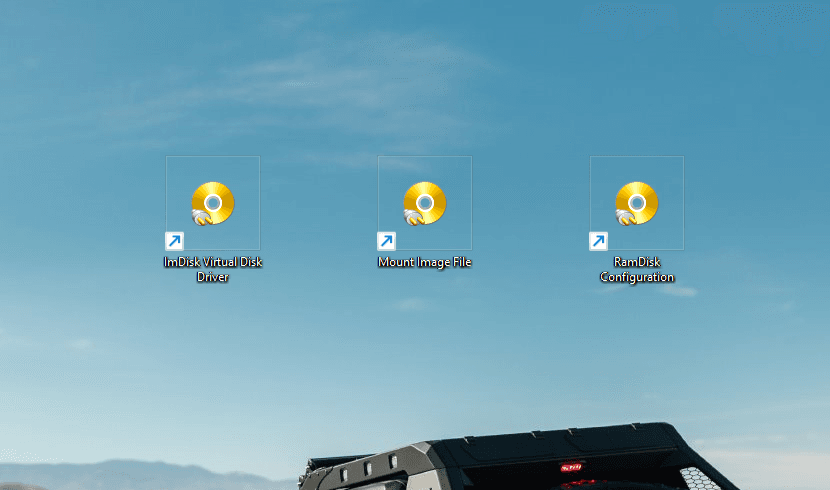
The ImDisk Virtual Disk Driver will be used to manage the virtual disks along with the RAM disks. Also, this tool is going to be used to create the RAM Disks. The RAMDisk Configuration tool allows you to configure general settings, including drive configurations, as well as enable auto-saving, which we will discuss further. The Mount Image File tool will be used to mount the existing disk image files (ISO, VHD, etc) as virtual drives.
- You just fire up the ImDisk Virtual Disk Driver and click the Mount New button in the menu.
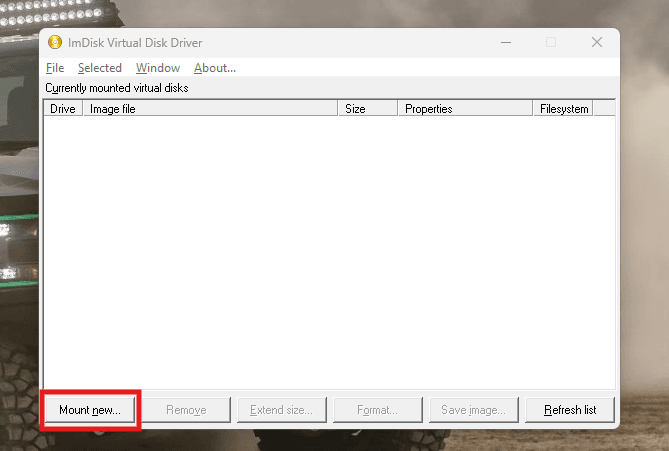
- Choose a drive letter for your RAM disk (e.g., D:, E:, or F:). You just leave the Image File section empty if you don’t want to create a RAM disk of an image file. Select the size of your virtual disk in the second input section. To demonstrate, I am creating a 2GB RAM Disk and assigning it the name D:. You can leave everything as it is and click Ok.
- Now, in the mounted drives list, you can see your new drive. You’ll also get the option to remove, format, and extend your RAM Disk.
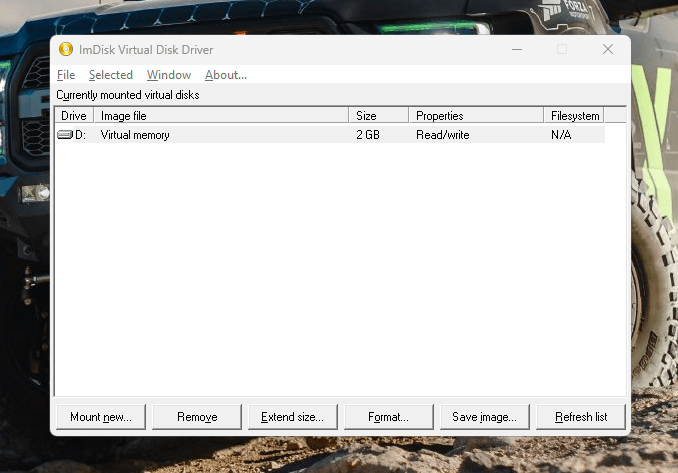
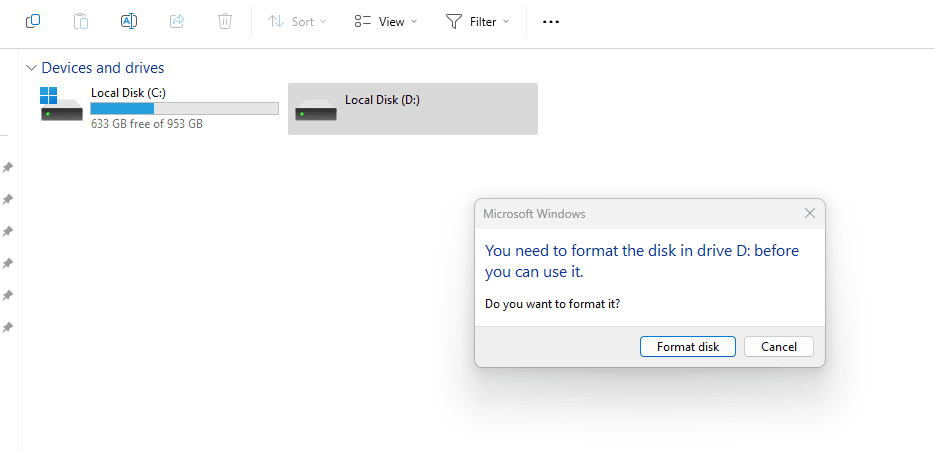
But, if I go to my Windows Explorer and look at the new D: drive, it isn’t ready to use. For that, I’ll have to format it first. You can format it from the Disk Driver menu or Windows Explorer itself. I’ll just double-click the D: drive, and it will ask for a format. Just quickly format it and it will be ready for your job.
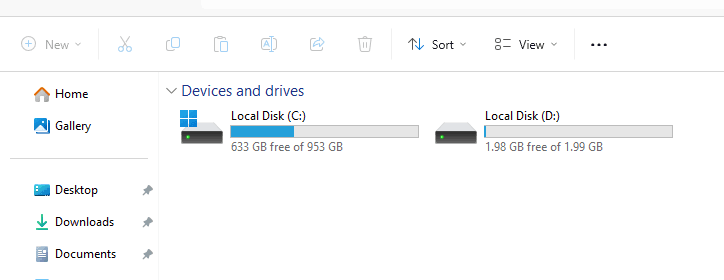
You can also create the RAM disk using the RAM Disk Configuration tool, which is a simpler option. The performance will be the same, but with the drive created with the configuration tool, the RAM disk might not be handled by the ImDisk software directly. Instead, it will act as a proxy while the different backend processes handle the data and everything else. You also get additional features which are given in the next section.
Creatinga RAM Disk in Windows without AutoSave and Auto-Mount
- Now, for this method, we are going to use the RAM Disk Configuration tool from the desktop. Just fire up this tool and enter the basic details about your drive, like its name and size. I am again creating a 2GB RAM Disk with D: drive name.
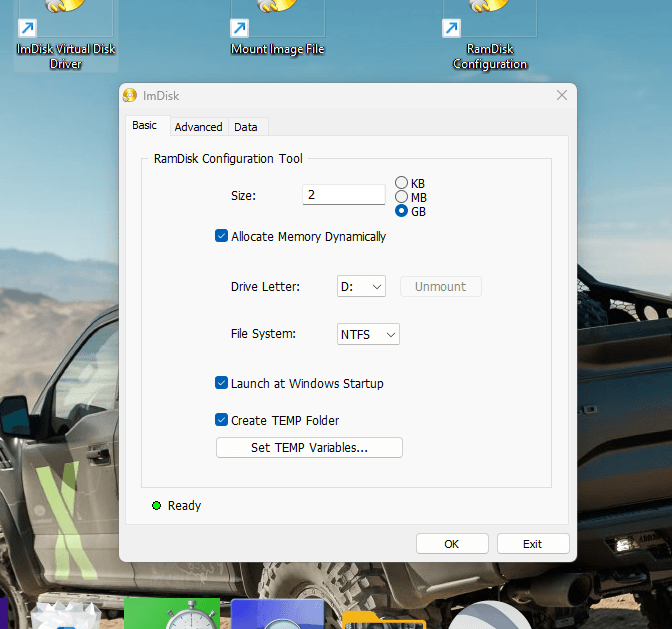
High-Performance vs Low-Performance RAM Disk
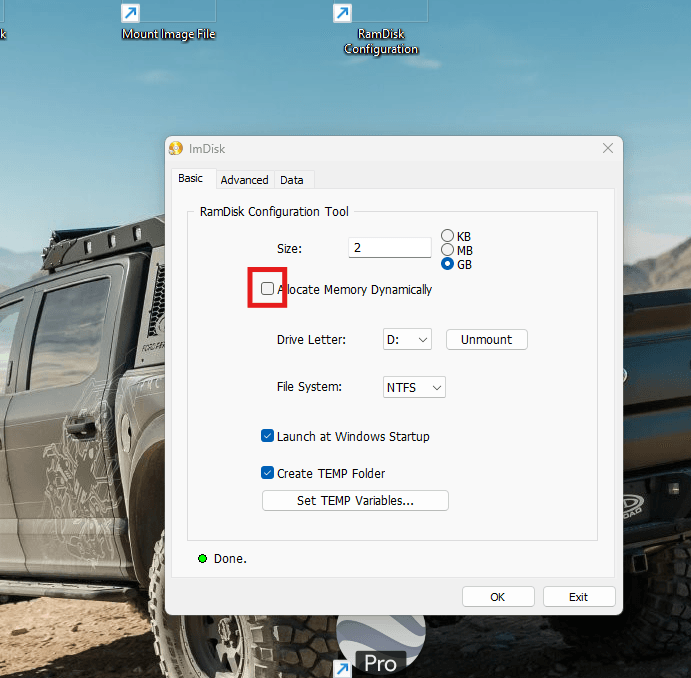
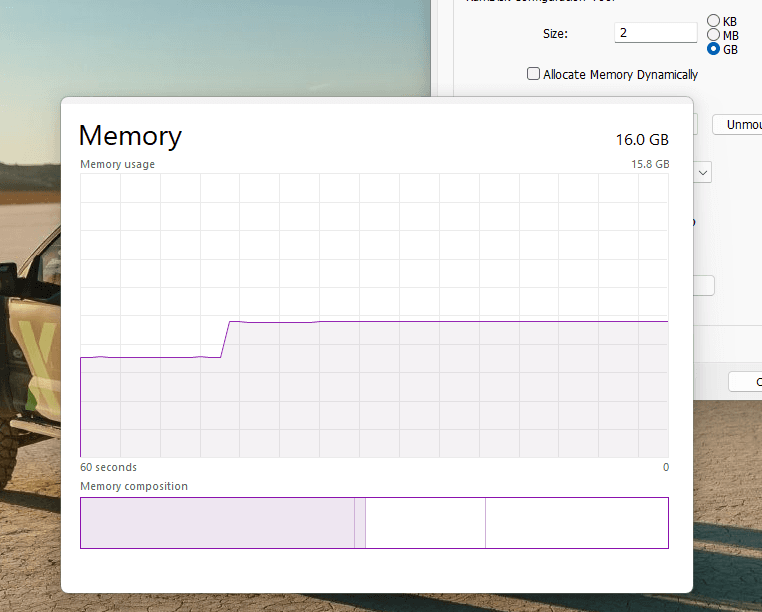
In the configuration menu, you can either allocate memory dynamically or just occupy the whole RAM Disk in memory all the time. I prefer to keep it unchecked to ensure the drive offers full performance and is always ready for its task. If you choose to allocate memory dynamically, it will reduce the performance but save memory space if you have a limited memory capacity. However, just by creating the RAM Disk without dynamic memory allocation, you will see a 2GB RAM usage spike and it will stay there because you have allocated 2GB for the RAM disk which now is unavailable as the system memory.
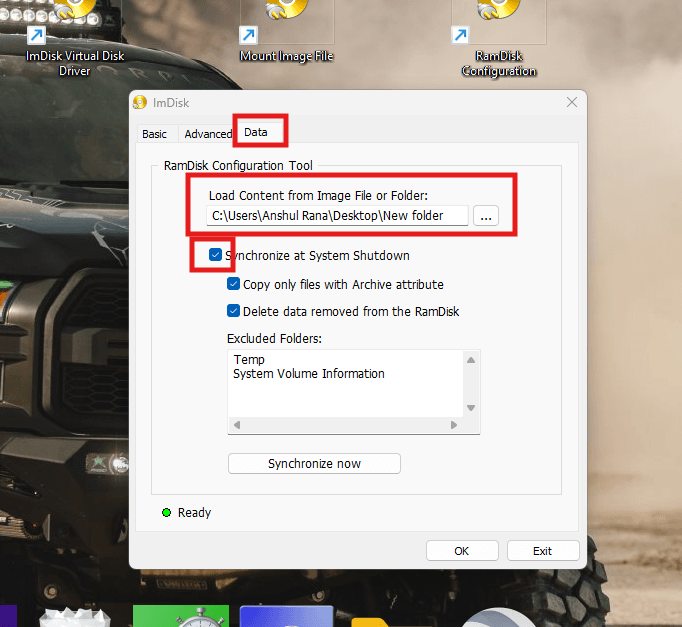
- Now, to the data tab in this menu, and choose an image file location in your main drive where the data will be stored before your system shuts down. Also, make sure to tick the option Synchronize at System Shutdown.
- A new tab will open with a Windows dialog to change the drive properties like its name and other things. I will keep everything as it is.
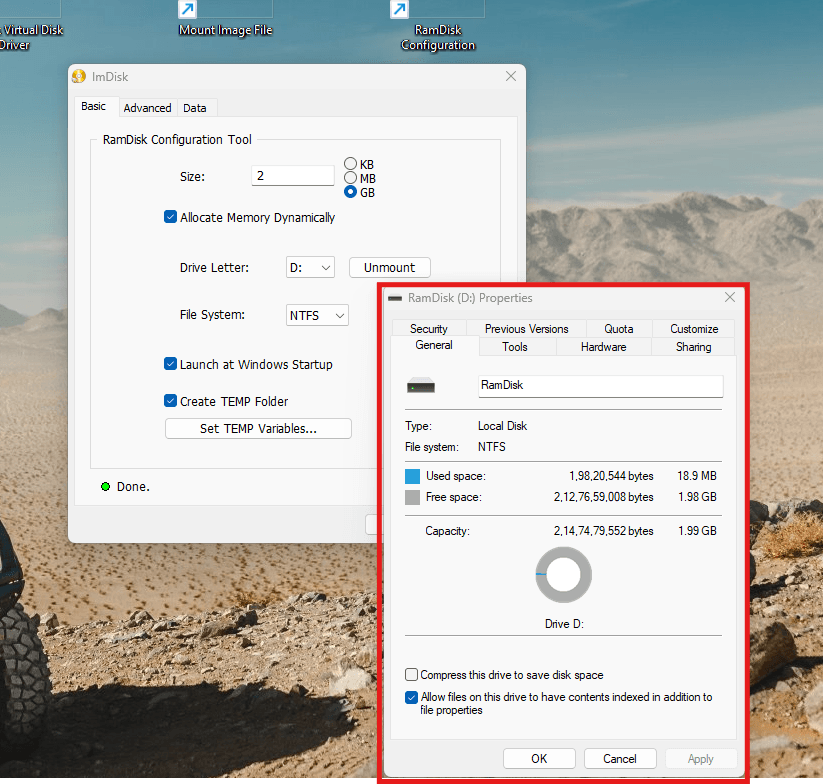
- This time, you don’t have to format your drive and it will be ready to use in the Windows Explorer.
With this drive, your system will synchronize all stored data into the image folder (on your primary drive) before shutting down. Also, it will load all the data when your system boots up. However, I found a huge increase in the boot-up time with this auto-save and synchronization feature. As I tried with a bigger RAM Disk size with more data on it, both booting and startup times kept increasing.
Running the Benchmarks
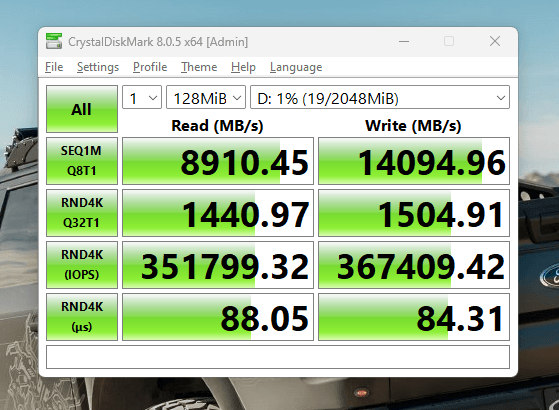
Let’s see how our RAM Disk performs on CDM tests. Here are the results for the default peak performance CDM profile.
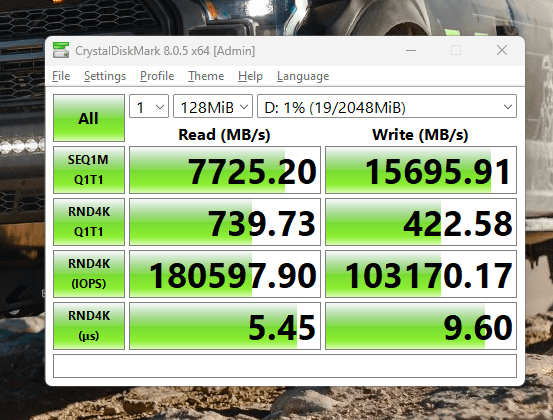
Here are the results for the Real-World performance profile.
In macOS
In macOS, you can easily create a RAM Disk manually without any third-party software. The process is pretty easy to do just with the help of Terminal.
- First, calculate the total required size of the RAM disk in Megabytes. For example, to create a 2 GB RAM Disk, multiply it by 2048 to get the total number of blocks. You can do the calculation like this.
2048 (MB in 2GB) x 2048 = 41,94,304 blocks.
- Open the terminal and run these commands:
diskutil erasevolume HFS+ "RAMDisk" `hdiutil attach -nomount ram://41,94,304`By the end, I have written the total blocks required for a 2GB RAM disk. However, you can change this number as per the requirements.
- You can change the name where I have written “RAMDisk”. Once you enter this command. The RAM disk will mount on the desktop or in Finder just like your other drives. It is now ready for you to use as your temporary high-speed storage drive.
- To Unmount the RAM Disk, use this command:
diskutil eject /Volumes/RAMDiskWho should create a RAM Disk?
RAM disks are generally preferred by power users who use resource-intensive applications, such as video editing, databases, 3D modeling, and VFX. High-performance gaming setups can also utilize a RAM Disk. Developers who test applications can utilize a RAM Disk to accelerate file operations. Data analysts, programmers, overclockers, or anyone working with random data more frequently can make use of the RAM Disk. Even if you are a normal user involved in moving heavy or large files frequently, RAM disks can greatly assist you with this task.
I hope this helps.

![How to Set up External Backup in Windows? [Complete Guide]](https://storedbits.com/wp-content/uploads/2024/10/setup-external-backup-in-windows-768x433.png)
